Device Provisioning User Guide
The
INeS IoT Security Platform provides
these Components and Features:
- INeS
IoT Web portal:
- Provides a GUI, accessible with
authorized login credentials
- Implements different management
capabilities per user role: Admin, Auditor, Tenant Admin, Tenant Auditor,
Tenant Operator, and Organization Operator.
- Allows managing all Device Provisioning entities:
- Administrations: Managing Tenants,
Organizations, Users, API Access Key, Audit Logs, and Report…
- Certificate Management Service:
Managing CAs, Custom Extension, Certificate Templates, Certificates,
Batch Generation, and EST Server for CMS.
- Device Provisioning Service: managing
Device Type, Devices, EST Server for DPS, and External CAs.
- INeS
IoT API
- Allows to interact with the INeS IoT Security Platform
Portal via REST API and DPS
EST Server
This
document is to describe how to use Device Provisioning Service in managing the
devices type, Devices as well as EST server for DPS.
1.1
Getting access to the platform
The portal implements the following user roles:
•
Admin: Main administrator can:
o
Manage all Tenants, Organizations, Users and API Credentials.
o
Manage Certificate Management Services (CMS): all CAs, Certificate
Templates, Custom Extensions, EST Server for CMS, can set the global access,
Tenant access, and organization access for any entity on CMS System
o
Manage Device Provisioning Services (DPS): Device Type, Devices,
External CAs, EST Server for DPS, can set the Global Access, Tenant Access, and
Organization Access for any entity on DPS System
•
Tenant Admin: The administration of the specific Tenant can:
o
Manage all its Organizations, Users and API Credentials.
o
Manage Certificate Management Services (CMS): including CAs,
Certificate Template that are assigned to that Tenants, can view all shared
(global access) entities of CMS system, manage EST Server for CMS, can set Tenant
Access, and Organization Access for any entity on CMS System
o
Manage Device Provisioning Services (DPS): Device Type, Devices,
External CAs, EST Server for DPS, can set the global access, Tenant access, and
organization access for any entity on DPS System
•
Tenant Operator:
can operate on Certificates and Batch Generation for all organizations
in that Tenant in CMS system; can operate on Devices for all organizations in
that Tenant in DPS System.
•
Organization Operator can operate on Certificates and
Batch Generation for its organization in CMS system; can operate on Devices for
its organizations in that Tenant in DPS System.
•
Auditor: Can get read-only access to all entities in system… for auditing
purpose.
•
Tenant Auditor: Can get read-only access
to all entities in that Tenant… for auditing purpose.
All
accesses to the platform are authenticated at least with username and password,
and optionally with a digital certificate as strong authentication method.
Please
ask WISeKey for your initial credentials to connect
to the platform.
The demo environment is available for tests in the URL:
https://ines.certifyiddemo.com/
Login with Username/Password:

2.1
Device Type Management
A
“Device Type” can be understood as a template that defines the characteristics
of devices of the same kind, sharing attributes like naming, cryptography,
Issuing CA, and others.
Access
rules:
·
Admin:
can CRUD all Device Types in system
·
Tenant
Admin: can CRUD the Device Type of that Tenant.
·
Auditor:
can only view Device Types
·
Tenant
Auditor: can only view the Device Types of that Tenant
·
Operator
roles (Tenant Operator, Organization Operator): Only can use Device
Type to create a device.
2.1.1
Creating a Device Type
Steps
detail to create a new Device type:
Step 1: Open Device Types from left menu: Configuration> Device Types. Then click on New button.
Step 2: Fill the all required
fields (*) on each section, user can collapse or expand by clicking on
arrow-down icon.
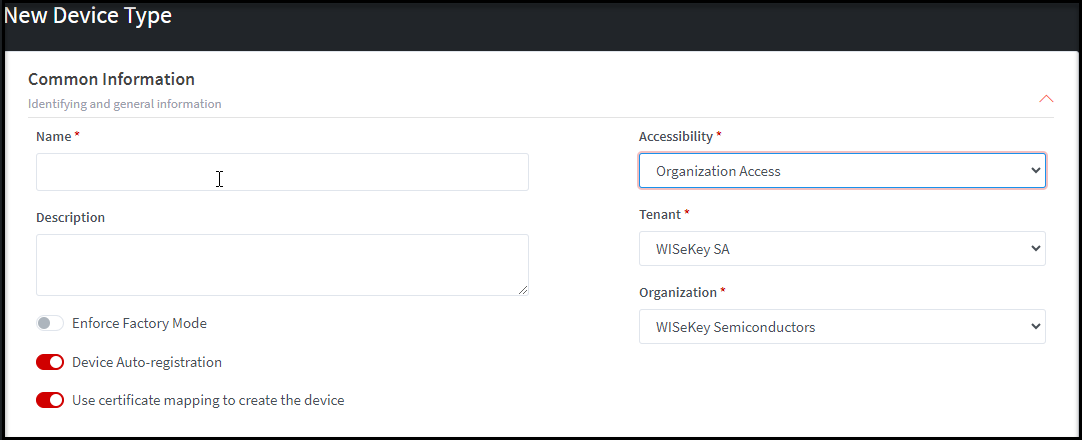
Common Information:
Identifying and general information
·
Name*: Fill the name of Device Type.
·
Accessibility: Tenant access and Organization access are available
for Admin and Tenant admin. You can select only one.
o
Tenant access: If this option
is selected, the device type is available for Tenant and all its organizations.
o
Organization access: If this
option is selected, the device type is available for the selected Organization
in Organization field.
·
Tenant: The Tenant list is available for Admin
to select the one when the Accessibility is Tenant access. (Note:
this option is not displayed for particular Tenant admin when Tenant access is
selected because the Tenant of that Tenant Admin is selected by default)
·
Organization*: select the Organization for which the device type will be
available
·
Description: Optional field.
·
Enforce Factory Mode: This is
unset by default. If this is set, services like EST for DPS will check the
device’s status so that a device must be in factory mode before issuing new
certificates. After issuing an operational certificate, the device must be set
to "OPERATIONAL MODE". But if unset the status is ignored before
generating the certificate.
·
Device
Auto-registration (DAR): If it is enabled, the system allows a new device to connect to INeS using
factory certificate (if valid Factory CA) and be
recognized (save the Finger Print of Factory Certificate to database) and auto-registered
in the platform (new device is created and operational certificate is
associated with this device). The auto-registration could be done via EST or a
reduced REST API (a valid Factory CA and Operation Certificate template need to
be set in this device type)
The main features for DPS must be to support "Zero Touch
Provisioning", so a device can be authenticated in INeS
with a factory certificate and then obtain an operational certificate.
This functionality must be able to support device auto-registration,
so a device that presents a valid credential can be registered in the device
table automatically.
Here is use-case:
o
We create an "EST for DPS" server that is configured to
accept connections using client certificates issued by a particular CA (Factory
CA, it can be internal or external CA). The EST server is set to issue
operational certificates of particular certificate templates.
o
A device is provisioned in the factory with a certificate issued
by the factory CA. This device doesn't exist yet in INeS
o
The device connects to the internet for the first time and starts
a "provisioning operation", which is a request to the EST server,
presenting the factory certificate
o
The EST server recognizes the connection of the device, and
creates the device in INeS (if external CA, using the
"Certificate fingerprint" as the device name - "unique ID" for device and let the other
required values to “UNDEFINED”; if internal CA, using reverse mapping of certificate
attribute which is set in the device type to fill the device's properties and
attributes). Then the EST server provides the new operational certificate, and
associates it to the new device account
o
The device is ready for operation
o
If the device later starts a "re-provisioning
operation", it will use again the factory certificate, and the EST server
will recognize the existing device, so there's no need to create a new device
in INeS, and the new operational certificate will be
associated to the existing device.
NOTE:
If DAR is enabled, the factory certificate and the operational certificate
can't be generated by the same CA
·
Use
certificate mapping to create the device:
o
If it is enabled, DAR is enabled and factory certificate issued by
internal CA, properties of the device will be set based on the mapping between
the Factory Certificate Template and the Device Type. For instance, if there is
a mapping CommonName - DeviceName
in the device type for Factory Certificate Template, then Common Name of the
Factory Certificate will be set for Device Name, etc.
o
If it is enabled, DAR is enabled and factory certificate issued by
external CA, the device name will be set to the certificate fingerprint of
factory certificate.
o
If it is disabled and DAR is enabled, the device name will be set
to the certificate fingerprint of factory certificate.
Illustrative
screenshot: if Admin creates device type
Illustrative
screenshot: if Tenant admin creates device type:

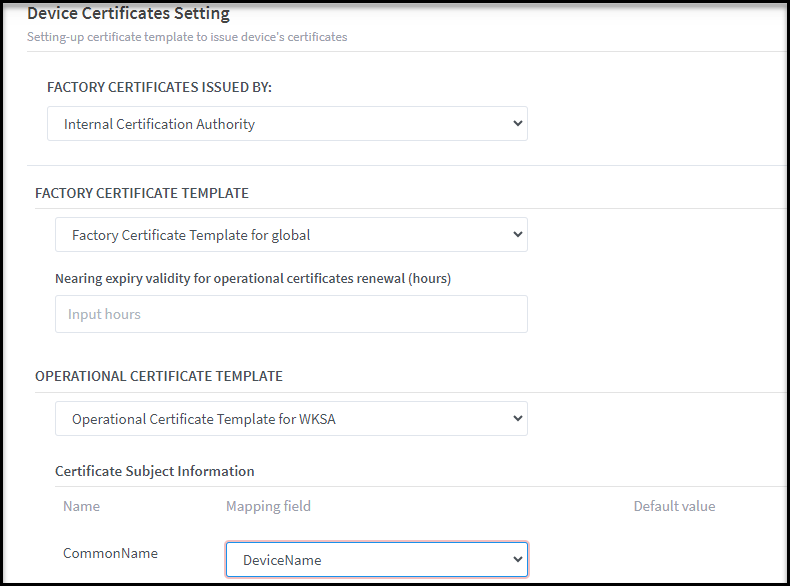
Device Certificates Setting: Setting-up certificate templates to
issue device's certificates.
There
are 2 settings of Certificate Template: Factory and Operational will be used to
issue device certificate:
·
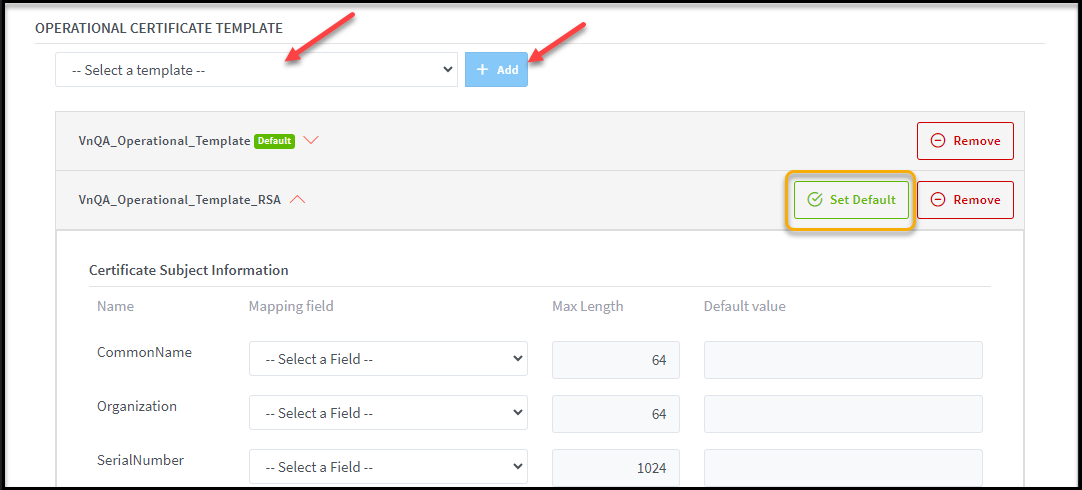
OPERATIONAL CERTIFICATE TEMPLATE: Lists all shared
Operational Certificate templates and the particular templates based on the
selected Tenant/Organization in a drop-down list. User can add multiple Operational
Certificate Templates by selecting one from the available list and clicking on
Add button. The first one will be set by default, you
can set other as default by clicking on Set
Default button. The default template will be used to issue operational
certificate when creating a device via Web portal. You can remove any
operational certificate template as well by clicking on Remove button.
Please
note that: We currently only support issuing
multiple operational certificates for device via API.
Illustrative screenshot:
·
FACTORY CERTIFICATE TEMPLATE:
o
If External Factory CA is selected: the list of External CAs will
be listed in External Certification Authority field for selection. If there
isn’t any external CA existed, you can click on Register New button to add a
new External CA.

o
If Internal Factory CA is selected: List all shared Factory
Certificate templates and the particular templates based on the selected Tenant/Organization
in a drop-down list. User can only select one Factory Certificate Template at a
time.
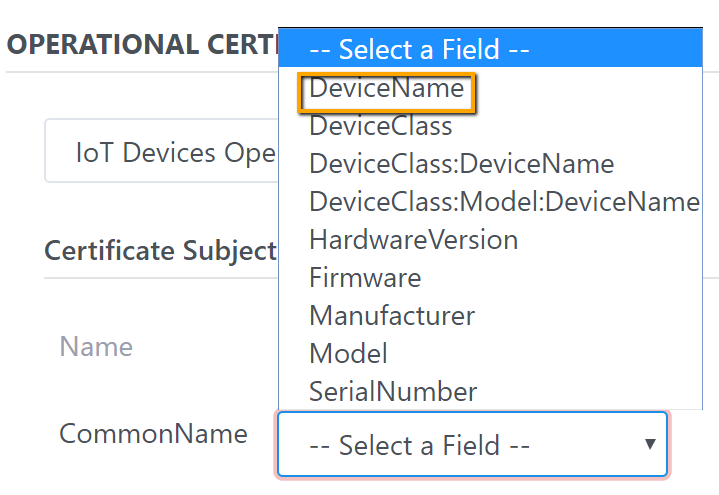
When a template is selected, all its subject will be displayed in
a table with 4 columns: Name, Mapping field, Max Length and Default Value
o
Name:
display subject name retrieve from Subjects section of selected Certificate
template
o
Mapping
field: only available for optional/required subject
o
Max
Length: display the max length of that subject and cannot be changed.
o
Default
value: only display default value of corresponding subject if any
(match with default value of that subject which is configured in Subject
section in Certificate template)
The option “Nearing expiry
validity for operational certificates renewal (hours)”: This option allows
you to call API to renew certificates nearing expiry. The same settings for
factory certificates.
Illustrative
screenshot:
User can select a mapping field for Subject from the drop-down
mapping list
Device
Credential Settings: Setting up device credential
This
allows to enable/disable Device ID/Password setting:
·
If it’s enabled: The password of device will be required to define
(manually or generate randomly) during device creation. The Device Name will be
set to Device ID. You can download the device credential after device is
created. The pair Device ID/Password will be used to authenticate when
connecting to DPS-EST.
·
If it’s disabled: The password of device will not be required
during device creation. There is no device credential generated after created
device.
·
Password retention time (hours): As Password is generated in the
server and stored in files, it should be deleted after a period of time
(hours), if a password retention time is not specified, it will be set default
by 1 hour. Please note:
During period time if it is downloaded by user, it will be deleted immediately.

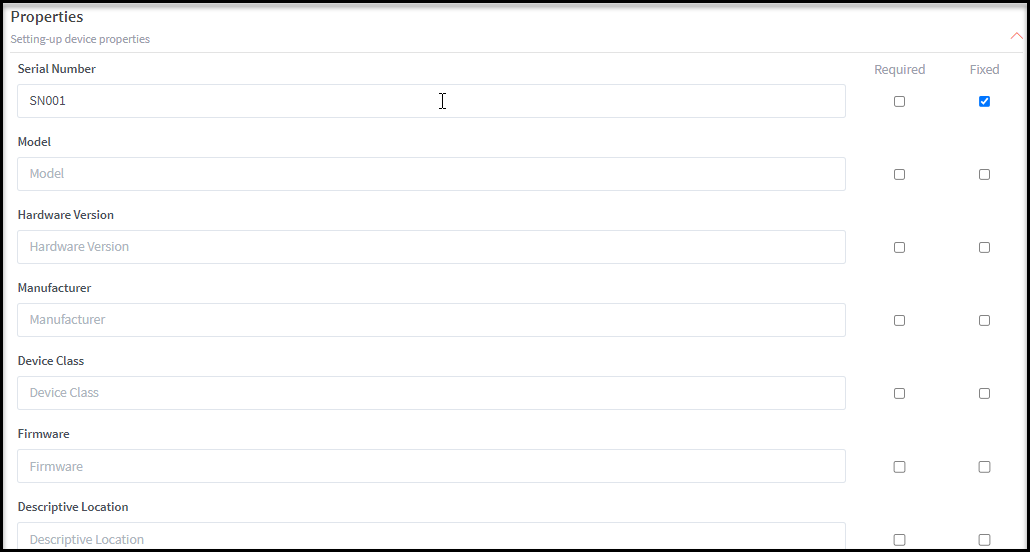
Properties:
Setting-up device properties
By
default, all fields in Properties are optional. User can set for most
properties:
·
Default
value: These default values are used when you create device via console/API
and can be edited.
·
Required
checkbox: to set it is required when create a device using this
template. That means user have to input a valid value for this property when
create a device.
·
Fixed
checkbox: when this checkbox is enabled, the administrator will set a default
value. This value will be displayed/used as a fixed value of fixed property for
all devices created from this template and cannot change this value in a
specific device.
Available properties: Serial Number, Model, Hardware Version,
Manufacturer, Device Class, Firmware, and Descriptive Location.
Illustrative screenshot:
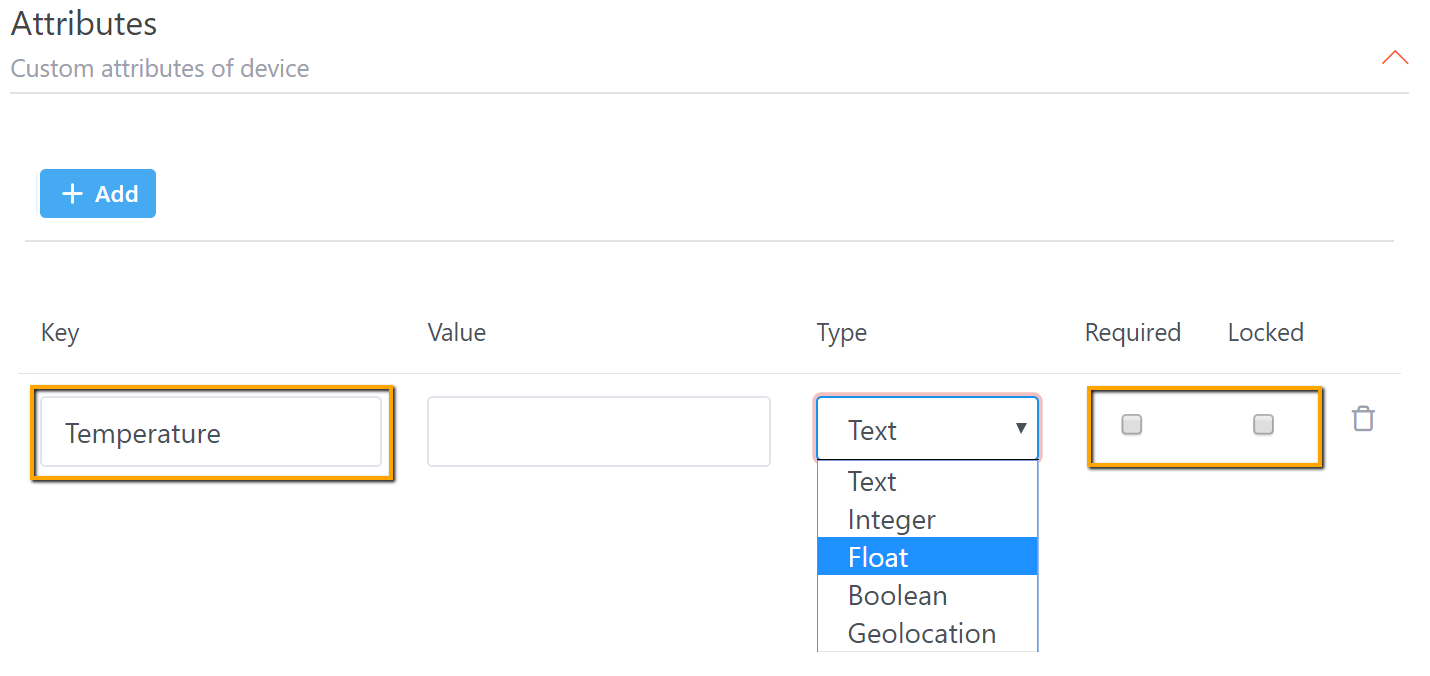
Attributes:
Custom attributes of device
User
can add one or more custom attributes for device in Device type settings. This
is optional.
Illustrative example:
Step 3:
After all required fields are filled, click on SAVE to create a new Device
type.
Step 4:
A new Device type will be listed and shown in the Device Type List page.
2.1.2
Device Type List page
All Device Types will be listed on the List page.
The
“Actions” option allows to: Clone, Edit,
Delete (delete action is available for inactive
device type only) device type on list page. The “View” icon opens the Device
Type Details page:

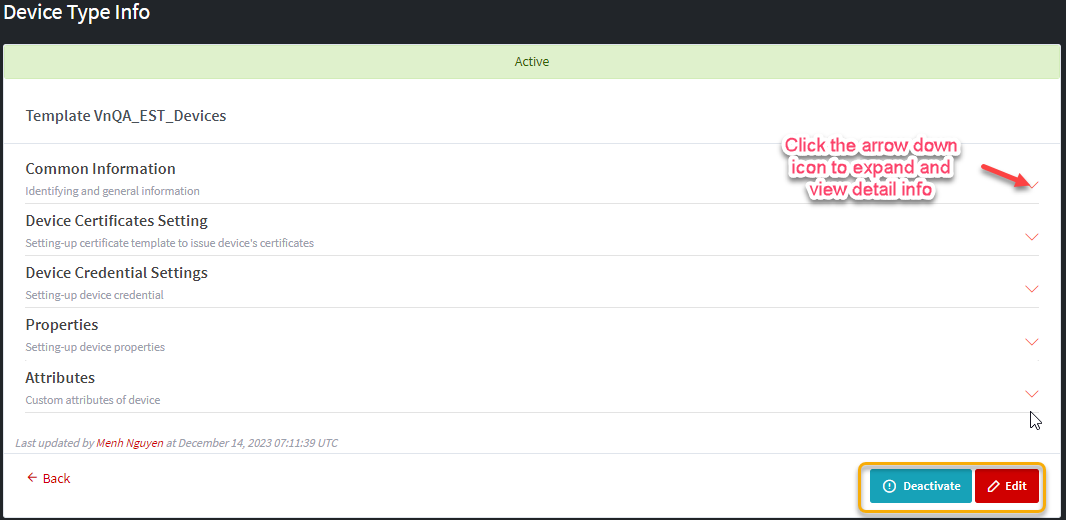
2.1.3
Device Type details page
View page. The possible operations are:
·
Manage Status (Active, Inactive)
·
Delete (only available if device type is deactivated)
·
Edit
2.1.4
Device Type Edit page
Allows editing all available fields EXCEPT
ID
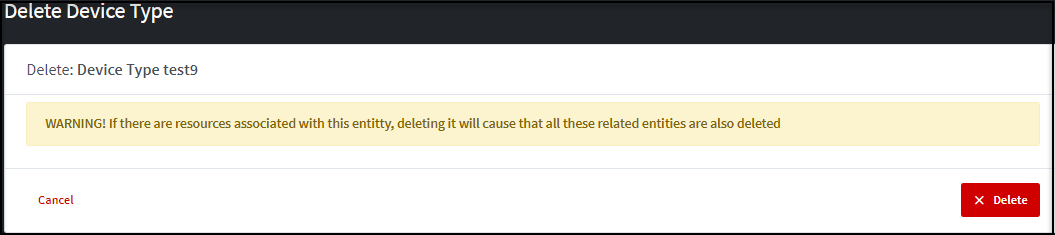
2.1.5
Device Type Delete page
Please
note that Deletion operations can’t be reversed. You only can delete an
inactive Device Type. A confirmation page will be shown.
2.2
Device Management
Access role:
·
Admin: can CRUD all devices of all organizations in all tenants
·
Tenant Admin: can CRUD all devices of all organizations that
associated with tenant which is assigned to that Tenant Admin
·
Tenant Operator: can CRUD all devices of all organizations that
associated with tenant which is assigned to that Tenant Operator
·
Organization Operator: can CRUD all devices of a particular
organization that is assigned to that Organization Operator
·
Auditor: can only view all devices of all organizations in all
tenants
·
Tenant Auditor: can view only all devices of all organizations
that associated with tenant which is assigned to that Tenant Auditor
2.2.1
Create a device
Admin,
Tenant Admin, Tenant Operator, Organization Operator are able to create a
device
A
device can be created on Web Console or via REST API. Here we show how to
create a device on Web Console.
Steps to create a new device:
Pre-requisite: there is an existing device type in global access or in tenant
access (the tenant that organization belongs to) or in organization access
Step 1: Login as an Admin (Tenant
admin, Tenant Operator, Organization Operator) to INeS
IoT portal then open Device Provisioning Service (DPS) from Home
page or from top bar menu. Then, click on Devices from the left-menu to open
the Device main page.
Step 2: Click
on New button on Device main page to create a new Device.
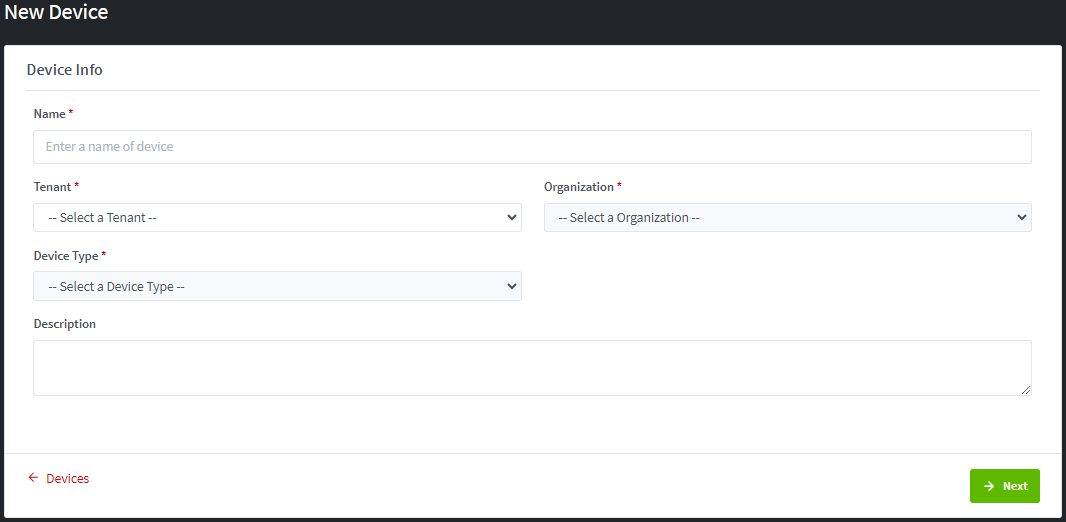
Step 3: Fill the all required fields for Device info step:
·
Name*:
Enter the device name, it is unique.
·
Tenant*:
Select the Tenant from the available drop-down list (only active Tenants are
listed). It is available and required for Admin only.
·
Organization*:
Select the Organization from the available drop-down list (only active
Organizations are listed). It is available and required for Admin, Tenant
Admin, and Tenant Operator role.
·
Device
Type*: Select the Device type from the available drop-down list. Only
active device types and they belong to selected Tenant (Tenant access) or are
assigned to selected Organization (Organization access) will be listed. This
field is required for selection by all roles that have the privilege to create
a device.
·
Description:
This field is optional
Illustrative screenshot for Admin:
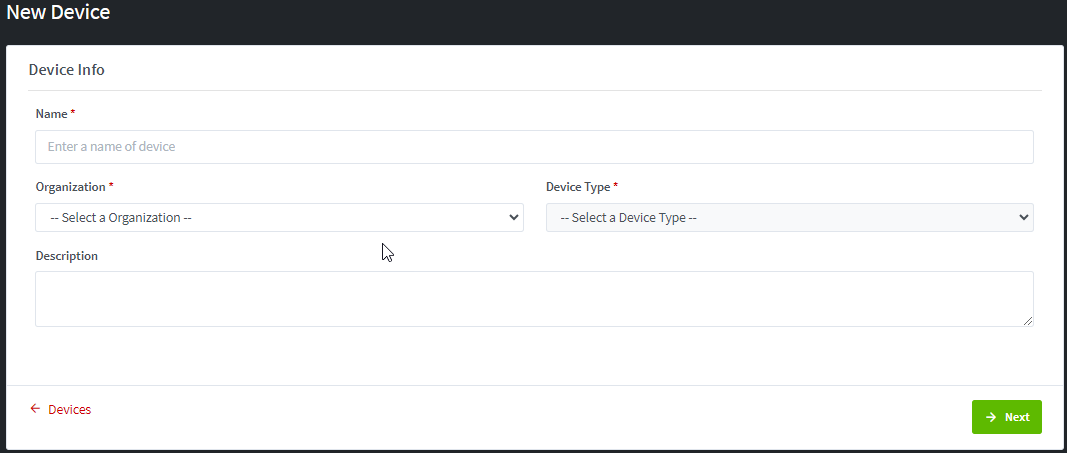
Illustrative screenshot for Tenant Admin, Tenant Operator
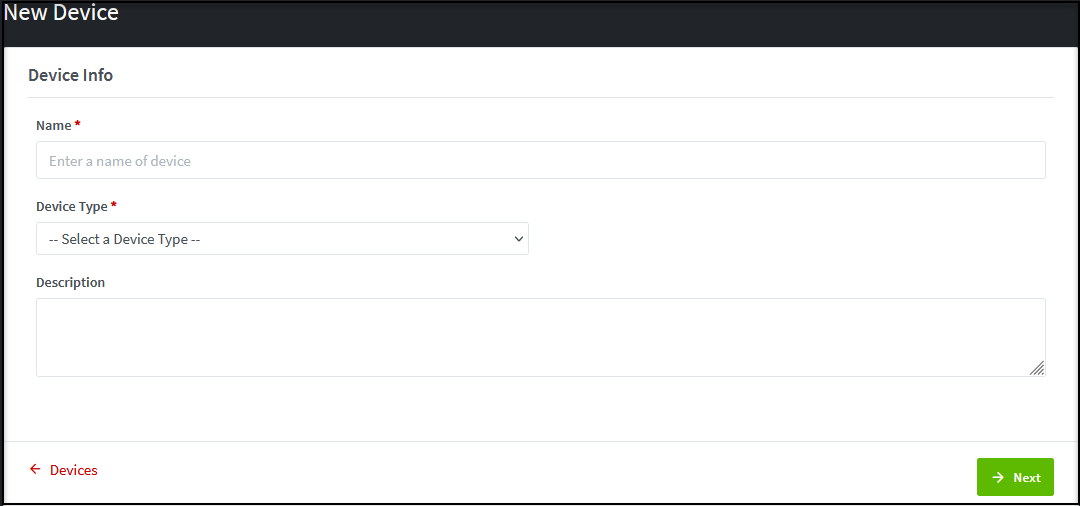
Illustrative screenshot for Organization Operator
After
all required fields in Device Info step are filled and valid (Device name is
unique). Click on Next button to open the next step to fill attributes of
device
Step 4: Fill the entire required fields for Attributes step:
This
step will show all defined properties and attributes for a specific device, it
is set as optional/required in corresponding selected device type in previous
step. The default/fixed value of any attribute that is set in device type will
be appeared. You can do the following actions:
·
You are required to fill the value for required field
.
·
You can change the default value if it is not set as fixed in
device type
·
You cannot change the fixed value of any attribute that is set as
fixed in the device type
Illustrative screenshot:

After all required fields in Attributes step are filled and valid
(Device name is unique). Click on Next button to open the next step to fill the
Device Factory Certificate or click Back button to go to previous step for
modification if needed.
Step 5: At
Device Factory Certificate setting – this step is optional:
·
If Factory Certificate Issued by External Certificate Authority
(External CAs) is set in Device type setting, the step Device Factory
Certificate is not shown during device creation. The device name is set to the
certificate fingerprint.
·
If Factory Certificate Issued by Internal Certificate Authority
(Internal CAs):
o
If there is no Factory Certificate template is configured in the
Device type, then, the step Device Factory Certificate is not shown during
device creation.
o
If there is Factory Certificate template is configured in the
Device type and setting “Use certificate
mapping to create the device” is
enabled, then, the device is
created using the reverse mapping of the factory certificate. That means
properties of the device will be set based on the mapping between the Factory
Certificate Template and the Device Type.
For instance,
if there is a mapping DeviceName - CommonName in the device type for Factory Certificate
Template, then Common Name of the Factory Certificate will be set for Device
Name, and so on....
o
If there is Factory Certificate template is configured in the Device
type and setting “Use certificate
mapping to create the device” is not
enabled, then all Certificate Subject Information and Subject Alternative
Name Information are listed, you can skip this step if you don’t want to
generate and bind Factory certificate to this device. Otherwise, you need to
fill the entire required field to generate a Factory certificate for this
device as following:
§
Certificate
request source*: You have to specify where the certificate request source comes
from. There are the two options:
·
CSR
to be uploaded: If this option is selected,
you have to upload a CSR. Please check the key settings in certificate template
to know which key type (RSA, ECC) and key size are supported to provide the CSR
with the valid key type and key size.
·
Private
Key and CSR to be generated in the server: If this
option is selected, the private key and CSR will be generated by server. The
Private Key will be destroyed based on the setting of Key retention period (days) in the certificate template.

Illustrative
screenshot: If the option CSR to be
uploaded is selected:

Illustrative screenshot if the option Private Key and CSR to be generated in the server is selected: It
will show a note about “You can’t
download the certificate with private key after <date> because of the key
retention policy.” The <date> is calculated from current date plus
the key retention period.

§
Certificate
Subject Information: Show all subject names of selected Factory certificate template in
the Device type settings along with mapping value. The system will check as
following:
a.
If the option Private Key
and CSR to be generated in the server is selected then the system will
check:
·
If subject name has a fixed value (in Certificate Template
settings) then this value cannot be changed.
·
If subject name is optional and no mapping in the device type:
User can input the value or let it empty
·
If subject name is required and no mapping in the device type:
User must provide the value
·
If subject name (optional/required) has a mapping field in the device
type:
o
Use the mapping, so the value in the certificate is taken from the
device attributes
o
If the device attribute is empty, we use the default value that we
can see in the device type setting
o
If the default value is empty, then user can put the value.
b.
If option CSR to be
uploaded is selected and valid CSR is uploaded then the system will check:
·
If subject name has a fixed value (in Certificate Template
settings) then this value cannot be changed.
·
If subject name is optional and no mapping in device type: The
value in CSR can be used. User can change the value if needed or let it is
empty
·
If subject name is required and no mapping in device type: The
value in CSR can be used. User can change the value if needed. This field must
have a value as it is required field.
·
If subject name (optional/required) has a mapping field in device
type:
o
Use the mapping, so the value in the certificate is taken from the
device attributes
o
If the device attribute is empty, we use the default value that we
can see in the device type setting
o
If the default value is empty, then the value in CSR will be
filled automatically.
o
If the CSR comes with some subject fields that are not in the
certificate template (i.e. OU field), we always ignore
it and user can put the value.
Illustrative screenshot: In device type we have this:

·
If the device has a value in “Manufacturer”, then “Organization =
Manufacturer”
·
If the device doesn’t have a value in Manufacturer, then
“Organization = “WISeKey Dev”
Another
example if default value is empty:

If
the device has a value in “DeviceName”, then “commonName = DeviceName”
If
the device doesn’t have a value in DeviceName, then “commonName = <VALUE_IN_CSR>
§
Subject
Alternative Name Information: the checkboxes are the same as
the checkboxes for Certificate Subject Information.
§
Certificate
Validity period (days): you can set date for valid from and validity period
·
Valid
From (format: Month/Day/Year): show current date by default and
you can choose another date.
·
Validity
period (days): show the validity period that is set in Certificate template. If
the checkbox “Unlimited Expiration” is enabled in Certificate template, it will
be shown in certificate request and you cannot set the validity period. To be
able to set the validity period, you have to disable the checkbox “Unlimited
Expiration”
Illustration screenshot: Validity period is set in Certificate template, it will
be shown in Device Factory Certificate
page:

Illustrative screenshot: Unlimited expiration is enabled for
Validity Period

Click
Next (all the required fields must be filled) or click Skip to bypass this step
to go to next step, or click Back button to go to previous step for
modification if needed.
Step 6: At
Device Operational Certificate setting – this step is optional.
·
If there is no Operational Certificate template is configured in
Device type then the step Device Operational Certificate is not shown during
device creation.
·
If there is an Operational Certificate template or more are set in
Device type, then all Certificate Subject Information and Subject Alternative
Name Information of default operational certificate template are listed, you
can skip this step if you don’t want to generate and bind Operational
certificate to this device. Otherwise, you need to fill the entire required
field to generate a Factory certificate for this device as following:
o
Certificate
request source*: You have to specify where the certificate request source comes
from. There are the two options:
§
CSR
to be uploaded: If this option is selected,
you have to upload a CSR. Please check the key settings in certificate template
to know which key type (RSA, ECC) and key size are supported to provide the CSR
with the valid key type and key size.
§
Private
Key and CSR to be generated in the server: If this
option is selected, the private key and CSR will be generated by server. The
Private Key will be destroyed based on the setting of Key retention period (days) in the certificate template.
Illustrative
screenshot: If the option CSR to be
uploaded is selected:
Illustrative screenshot if the option Private Key and CSR to be generated in the server is selected: It
will show a note about “You can’t
download the certificate with private key after <date> because of the key
retention policy.” The <date> is calculated from current date plus
the key retention period.
o
Certificate
Subject Information: Show all subject names of selected Factory certificate template in
the Device type settings along with mapping value. The system will check as
following:
a.
If option Private Key and
CSR to be generated in the server is selected then the system will check:
§
If subject name has a fixed value (in Certificate Template
settings) then this value cannot be changed.
§
If subject name is optional and no mapping in device type: User
can input the value or leave it empty
§
If subject name is required and no mapping in device type: User
must provide the value
§
If subject name (optional/required) has a mapping field in the
device type:
·
Use the mapping, so the value in the certificate is taken from the
device attributes
·
If the device attribute is empty, we use the default value that we
can see in the device type setting
·
If the default value is empty, then user can put the value.
b.
If option CSR to be
uploaded is selected and valid CSR is uploaded then the system will check:
§
If subject name has a fixed value (in Certificate Template
settings) then this value cannot be changed.
§
If subject name is optional and no mapping in device type: The
value in CSR can be used. User can change the value if needed or leave it empty
§
If subject name is required and no mapping in the device type: The
value in CSR can be used. User can change the value if needed. This field must
have a value as it is a required field.
§
If subject name (optional/required) has a mapping field in the device
type:
·
Use the mapping, so the value in the certificate is taken from the
device attributes
·
If the device attribute is empty, we use the default value that we
can see in the device type setting
·
If the default value is empty, then the value in CSR will be
filled automatically.
·
If the CSR comes with some subject fields that are not in the
certificate template (i.e. OU field), we always ignore
it and user can put the value.
Illustrative screenshot: In device type we have this:
·
If the device has a value in “Manufacturer”, then “Organization =
Manufacturer”
·
If the device doesn’t have a value in Manufacturer, then
“Organization = “WISeKey Dev”
Another example if default value is empty:
If the device has a value in “DeviceName”,
then “commonName = DeviceName”
If the device doesn’t have a value in DeviceName,
then “commonName = <VALUE_IN_CSR>
o
Subject
Alternative Name Information: the checkboxes are the same as
the checkboxes for Certificate Subject Information.
o
Certificate
Validity period (days): you can set date for valid from and validity period
§
Valid
From (format: Month/Day/Year): show current date by default and
you can choose another date.
§
Validity
period (days): show the validity period that is set in Certificate template. If
the checkbox “Unlimited Expiration” is enabled in Certificate template, it will
be shown in certificate request and you cannot set the validity period. To be
able to set the validity period, you have to disable the checkbox “Unlimited
Expiration”
Illustration
screenshot: Validity period is set in Certificate template,
it will be shown in Device Operational Certificate page:
Illustrative screenshot: Unlimited expiration is enabled for the Validity
Period
Click
Next (all the required fields must be filled) or click Skip to bypass this step
to go to next step, or click Back button to go to previous step for
modification if needed.
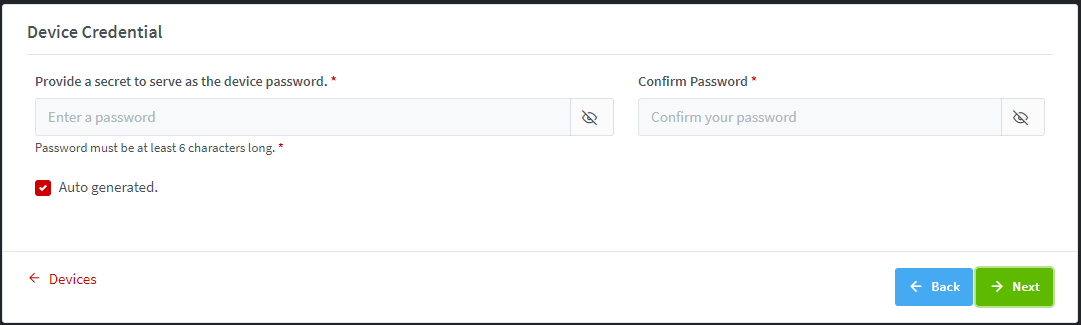
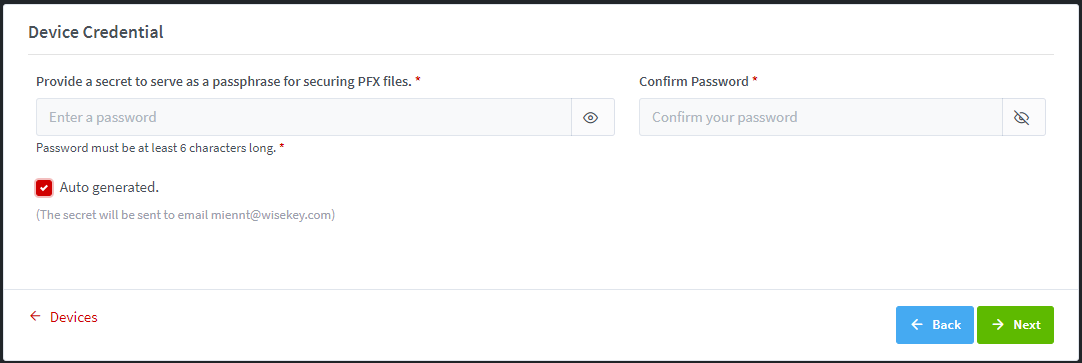
Step 7: Device Credentials
This
step will be shown during device creation if one of the following conditions is
satisfied:
·
Device ID/Password option is enabled in Device Type
·
Device Factory Certificate: option Private Key and CSR to be generated in the server is selected during device creation.
·
Device Operational Certificate: option Private Key and CSR to be generated in the server is selected during device creation.
At
this step, you can enter manually a password (for both device & pfx passphrase of certificate) or choose the option “Auto
generated.” to generate randomly a password.
Illustrative screenshot:
Device
ID/Password option is enabled only (There is no selection the option
“Private key and CSR to be generated in the server”)
DeviceID/Password option is disabled but the option
“Private key and CSR to be generated in the server” is selected during device
creation
DeviceID/Password option is enabled and “Private key and
CSR to be generated in the server” is selected during device creation.
Click
Next to go to next step, or click Back button to go to previous step for
modification if needed.
Step 8: New Device Overview
It
will show the details of Device Info, Properties, Attributes, Factory
Certificate (Validity Period, Public Key, Subject DN, Subject Alternative Name…),
and Operational Certificate (Validity Period, Public Key, Subject DN, Subject
Alternative Name…).
Illustrative screenshot:

Click Back button to go to previous step for modification if
needed. Click Save button to complete the device creation and a new device
will be created successfully.
IMPORTANT:
A device after created successfully will be in one of the following modes:
·
NEW:
The device is created but it doesn't have any credential
·
FACTORY
MODE: The device is created and it has a factory certificate AND/OR device
ID/password
·
OPERATIONAL
MODE: The device has one or more operational certificates
·
DISABLED:
The device is disabled and can't do operations in the portal
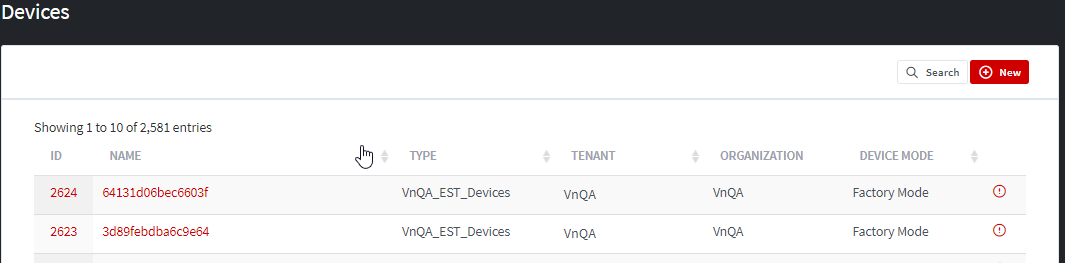
2.2.2
Device list page
All new devices will be listed in the Device main page
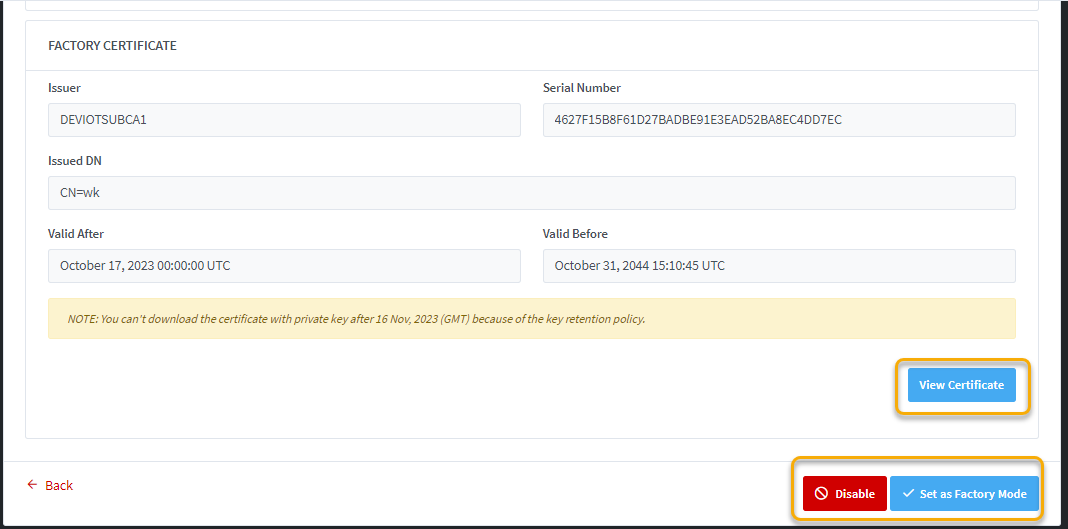
2.2.3
Device detail page
This
page shows all details of the device. It allows actions such as Set as Factory
Mode (if device is in Operational Mode), Disable any devices, view certificates
which are bound to that device, download Device Credential of device that has Device
ID/Password.
Illustrative screenshot:
Device general information:

Device properties

Device certificates: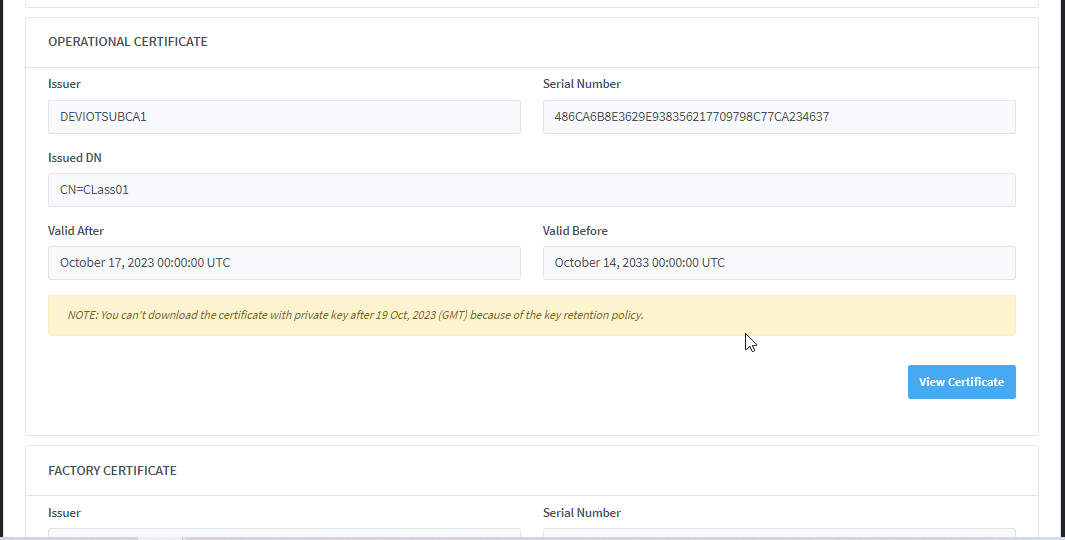
Download
Device Credential: The downloaded file will contain the Device ID and Password.
Please note: The credential file will be deleted automatically after over the
password retention time which is set in corresponding device type if you still
don’t download it yet. However, whenever you downloaded, the file will be
deleted immediately.

2.2.4
Set a device as Factory Mode
If
device is in Operational Mode, it can be set to Factory Mode by clicking the
button [Set as Factory Mode] in the device detail page.
2.2.5
Disable a device
You
can disable any device by clicking on Disable button in the device detail page.
Please
use this option if you want to disallow that device to connect to any DPS API
and EST Server
2.2.6
Enable a device
You
can enable an inactive (disabled) device to make it works again in DPS and
allow it to connect to DPS API as well as EST Server.
2.3
EST Server
This
functionality is to create an EST Server for DPS. Configure EST Server is
available for Admin and Tenant Admin. Auditor can view only.
EST
is a standard protocol to obtain and manage certificates, and widely supported
by the IoT industry.
The
EST Server functionality available in the CMS Module is intended to be used by
applications (i.e. factory applications or gateways)
that need to obtain certificates to be embedded later in IoT Devices.
INeS also provides a separate EST functionality integrated in the DPS
Module, which is intended to be used by the IoT devices, which will
authenticate themselves with a “Factory Certificate” (or a unique password) to
obtain an “Operational Certificate”.
Therefore,
a possible use case for EST in INeS could be:
·
EST in CMS is used by a provisioning application to obtain
“Factory Certificates” and embed those in the IoT Devices
·
EST in DPS is used by the IoT Device, to obtain an “Operational
Certificate”
2.3.1
About EST Servers
Supporting
EST protocol in INES works as follows:
·
It is a domain-based routing, thus one customer as an organization
in INES, may have several EST Servers.
·
The EST server can authenticate clients in two modes:
o
Device ID/Password Auth: The client
uses the Device credential for authentication to request new operational
certificates or re-enroll (renew) operational certificates of one or more
devices. The Device credential can be a pair of Device id and Password working
as the user name and password.
o
Factory Certificate Auth: The client
uses the Factory certificate for authentication to request the new operational
certificate or re-enroll the operational certificate of a specific device.
Note: In order to support both authentication modes, it is required to
use an operational template linked with a device template, otherwise it will
support Device ID/Password only.
2.3.2
Creating a new EST Server
Pre-requisite:
•
Only Admin and Tenant Admin role can
create EST Server.
•
Tenant/Organization exists
•
Device Type is defined and available
for the organization
How to create an EST Server for DPS
Step
1: Navigate to Configuration > EST Servers on left-menu to view
the EST Servers list
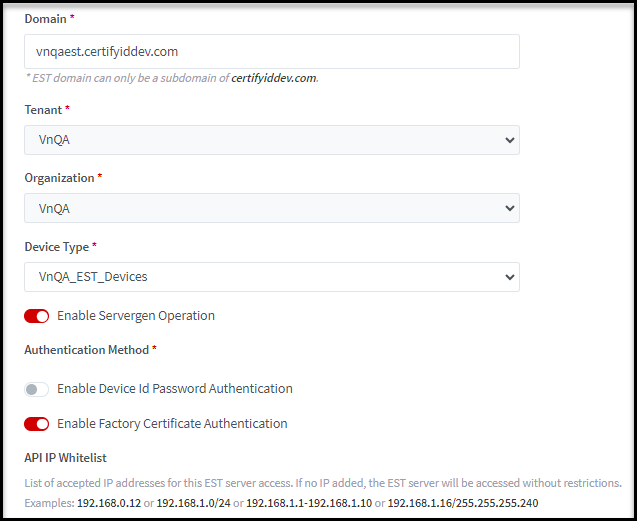
Step 2: Click on “New” button, and fill the all required fields, marked with the “*” sign:
·
Domain*: EST domain can only be a subdomain of certifyiddev.com (on DEV
environment), a subdomain of certifyiddemo.com (on DEMO environment), a
subdomain of certifyid.com (on PRODUCTION environment). A new EST domain will
be generated automatically in the server so that you can use it.
·
Tenant*:
·
Organization*: Select one from the available list
·
Device Type*: Will list all the Device Types that are associated with selected
Tenant and selected organization. You can select one.
·
Enable Servergen Operation: It
allows key to be generated in the Server
·
Authentication Method*: You can
enable one or both
o
Enable Device ID Password Authentication: It
allows to call Simple Enroll endpoint with Device ID Password Authentication to
issue an operational certificate.
o
Enable Factory Certificate Authentication: It
allows to call Simple Enroll endpoint with Factory Certificate Authentication
to issue an operational certificate.
·
IP
White List: List of accepted IP addresses for this EST server access. If no IP
added, the EST server will be accessed without restrictions.
Examples:
192.168.0.12 or 192.168.1.0/24 or 192.168.1.1-192.168.1.10 or
192.168.1.16/255.255.255.240
IMPORTANT:
The duplicated Domain of EST Server can be used for all organizations in a
certain tenant. It cannot be used for other Tenants.
Illustrative screenshot:
Step 3: Click on SAVE button to complete.
NOTE:
·
The same EST Server can be created/cloned for all organizations in
that Tenant. It cannot be used for other Tenants.
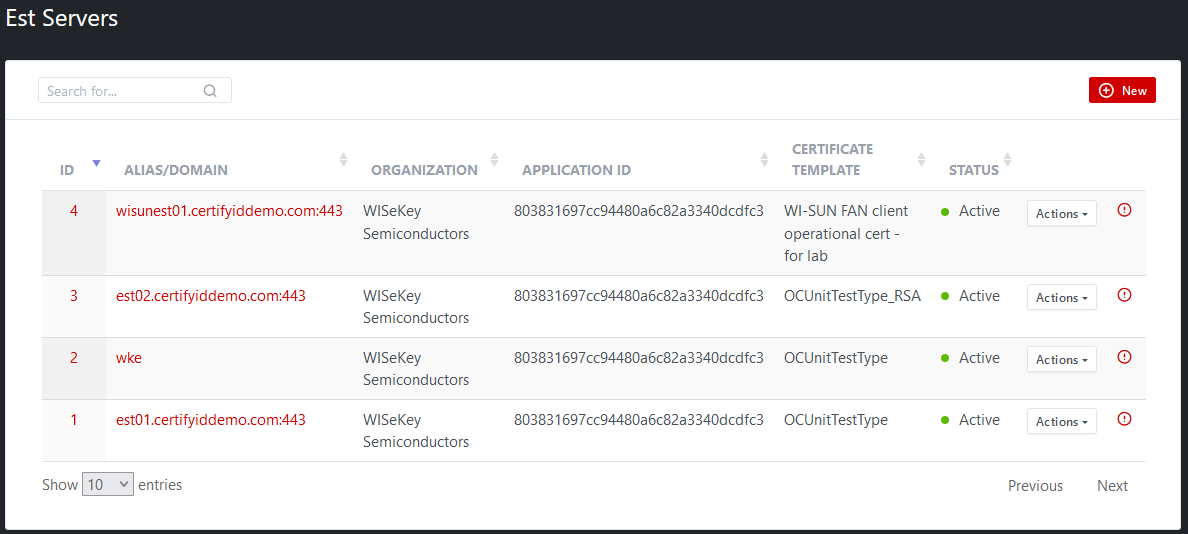
2.3.3
EST Servers List page
All EST Servers will be listed on the List page.
The “Actions” option allows to: Clone, Edit EST Server on list page. The “View” icon opens the EST
Server Details page.

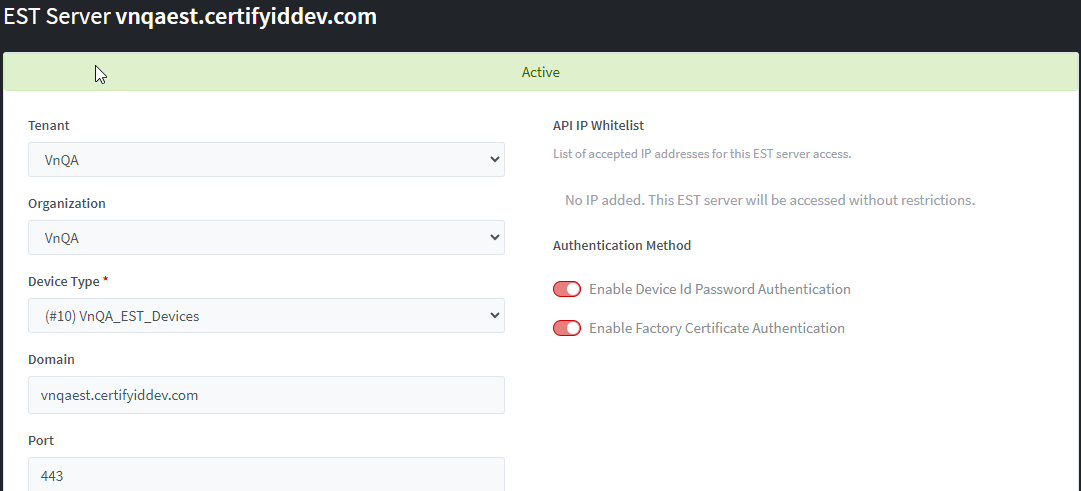
2.3.4
EST Server Details page
It’s possible to test EST Server Connection, deactivate,
re-activate, delete, and edit using the related buttons available in this page.

You
can add one or more Arbitrary Label for domain in a particular EST Server. Each
Arbitrary Label List is associated with a device type that assigned to
organization/tenant.
How
to add an Arbitrary Label List:
Step 1: View detail a particular EST Server then scroll down to the end to
find the Arbitrary Label List section. Click on New button.
Step 2: Fill the required fields:
·
Arbitrary Label: Between 3 and 24 characters long
and contains only lowercase letters and numbers. It does not allow the spaces.
·
Device Type: Select one device type that is available in the list.

2.3.5
EST Server Edit page
Allows editing all available fields EXCEPT
ID
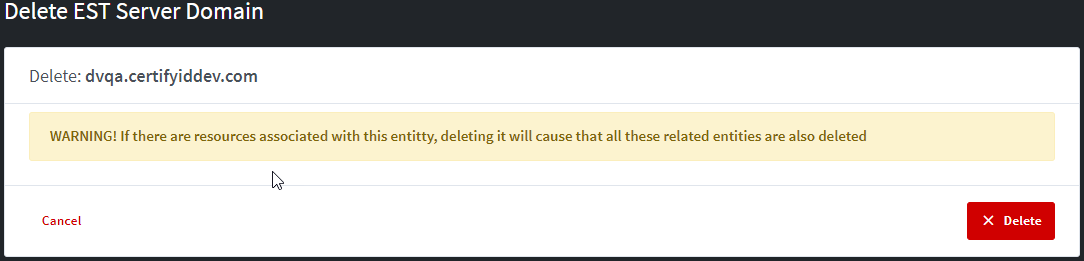
2.3.6
EST Server Delete page
Please
note that Deletion operations can’t be reversed. You only can delete an
inactive EST Server. A confirmation page will be shown.
2.3.7
How EST Server works with
libest and Azure IoT Identity Service
2.3.7.1
Introduction to Cisco
open-source
libest library
The
open source implementation of the EST protocol library
can be found at:
https://github.com/cisco/libest
In
order to compile and run the binaries of the library, it is required to do some
patch on the latest source code as follows:
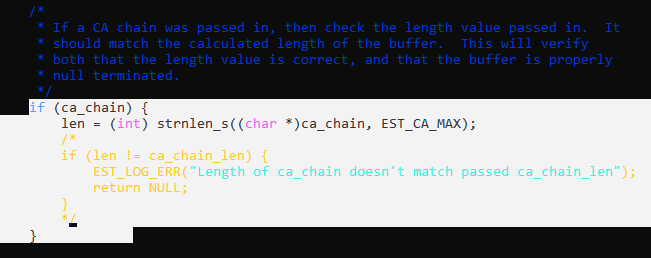
·
Disable checking length of the CA chain by following changes in src/est/est_client.c
file:
Another change required to let the libest
to support EC cert is as follows in the src/est/est.h

·
OS: Ubuntu 20, it does not work in Ubuntu 22.
·
In order to use the estclient, it is
required to specify the CACERT using command lines bellows:
cd /home/<test_user>/libest/libest/example/client
export EST_OPENSSL_CACERT=server.pem
2.3.7.2
Introduction to Azure IoT
Identity Service
Microsoft
Azure provides a service named Azure IoT Identity Service which help devices to
request x509 device certificates through EST Services. The details about the
service can be found here:
https://azure.github.io/iot-identity-service/
2.3.7.3
Test cases
This document contains two set of test cases, they are:
·
Test cases using libest
·
Test cases using Azure IoT Identity Service.
2.3.7.3.1
Test cases using
libest
1.
[TC-01] Enroll a RSA operational
certificate using HTTP Basic authentication.
2.
[TC-02] Enroll a EC P-256 operational
certificate using HTTP Basic authentication.
3.
[TC-03] Enroll a RSA operational
certificate using TLS authentication, where TLS Client certificate is a factory
certificate.
4.
[TC-04] Enroll a EC P-256 operational
certificate using TLS authentication, where TLS Client certificate is a factory
certificate.
5.
[TC-05] Enroll a RSA operational
certificate using TLS authentication, where TLS Client certificate is an
existing operational certificate.
6.
[TC-06] Enroll a EC P-256 operational
certificate using TLS authentication, where TLS Client certificate is an
existing operational certificate.
7.
[TC-07] Enroll a RSA operational
certificate using HTTP Basic authentication where key is generated in the
server.
8.
[TC-08] Enroll a
EC P-256 operational certificate using HTTP Basic authentication where
key is generated in the server.
9.
[TC-09] Enroll a
RSA operational certificate using TLS authentication, where TLS Client
certificate is a factory certificate where key is generated in the server.
10.
[TC-10]
Enroll a EC P-256 operational certificate using TLS
authentication, where TLS Client certificate is a factory certificate where
key is generated in the server.
11.
[TC-11]
Get CA Certificates using HTTP Basic authentication.
12.
[TC-12]
Enroll a EC P-256 operational certificate using HTTP
Basic authentication and WI-SUN certificate template.
13.
[TC-13]
Enroll a EC P-256 operational certificate using
Certificate TLS Authentication.
2.3.7.3.2
Test cases using Azure IoT
Identity Service.
1.
[TC-Aziot-tc01]: To connect to est01.certifyiddemo.com server to
request EC P256 certificates
2.
[TC-Aziot-tc02]: To connect to est02.certifyiddemo.com server to
request RSA certificates
3.
[TC-Aziot-tc03]: To connect to est01.certifyiddemo.com server to
request EC P256 certificates by a device factory certificate.
2.3.7.4
Test preparation
2.3.7.4.1
Prepare EST Servers in IoT CMS
03 EST Servers for WISeKey Semiconductors
organization are created as follows:
·
est01.certifyiddemo.com: To issue EC P-256 Certificates
·
est02.certifyiddemo.com: To issue RSA Certificates
·
wisunest01. certifyiddemo.com: To issue client EC certificates for
WI-SUN type.
2.3.7.5
Test procedures
2.3.7.5.1
Test cases using
libest
2.3.7.5.1.1
[TC-01]
Description
Enroll an RSA operational certificate using HTTP Basic
authentication
Steps:
1.
Using openssl to generate a private key:
openssl genrsa -des3 -out private.pem
2048
2.
Using estclient to enroll a certificate
as follows:
./estclient -e -s est02.certifyiddemo.com -p 443 -o . -u
803831697cc94480a6c82a3340dcdfc3 -h 637d1d57cd5941819014506bf3b2615b --pem-output -x private.pem
--common-name myclient -v
Where: u/p is
corresponding to AppID and AppKey
of the app assoicated in the settings of the EST
Server (est02)
Files:
1.
tc01.sh
2.3.7.5.1.2
[TC-02]
Description
Enroll a EC P-256 operational certificate
using HTTP Basic authentication.
Steps:
1.
Using openssl to generate key and CSR
openssl ecparam -name prime256v1
-genkey
-noout -out ec_private.key
openssl req -new -sha256
-key ec_private.key -out ec_request.csr
-config config.txt
2.
Using estclient to enroll a certificate
as follows:
./estclient -v -e -s est01.certifyiddemo.com -p 443 -o . -u
803831697cc94480a6c82a3340dcdfc3 -h 637d1d57cd5941819014506bf3b2615b --pem-output -y ec_request.csr
Files:
1.
tc02.sh
2.3.7.5.1.3
[TC-03]
Description
Enroll a RSA operational certificate
using TLS authentication, where TLS Client certificate is a factory
certificate.
Steps:
1.
Open Postman
2.
Call Login
3.
Call CreateDeviceAndFactoryRSACert. This
function will create a device and the corresponding factory RSA 2048
certificate.
4.
Download the PFX of the factory certificate, and then use openssl or xca to export the
certificate into two files:
·
rsa_factory.pem:
To store the certificate in PEM format
·
rsa_factory_key.pem:
to store the private key in PEM format.
5.
Using openssl to generate a private key
openssl genrsa -des3 -out private.pem
2048
6.
Using estclient as follows:
./estclient -e -s est02.certifyiddemo.com -p 443 -o . -c rsa_factory.pem
-k rsa_factory_key.pem --pem-output
-x private.pem --common-name myclient
-v
Script file name: tc03.sh
2.3.7.5.1.4
[TC-04]
Description
Enroll a EC P-256 operational certificate
using TLS authentication, where TLS Client certificate is a factory
certificate.
Steps:
1.
Open Postman
2.
Call Login
3.
Call CreateDeviceAndFactoryECCert. This
function will create a device and the corresponding factory RSA 2048
certificate.
4.
Download the PFX of the factory certificate, and then use openssl or xca to export the
certificate into two files:
ec_factory.pem:
To store the certificate in PEM format
ec_factory_key.pem:
to store the private key in PEM format.
3.
Using openssl to generate key and CSR
openssl ecparam -name prime256v1
-genkey
-noout -out ec_private.key
openssl req -new
-sha256 -key ec_private.key -out ec_request.csr
-config config.txt
5.
Using estclient as follows:
./estclient -v -e -s
est01.certifyiddemo.com -p 443 -o . -c ec_factory.pem
-k ec_factory_key.pem --pem-output
-y ec_request.csr
Script file name: tc04.sh
2.3.7.5.1.5
[TC-05]
Description
Enroll a RSA operational certificate
using TLS authentication, where TLS Client certificate is an existing
operational certificate.
1.
Open Postman
2.
Call Login
3.
Call CreateDeviceAndRSACerts: to issue a
corresponding factory certificate, and the operational certificate will be
issued with a short period of 1 days.
4.
Download the PFX of the operational certificate, and then use openssl or xca to export the
certificate into two files:
·
operational.pem:
To store the certificate in PEM format
·
operational_key.pem:
to store the private key in PEM format.
5.
Using openssl to generate a private key
openssl genrsa -des3
-out private.pem
2048
6.
Using estclient as follows:
./estclient -v -r -s est02.certifyiddemo.com -p 443 -o . -c operational.pem -k operational_key.pem
--pem-output -x private.pem
--common-name myclient
Script file name: tc05.sh
2.3.7.5.1.6
[TC-06]
Description
Enroll a EC P-256 operational certificate
using TLS authentication, where TLS Client certificate is an existing
operational certificate.
1.
Open Postman
2.
Call Login
3.
Call CreateDeviceAndECCerts to issue a
corresponding factory certificate, and the operational certificate will be
issued with a short period of 1 days.
4.
Download the PFX of the operational certificate, and then use openssl or xca to export the
certificate into two files:
·
ec_operational.pem:
To store the certificate in PEM format
·
ec_operational_key.pem:
to store the private key in PEM format.
5.
Using openssl to generate a private key
openssl ecparam -name prime256v1 -genkey -noout -out ec_private.key
openssl req -new -sha256 -key ec_private.key
-out ec_request.csr -config config.txt
6.
Using estclient as follows:
./estclient -v -r -s est01.certifyiddemo.com -p 443 -o . -c ec_operational.pem -k ec_operational_key.pem
--pem-output
Script file name: tc06.sh
2.3.7.5.1.7
[TC-07]
Description
Enroll a RSA operational certificate
using HTTP Basic authentication where key is generated in the server.
Steps:
1.
Using openssl to generate a private key:
openssl genrsa -des3 -out private.pem
2048
2.
Using estclient to enroll a certificate
as follows:
./estclient -v -q -e -s est02.certifyiddemo.com -p 443 -o . -u
803831697cc94480a6c82a3340dcdfc3 -h 637d1d57cd5941819014506bf3b2615b --pem-output -x private.pem
--common-name myclient
Where: u/p is
corresponding to AppID and AppKey
of the app assoicated in the settings of the EST
Server (est02)
Script file name: tc07.sh
2.3.7.5.1.8
[TC-08]
Description
Enroll a EC P-256 operational certificate
using HTTP Basic authentication where key is generated in the server.
Steps:
1.
Using openssl to generate key and CSR
openssl ecparam -name prime256v1
-genkey
-noout -out ec_private.key
openssl req -new
-sha256 -key ec_private.key -out ec_request.csr
-config config.txt
2.
Using estclient to enroll a certificate
as follows:
./estclient -v -q -e -s est01.certifyiddemo.com -p 443 -o . -u
803831697cc94480a6c82a3340dcdfc3 -h 637d1d57cd5941819014506bf3b2615b --pem-output -x ec_private.pem
--common-name myclientec
Script file name: tc08.sh
2.3.7.5.1.9
[TC-09]
Description
Enroll a RSA operational certificate
using TLS authentication, where TLS Client certificate is a factory certificate
where
key is generated in the server.
Steps:
7.
Open Postman
8.
Call Login
9.
Call CreateDeviceAndFactoryRSACert. This
function will create a device and the corresponding factory RSA 2048
certificate.
10.
Download
the PFX of the factory certificate, and then use openssl
or xca to export the certificate into two files:
·
rsa_factory.pem:
To store the certificate in PEM format
·
rsa_factory_key.pem:
to store the private key in PEM format.
11.
Using
openssl to generate a private key
openssl genrsa -des3 -out private.pem
2048
12.
Using
estclient as follows:
./estclient -q -s est02.certifyiddemo.com -p 443 -o . -c rsa_factory.pem
-k rsa_factory_key.pem --pem-output
-x private.pem --common-name myclientrsa
-v
Script file name: tc09.sh
2.3.7.5.1.10
[TC-10]
Description
Enroll a EC P-256 operational certificate
using TLS authentication, where TLS Client certificate is a factory certificate
where
key is generated in the server.
Steps:
6.
Open Postman
7.
Call Login
8.
Call CreateDeviceAndFactoryECCert. This
function will create a device and the corresponding factory RSA 2048
certificate.
9.
Download the PFX of the factory certificate, and then use openssl or xca to export the
certificate into two files:
ec_factory.pem:
To store the certificate in PEM format
ec_factory_key.pem:
to store the private key in PEM format.
4.
Using openssl to generate key and CSR
openssl ecparam -name prime256v1
-genkey
-noout -out ec_private.key
openssl req -new
-sha256 -key ec_private.key -out ec_request.csr
-config config.txt
10.
Using
estclient as follows:
./estclient -v -q -s
est01.certifyiddemo.com -p 443 -o . -c ec_factory.pem
-k ec_factory_key.pem --pem-output
--pem-output -x ec_private.pem
--common-name myclientecc
Script file name: tc10.sh
2.3.7.5.1.11
[TC-11]
Description
Get CA Certificates using HTTP Basic authentication.
Script file name: tc11.sh
2.3.7.5.1.12
[TC-12]
Description
Enroll a EC P-256 operational certificate
using HTTP Basic authentication and WI-SUN certificate template.
Steps:
1.
Using openssl to generate key and CSR
openssl ecparam -name prime256v1
-genkey
-noout -out ec_private.key
openssl req -new
-sha256 -key ec_private.key -out ec_request.csr
-subj "/" -config openssl_hwm.config
2.
Using estclient to enroll a certificate
as follows:
./estclient -e -s wisunest01.certifyiddemo.com -p 443 -o . -u
803831697cc94480a6c82a3340dcdfc3 -h 637d1d57cd5941819014506bf3b2615b --pem-output -y ec_request.csr -v
Script file name: tc12.sh
2.3.7.5.1.13
[TC-13]
Description
Enroll a EC P-256 operational certificate
using Certificate TLS Authentication.
This use case is similar with the use-case TC-02 with the
difference in authentication, it is that a TLS Certificate will be used for
authentication to replace the usage of HTTP-base authentication.
openssl ecparam -name prime256v1
-genkey
-noout -out ec_private.key
openssl req -new
-sha256 -key ec_private.key -out ec_request.csr
-config config.txt
./estclient -e -s est01.certifyiddemo.com -p 443 -o . -c app_cert.pem
-k app_key.pem --pem-output
-y ec_request.csr –v
Where:
·
app_cert
stores the certificate in PEM
·
app_key
stores the key in PEM
·
The
certificate and the key is export from the PFX issued
for the corresponding API application.
Script file name: tc13.sh
2.3.7.5.2
Test cases using Azure IoT
Identity Service
2.3.7.5.2.1
About the Azure
IoT Identity Service
The details about the service can be found here:
https://github.com/Azure/iot-identity-service
Below is the official guide to install the Azure Identity Service
1.2.6:
The installation was done in the WSL2/Windows 11 Ubuntu 20.04
System directory and commands:
Following are commands required for tests:
aziotctl
config apply
aziotctl
check
aziotctl
system restart
aziotctl
system logs
More information about the command can be found here:
https://azure.github.io/iot-identity-service/aziotctl.html
Configuration
The first step is to configure the following file /etc/aziot/config.toml, below is
the content of the file:
Notes: Sample configuration
files in this document can be found in the zip package.
#---------------BEGIN /etc/aziot/config.toml-------------------------------------------
[provisioning]
source = "dps"
global_endpoint = "https://global.azure-devices-provisioning.net"
id_scope = "0ne00xxxx"
[provisioning.attestation]
method = "x509"
registration_id = "l001"
identity_cert = { method
= "est", common_name
= "l001" }
[cert_issuance.est]
trusted_certs = ["file:///etc/aziot/secrets/cacert.pem"]
[cert_issuance.est.auth]
username = "provisioningserviceowner"
password = "Pgocbe…….hl8gpI="
identity_cert = "file:///etc/aziot/secrets/app_cert.pem"
identity_pk = "file:///etc/aziot/secrets/app_key.pem"
[cert_issuance.est.urls]
default = "https://est02.certifyiddemo.com/.well-known/est"
#---------------END /etc/aziot/config.toml-------------------------------------------
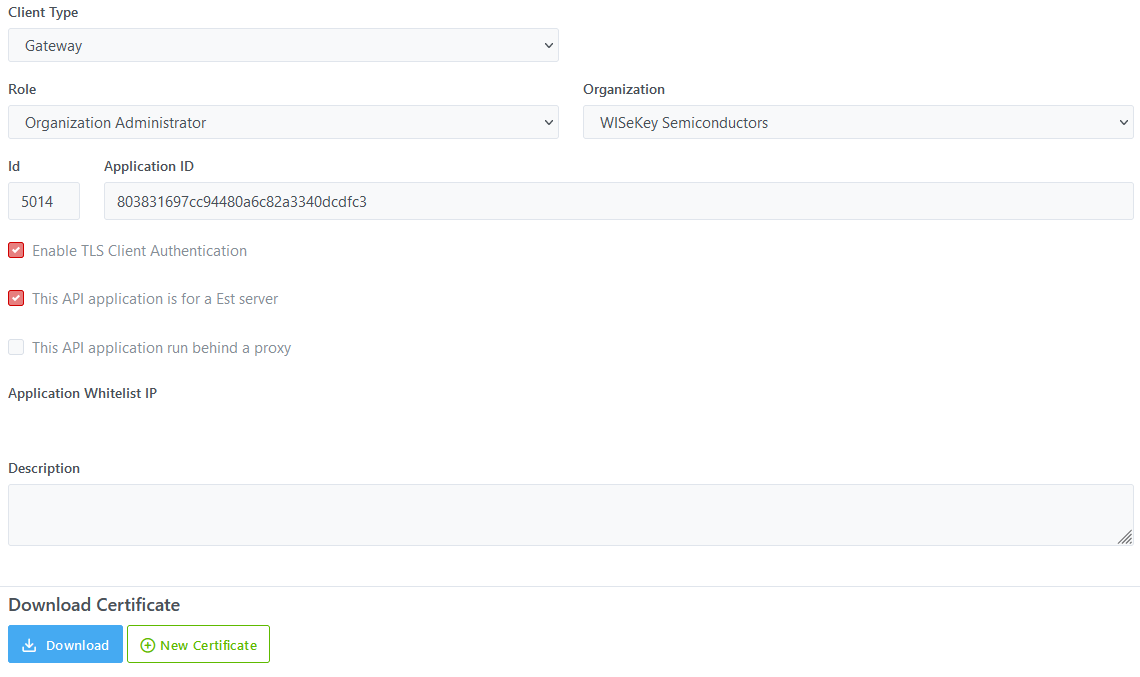
Where
·
app_cert.pem,
app_key.pem are the certificate and key of the API
Application corresponding to the EST Server.
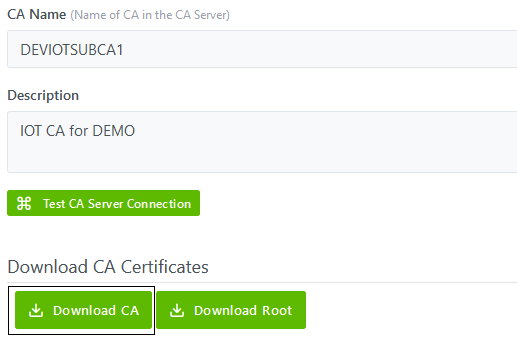
·
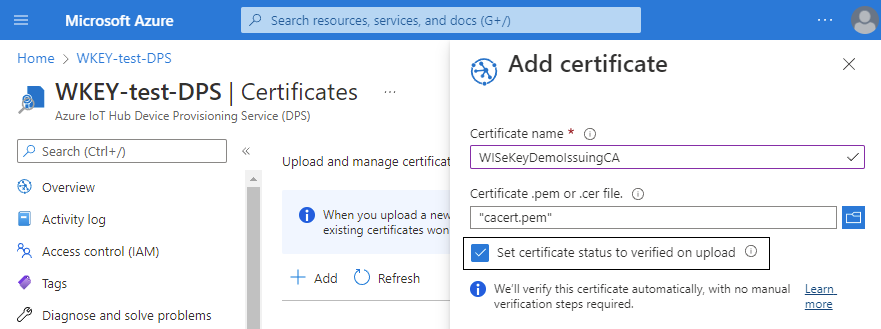
cacert.pem:
contains the issuing CA certificate in PEM format and can be downloaded from
IoT CMS as follows:
This issuing CA must be uploaded and verified in Azure DPS before
executing the test scripts, the uploading process can be as follows through the
Azure IoT DPS interface:
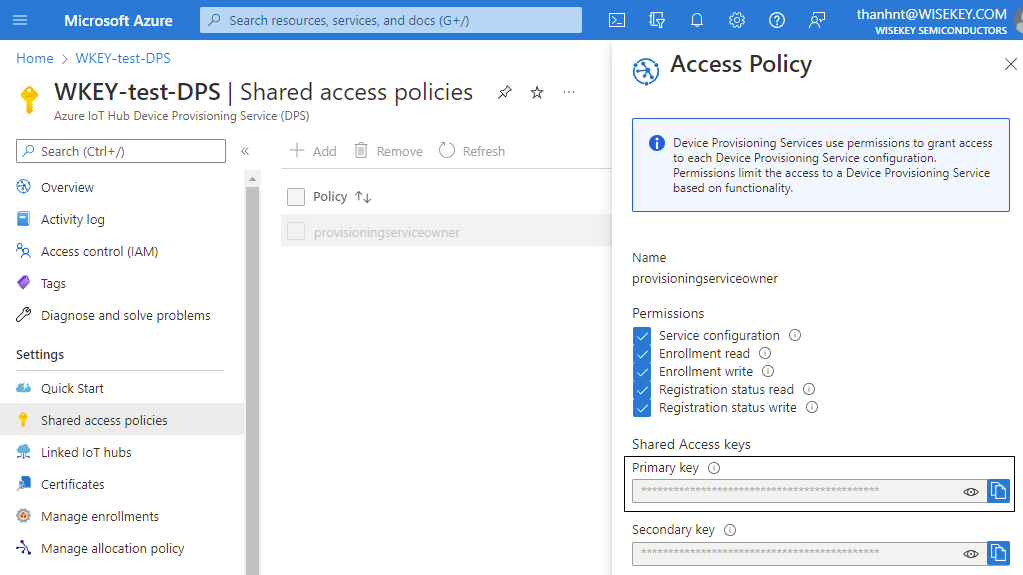
·
username and password is the credential
to connect to the Azure portal. It can be found in the Shared access policies
menu below:
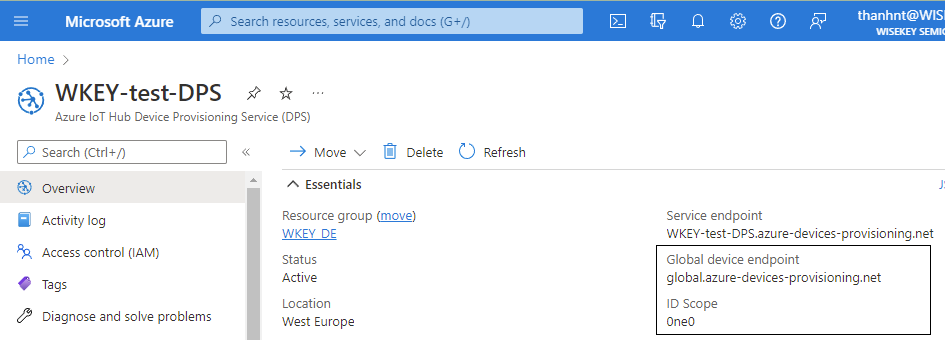
·
global_endpoint
and id_scope can be found as follows:
After the file /etc/aziot/config.toml is finished, it is required to do following
commands to verify the configuration:
aziotctl
config apply
aziotctl
check
aziotctl
system restart
aziotctl
system logs
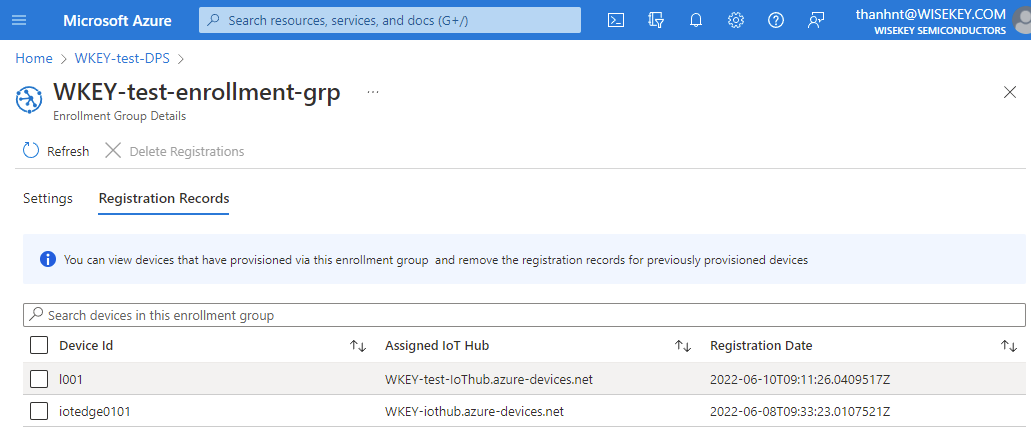
if the configuration is correctly, then system will create a new
device in Azure like below:
2.3.7.5.2.2
Test cases
This document covers 03 test cases below:
·
[TC-Aziot-tc01]: Connect to est01.certifyiddemo.com server to
request EC P256 certificates. The credential to connect to the EST Server is a
TLS certificate corresponding to the API application associated with the EST
Server.
·
[TC-Aziot-tc02]: Connect to est01.certifyiddemo.com server to
request RSA certificates. The credential to connect to the EST Server is a TLS
certificate corresponding to the API application associated with the EST
Server.
·
[TC-Aziot-tc03]: Connect to est01.certifyiddemo.com server to
request EC P256 certificates. The credential to connect to the EST Server is a
factory device certificate.
Each test case contains following files:
·
A config file in /etc/aziot/certd/config.d/ to
declare EST Server to connect to and
corresponding credential for the authentication.
·
A config file in /etc/aziot/keyd/config.d/ to
store information about the key file.
·
A script file to request a certificate through Azure Iot Identity Service to the
EST Server.
[TC- Aziot-tc01]
Description
Connect to est01.certifyiddemo.com server to request EC P256
certificates. The credential to connect to the EST Server is a TLS certificate
corresponding to the API application associated with the EST Server.
Steps
Put the configuration files (.toml) in
the right folders, and then execute the script file (.sh).
Files:
/etc/aziot/certd/config.d/aziot-tc01.toml
/etc/aziot/keyd/config.d/aziot-tc01.toml
/script/aziot-tc01.sh
[TC- Aziot-tc02]
Description
Connect to est01.certifyiddemo.com server to request RSA
certificates. The credential to connect to the EST Server is a TLS certificate
corresponding to the API application associated with the EST Server.
Steps
Put the configuration files (.toml) in
the right folders, and then execute the script file (.sh).
Files:
/etc/aziot/certd/config.d/aziot-tc02.toml
/etc/aziot/keyd/config.d/aziot-tc02.toml
/script/aziot-tc02.sh
[TC- Aziot-tc03]
Description
Connect to est01.certifyiddemo.com server to request EC P256
certificates. The credential to connect to the EST Server is a factory device
certificate. The factory certificate and key can be prepared the same steps
with the [TC-04] in the test cases using libest.
Steps
Put the configuration files (.toml) in
the right folders, and then execute the script file (.sh).
Files:
/etc/aziot/certd/config.d/aziot-tc03.toml
/etc/aziot/keyd/config.d/aziot-tc03.toml
/script/aziot-tc03.sh
2.4
External Certification
Authorities (CAs)
The
external CAs will be used to configure in Device type when the External
Certification Authorities is enabled for Factory Certificate. This will be used
by EST-DPS to allow connections of new devices.
Access
role:
·
Admin:
can CRUD External CAs for any tenants and organizations.
·
Tenant
Admin: can CRUD External CAs for organizations belongs to that tenant
only.
·
Auditor/Tenant
Auditor: can view External CAs only.
·
Other
roles: cannot access.
2.4.1
Register and verify an External CA
How to register an External CA
Step 1: Login as Admin or Tenant Admin and open Device Provisioning in
Services at top bar menu. Then open Configuration > External CAs in
left-menu.
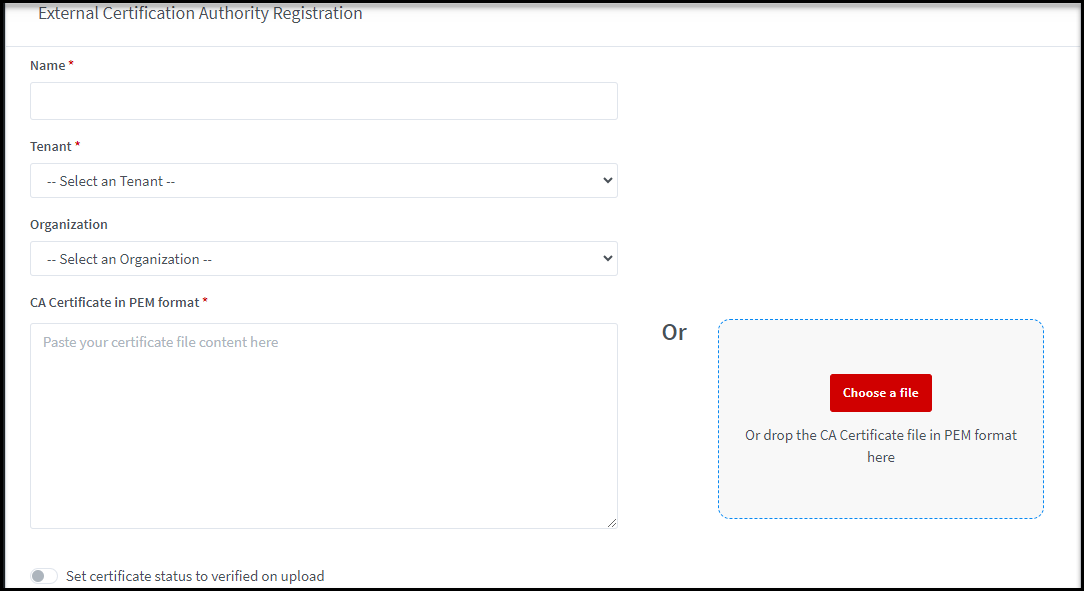
Step 2: Click on Register button to register an external CA
Step 3: Fill all the required (*) fields:
·
Name
*: Fill the name of external CA, it must be unique.
·
Tenant*:
If you logged-in as Admin, you must specify the Tenant.
·
Organization:
o
If you logged-in as Amin, this field will be optional. You can
create external CA for Tenant (if not specify the organization), otherwise you
can select the organization from the drop-down list if you want to create an
external CA for particular organization.
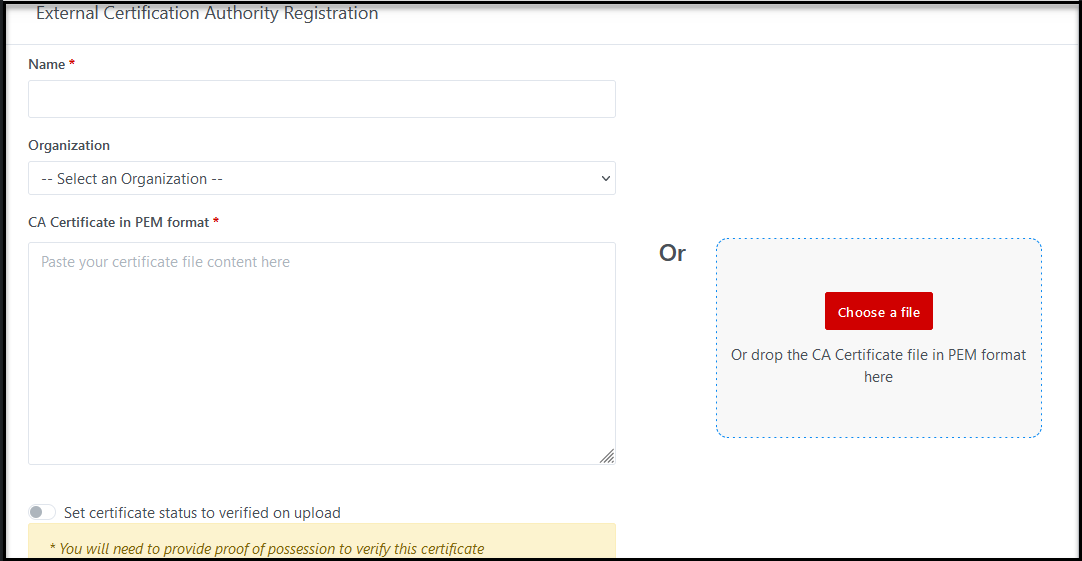
o
If you logged-in as Tenant Admin, this field is required. You have
to specify the organization of this external CA.
·
CA
Certificate in PEM format*: This is a required field; you must upload a PEM file of the
issuing CA (drop the CA Certificate file in PEM format) or copy the content of certificate
file and paste it into the textbox area.
·
Set
certificate status to verified on upload: This is
optional field. If it is enabled then the external CA is set as verified.
Otherwise, it is set to unverified status.
Step 4: Click on Register button to complete process. A new external CA
will be created successfully and listed in the External CAs list page.
Illustrative screenshot: if Admin creates External CAs
Illustrative screenshot: if Tenant Admin creates External CAs
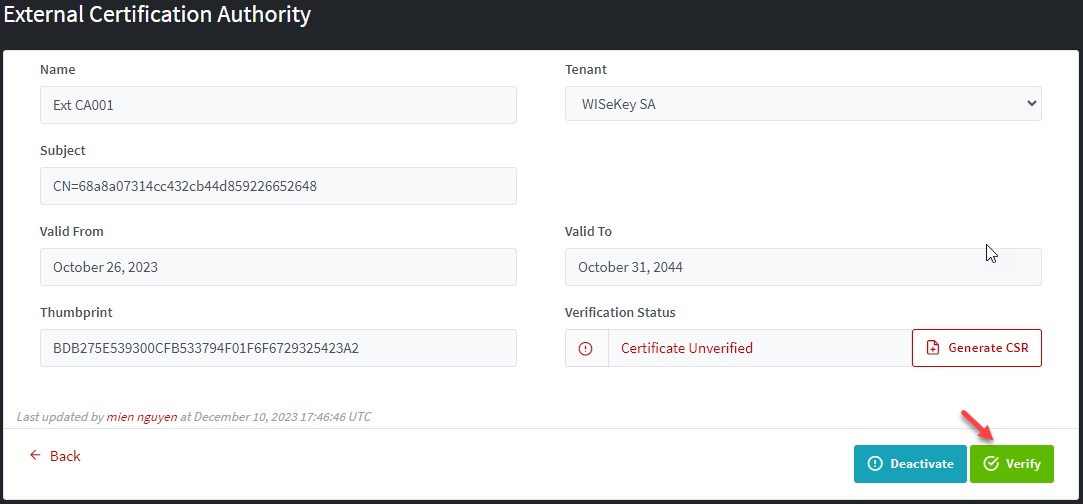
How to verify an external CA
After
an External is registered successfully, you can manually set an existing
external CA as verified if it is in unverified status by clicking on Action button in
list page then select Verify option or click Verify button in external detail
page.
Illustrative
screenshot:

Note:
Only verified External CAs can be listed for selecting during configuration
Factory Certificate in Device type.
2.4.2
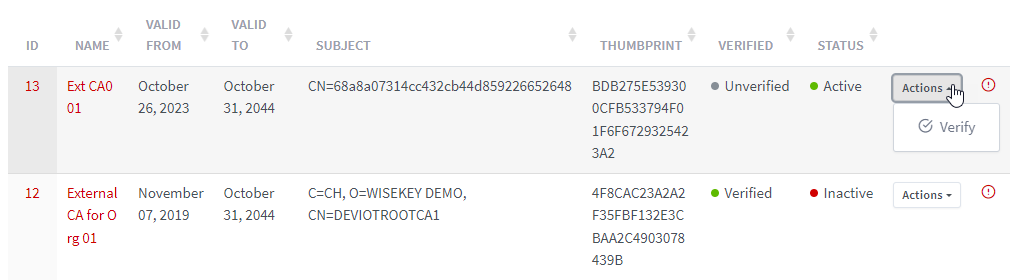
External CAs List Page
All External CAs will be listed on the List page.
The
“Actions” option allows to: Verify (if
CA is unverified), Delete (if CA is
inactive) on list page. The “View” icon opens the CA Details page.
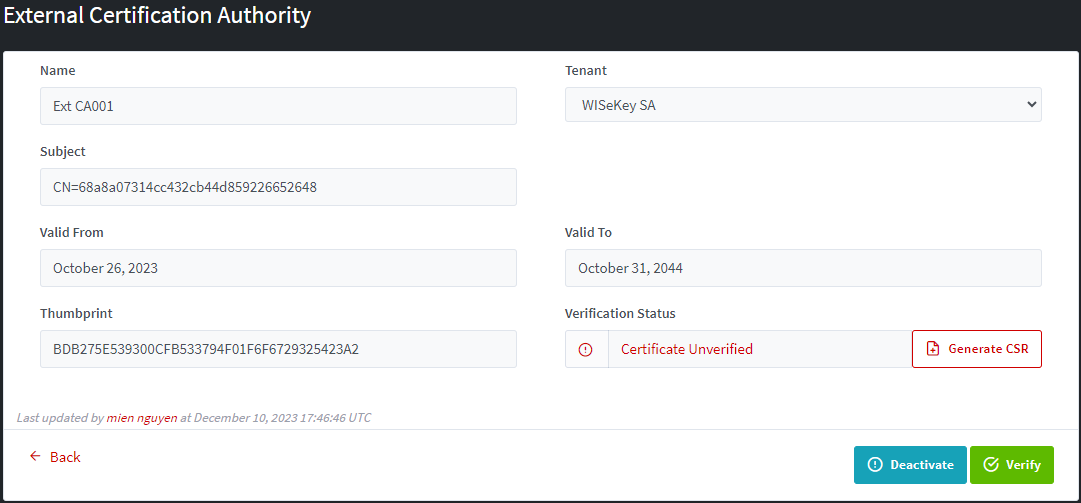
2.4.3
External CAs Detail Page
From
the “View” page, it’s possible to manage status, generate CSR, verify and Delete among other options.
If
the CA is not verified then you can generate CSR, Verify CA, and Deactivate CA:
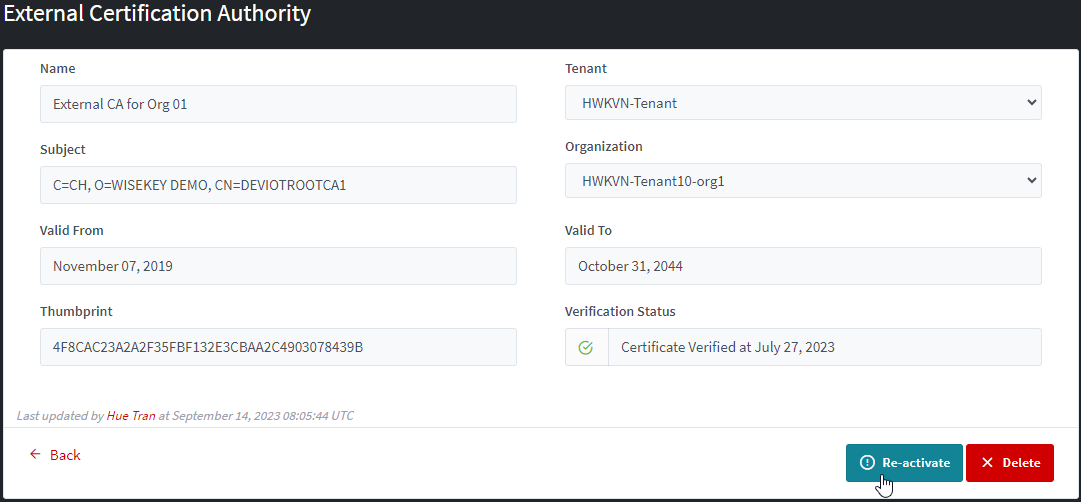
If the CA is verified, you can deactivate only:

If the CA is inactive, you can re-activate or delete it.
2.4.4
Activate/Deactivate an
External CA
Admin can deactivate or re-activate any External CAs.
Tenant Admin can deactivate or re-activate any External CAs belong
to that Tenant.
2.4.5
Delete an External CA
Please note that Deletion operations can’t be reversed. A
confirmation page will be shown.
