Certificate Management User Guide
The INeS IoT Security Platform provides these Components and
Features:
- INeS IoT
Web portal:
- Provides
a GUI, accessible with authorized login credentials
- Implements
different management capabilities per user role: Admin, Auditor, Tenant
Admin, Tenant Auditor, Tenant Operator, and Organization Operator.
- Allows
managing all entities:
- Administrations:
Managing Tenants, Organizations, Users, API Access Key, Audit Logs, and
Report.
- Certificate
Management Service (CMS): Managing CAs, Custom Extension, Certificate
Templates, Certificates, Batch Generation, and EST Server for CMS.
- Device
Provisioning Service (DPS): Managing Device Type, Devices, EST Server
for DPS, and External CAs.
- INeS IoT
API
- Allows
to interact with the INeS IoT Security Platform Portal via REST API and
EST Server
This document is to describe how to use Certificate Management
Service (CMS): Manage CAs, certificate templates, certificate, and the batch of
certificate issuance.
1.1
Getting access to the platform
The portal implements the following user roles:
•
Admin: Main administrator can:
o
Manage all Tenants, Organizations, Users and API credentials.
o
Manage Certificate Management Services (CMS): all CAs, Certificate
Templates, Custom Extensions, EST Server for CMS, can set the global access,
Tenant access, and organization access for any entity on CMS System
o
Manage Device Provisioning Services (DPS): Device Type, Devices,
External CAs, EST Server for DPS, can set the Global Access, Tenant Access, and
Organization Access for any entity on DPS System
•
Tenant Admin: The administration of the specific Tenant can:
o
Manage all its Organizations, Users and API credentials.
o
Manage Certificate Management Services (CMS): including CAs,
Certificate Template that are assigned to that Tenants, can view all shared
(global access) entities of CMS system, manage EST Server for CMS, can set Tenant
Access, and Organization Access for any entity on CMS System
o
Manage Device Provisioning Services (DPS): Device Type, Devices,
External CAs, EST Server for DPS, can set the global access, Tenant access, and
organization access for any entity on DPS System
•
Tenant Operator:
can operate on Certificates and Batch Generation for all organizations
in that Tenant in CMS system; can operate on Devices for all organizations in
that Tenant in DPS System.
•
Organization Operator can operate on Certificates and
Batch Generation for its organization in CMS system; can operate on Devices for
its organizations in that Tenant in DPS System.
•
Auditor: Can get read-only access to all entities in system… for auditing
purpose.
•
Tenant Auditor: Can get read-only access
to all entities in that Tenant… for auditing purpose.
All accesses to the platform are authenticated at least with
username and password, and optionally with a digital certificate as strong
authentication method.
Please ask WISeKey for your initial credentials to connect to the
platform.
The demo
environment is available for tests in the URL:
https://ines.certifyiddemo.com/
Login with Username/Password:

2.1
Certificate Template
Management
Access rules:
·
Admin
can CRUD
[1]
all certificate templates
·
Tenant Admin: can CRUD all certificate templates of that Tenant and can use
all shared certificate template (The certificate template can be accessed
global)
·
Auditor
& Tenant Auditor: can only view all certificate templates
·
Tenant
Operator: can use all certificate templates when requesting a
certificate
·
Organization
Operator: can use
certificate templates of the tenant that organization operator belongs to, and
use all shared certificate templates when requesting a certificate
Important Note:
As previously explained, the CMS connects to existing Certification Authorities
using PrimeKey EJBCA. In order to be able to successfully use certificate
templates, it must exist in the EJBCA CA at least one appropriate “End-Entity
Profile” and a “Certificate Template”. Please contact WISeKey if you need
assistance for these particular preparation works.
2.1.1
Introduction about certificate
templates
A certificate template can be understood as a “Type of
Certificate” that the CMS can issue. The Certificate templates define the
characteristics of the certificates in terms of:
·
Identity attributes (names that are inserted in the certificates)
·
Cryptography characteristics (key types and origin)
·
Usage characteristics (key usage)
INeS CMS defines two types of certificates:
·
“Factory Certificate”. These certificates are typically inserted
in the IoT devices during manufacturing and are used for the initial connection
and maybe during maintenance mode. Normally these certificates typically will
be used as the digital identity of the IoT device during the lifetime of the IoT
device
·
“Operational Certificates”. These certificates are typically used
by the devices for their normal operations. Normally, these certificates should
be renewed periodically during the lifetime of the device and sometimes are
linked to the owner of the device.
These distinctions are merely illustrative, and the important
concept to retain is that a device can have multiple certificates, and
typically one will be a factory certificate and others are operational
certificate, but each customer can decide on how to adopt its own approach. In
many cases, the devices will only have a single certificate.
2.1.2
Creating a Certificate
Template
Here are steps details to create a Certificate Template:
Step 1:
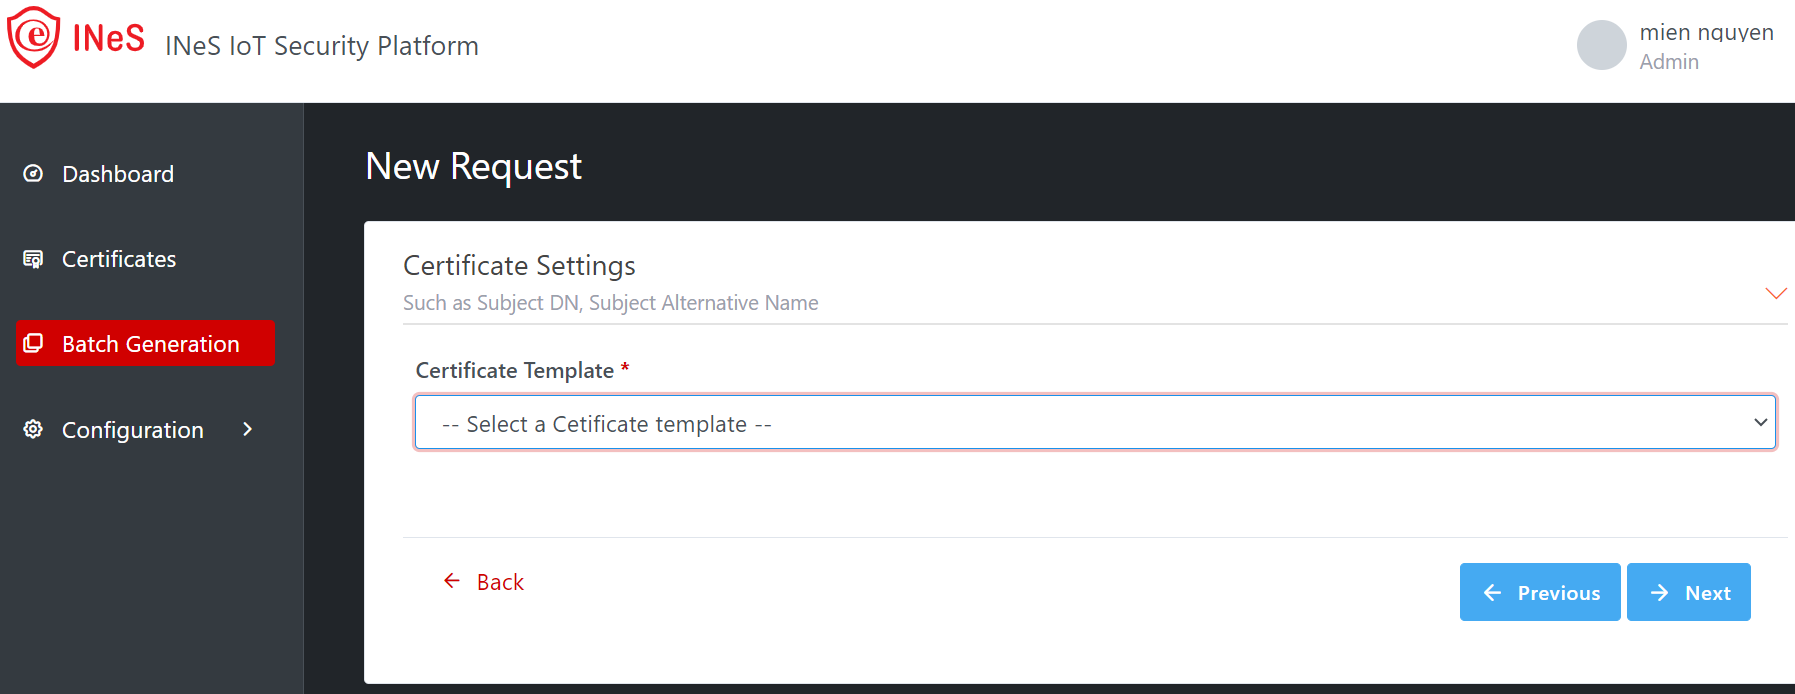
Open Certificate Management Service from HOME page or from top bar menu,
then open “Certificate Templates” from left menu: Configuration > Certificate Templates then click on the “New”
button.
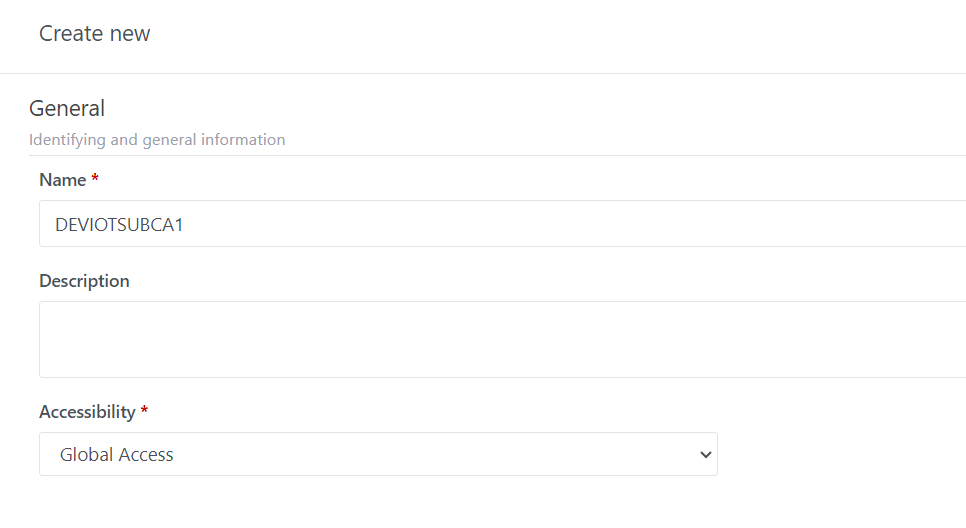
Step 2: Fill
the all required fields (*):
General
section: Identifying and general information
·
Accessibility*: There are 3 options:
o
Global
Access: This option is to share this certificate template to all resources
in the INeS IoT system and only administrator can do this. It will be available
for using to request a certificate by any resource except auditor.
o
Tenant
Access: This option is to assign this certificate template to a certain
tenant. You must select the specific Tenant from the drop-down list when this
option is selected if you access as an administrator. If you access as a Tenant
admin, you only need to enable Tenant Access for yourself.
o
Organization
Access: This option is to assign this certificate template to a specific
organization of the certain tenant. You must select the specific Tenant and
organization of that tenant when this option is selected if you access as an
administrator. If you access as a Tenant admin, you only need to select the
Organization that you want to assign.
·
Certificate Type: Factory (Default) or
Operational.
·
Name*: Name of Certificate template.
·
Description: This is optional field.
·
Validity period (days): You have to
set the xxx (days) validity period or you can enable option “Unlimited
expiration”. When option “Unlimited expiration” is enable,
the validity of the certificate will be validity of issuing CA.
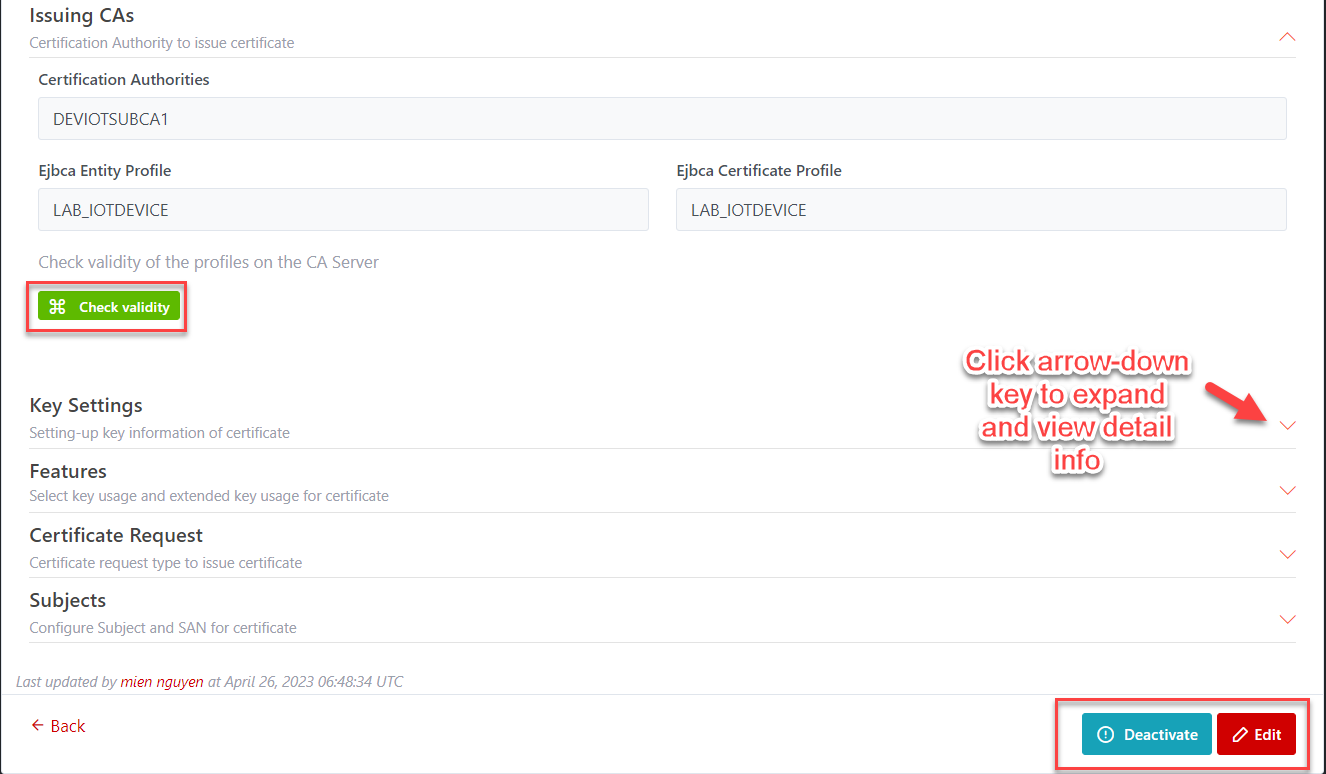
Issuing CAs:
Certification Authority allowed to issue certificates with this template
It’s required to configure:
·
Certification Authorities: Select one
of the available CAs (only shows Active CAs) from the dropdown list. The CAs
list is different amongs access selection.
o
If
Accessibility is Global access (only administrator can set this):
you can see all the active CAs in the list
o
If
Accessibility is Tenant access (both admin & tenant admin can
do this): can only see the shared CA (global access) and all its CA in
the list.
o
If
Accessibility is Organization access (both admin
& tenant admin can do this): can only see the shared CA (global
access), all CAs of that tenant, and the CA of that organization.
·
Ejbca Entity Profile: Must match an existing EE
Profile in the EJBCA Server
·
Ejbca Certificate Profile: Must match
an existing CP in the EJBCA Server
·
Check Validity: User can test connection to check validity of the profiles on
the CA Server in certificate template while creating, editing and viewing
details of certificate template.
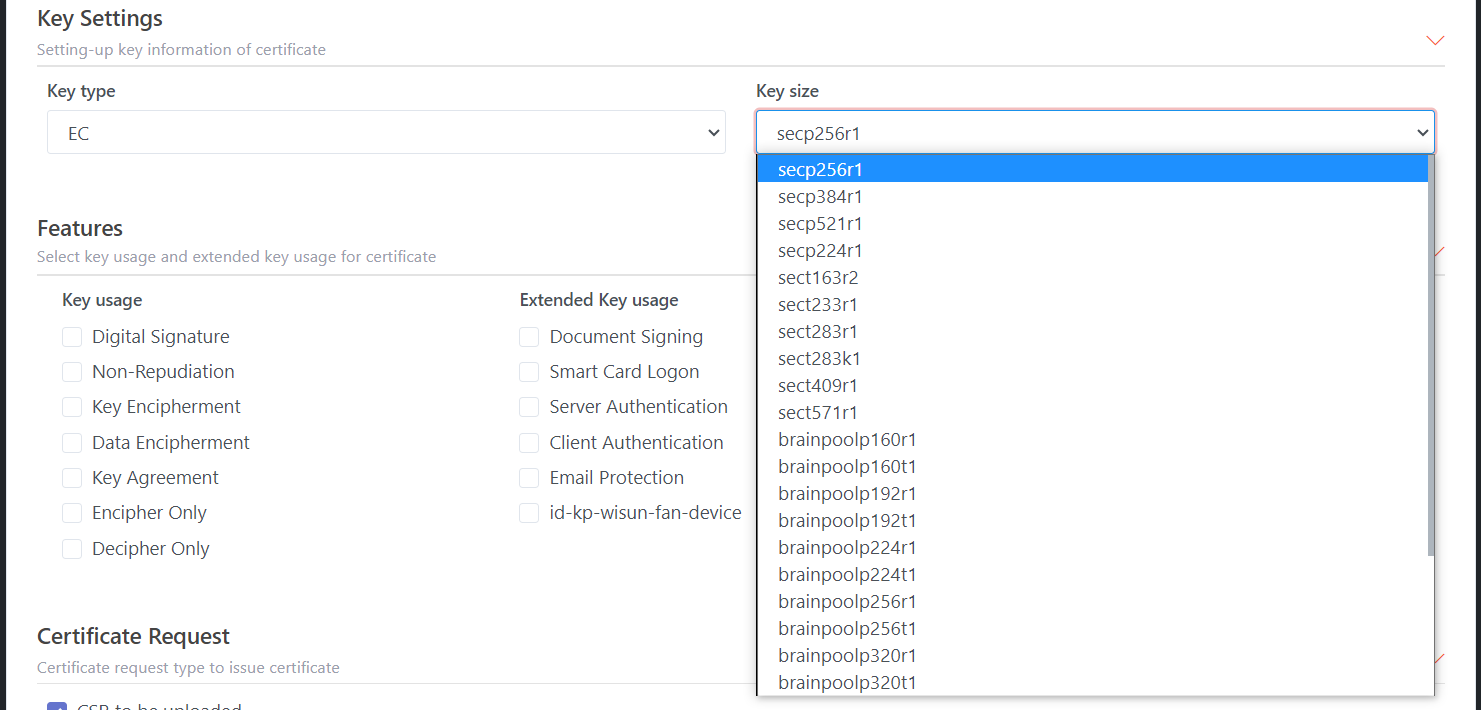
Key Settings:
Setting-up key information for issued certificates. Available
settings:
·
Key type: There are two key types: EC (default) & RSA.
·
Key size: For EC, secp256r1 is the preferred size. Key size depends on the
key type:
o
If
key type = RSA, then key sizes are: 1024, 2048, 4096, and 1544
o
If
key type = EC, then key sizes are: secp256r1, secp384r1, secp521r1, secp224r1,
sect163r2, sect233r1, sect283r1, sect283k1, sect163k1, sect233k1…
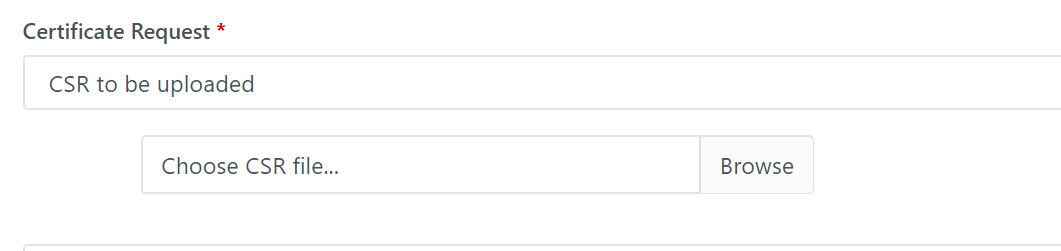
Certificate Request: Certificate request type to issue
certificate. There are 2 options; you must select one or both of them:
·
CSR
to be uploaded: If this option is enabled, you are
required to upload a CSR when requesting a new certificate.
·
Private Key and CSR to be generated in the server: If this option is enabled, the private key and CSR
will be generated and stored in the server. You have to set the Key
retention period (days) - This is basically a number of days that the system
will keep the private keys (It is set to 30 days by default). The system will
run daily and deletes expired keys for each template. The key is also deleted
immediately if the user downloaded the key.
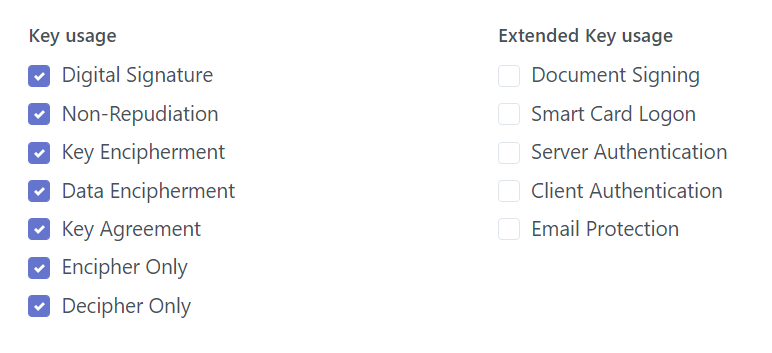
Features:
Select key usage and extended key usage for certificate
·
Key usage: Enable one or multiple key usage by checking the appropriate
checkbox in the list: Digital Signature, Key Agreement, Data Encipherment…
·
Extended Key usage: Enable one or multiple extended
key usage by checking the appropriate checkbox in the list: Document Signing,
Smart Card Logon, Server Authentication, Client Authentication, and Email
Protection.
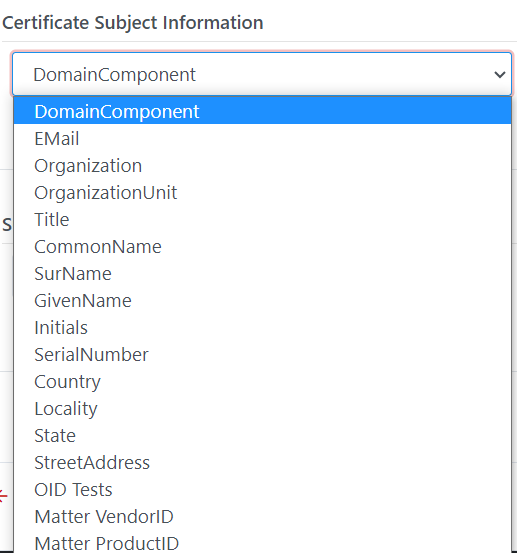
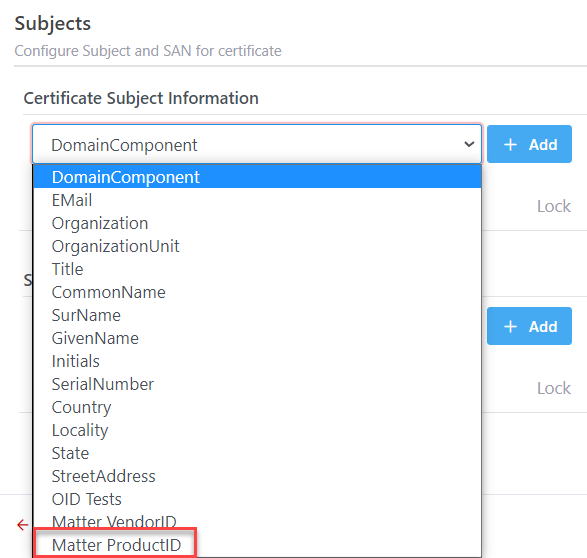
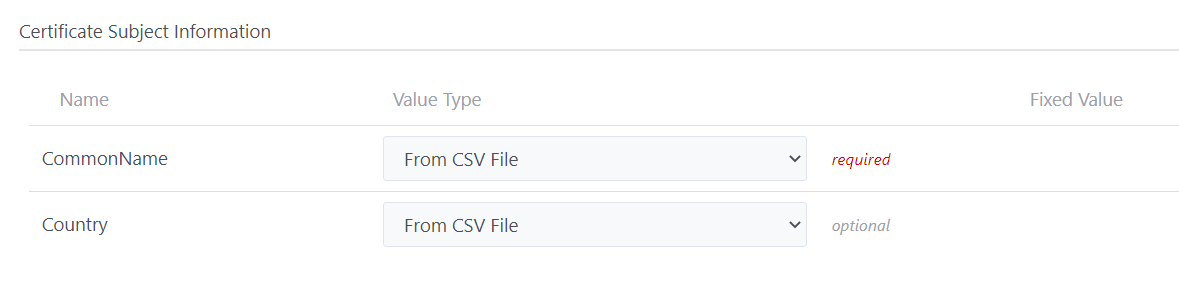
Subjects:
Configure Subject and SAN for issued certificates
All custom extensions will be available
in the list for selection, it is filter based on the type of custom extension
(SAN, SubjectDN).
·
Certificate Subject Information: User can
add any subjects from the list, each
subject can be added only one time EXCEPT Organization and Organization Unit. User
can set the length, default value, make it required and/or locked
·
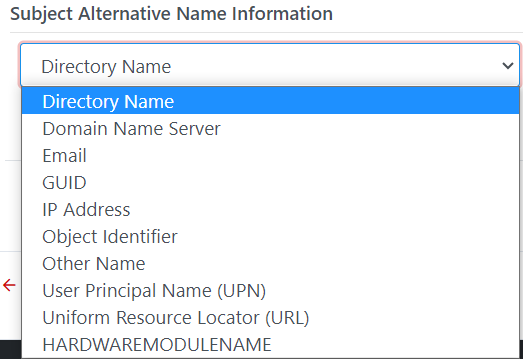
Subject Alternative Name Information: Can add
one
or more SAN from the list. User
can set if SAN are Required, Locked and the default value for each SAN
Illustrative example:
General settings:

Issuing CAs:

Key settings (RSA Key):

Key settings (EC Key):
Features:
Certificate Request

Subjects:
SANs:
Step 3:
After all required fields are filled, click on SAVE to create a new Certificate
template.
You should test
the connection to check validity for issuing CAs to make sure certificate
can be issued when using this Certificate template.
Step 4:
A new Certificate Template will be listed and shown in the Certificate Template
List page.
2.1.3
Certificate Template List page
All Templates will be listed on the List page.
The “Action” option allows to: Clone, Edit, Delete users on list page. The “View” icon opens the
Template Details page.
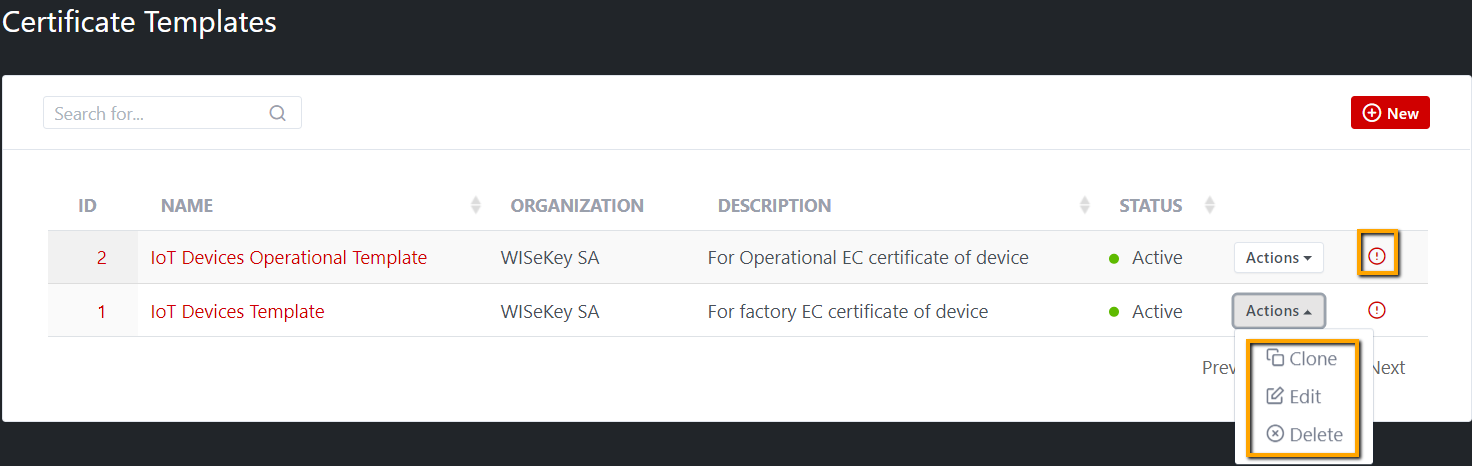
Admin and Tenant Admin can:
·
“Clone” an existing Certificate template: clone all information of
selected certificate to new one, user have to rename the certificate template
before saving.
·
“Edit” the template to update/delete an existing certificate
template: User can change anything in certificate template (general info,
issuing CAs, Key settings, Feature, Subjects…) during update, user can test
connection for issuing CAs.
·
“Delete” a certificate template.
2.1.4
Certificate Template details
page
View page. The possible operations are:
·
Activate-Deactivate the template
·
Test the CA connection
·
Delete
·
Edit
Illustrative screen:

IMPORTANT: If the certificate template is being shared to all resources then:
When you stop sharing it by assigning it to an organization:
·
All device types belonging to other tenants/organizations that are
associated with it will be deactivated
·
All shared device types associated with it will also stop sharing
and belong to new tenant/organization.
When you change sharing it to another tenant:
·
All device types belonging to the previous tenant that are
associated with it will be deactivated
2.2
Certificate Management
Only Administrator (Admin, Tenant Admin)
and Operator (Tenant Operator, Organization Operator) can:
·
Create new Certificate
·
Rekey/Renew Certificate
·
Revoke Certificate.
2.2.1
Issue manually a Certificate
Pre-requisite:
·
Certificate template is already created with valid Issuing CA
configured
Steps to issue a Certificate
Step 1: Open Certificate Management Service from HOME page or from
top bar menu then open Certificates menu.
Step 2: In Certificate list page, click on New
button
Step 3: Fill the all required
fields (*) on each section, user can collapse or expand by clicking on
arrow-down icon.
Identity and
general information
·
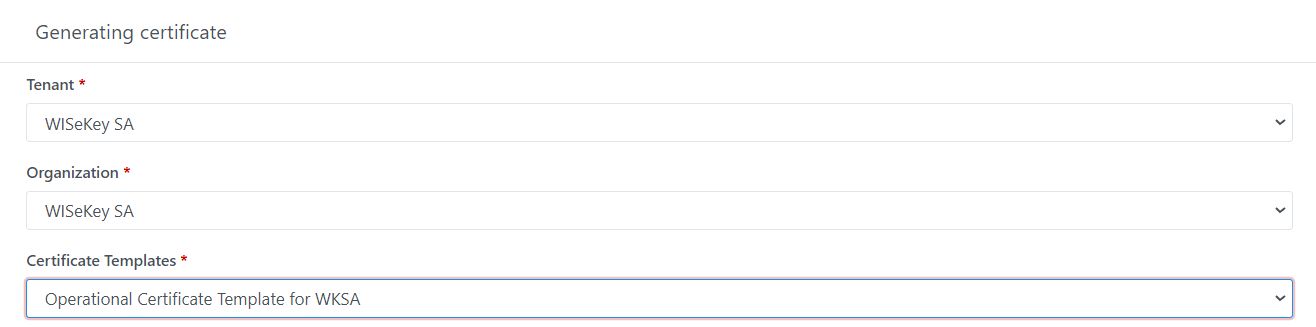
Tenant*: Select the Tenant where the new certificate will belong to. It is
available for Admin role only.
·
Organization*: select the Organization of that Tenant where the new
certificate will belong to. This is available for Admin and Tenant Admin/Tenant
Operator role.
·
Certificate Templates*: Select the available
Certificate template from drop-down selection list
·
Certificate Request *: Select Certificate
request type from the drop-down selection list:
o
CSR
to be uploaded: if select CSR you must upload a CSR to generate a certificate.
The CSR must contain the key that is set in Certificate template.
o
Private
key and CSR to be generated in the Server: if select
this option the process will generate a PFX file containing the private key and
certificate. You can setup the password for the PFX or let the system to
generate a random passphrase. The private key will be deleted per key retention
days that is set in the template.
·
Certificate Subject Information *:
Fill the data in required subject in this
section (it depends on Certificate template configuration)
·
Subject Alternative Name Information*:
Fill the data in required subject in this section (it depends on Certificate
template configuration)
·
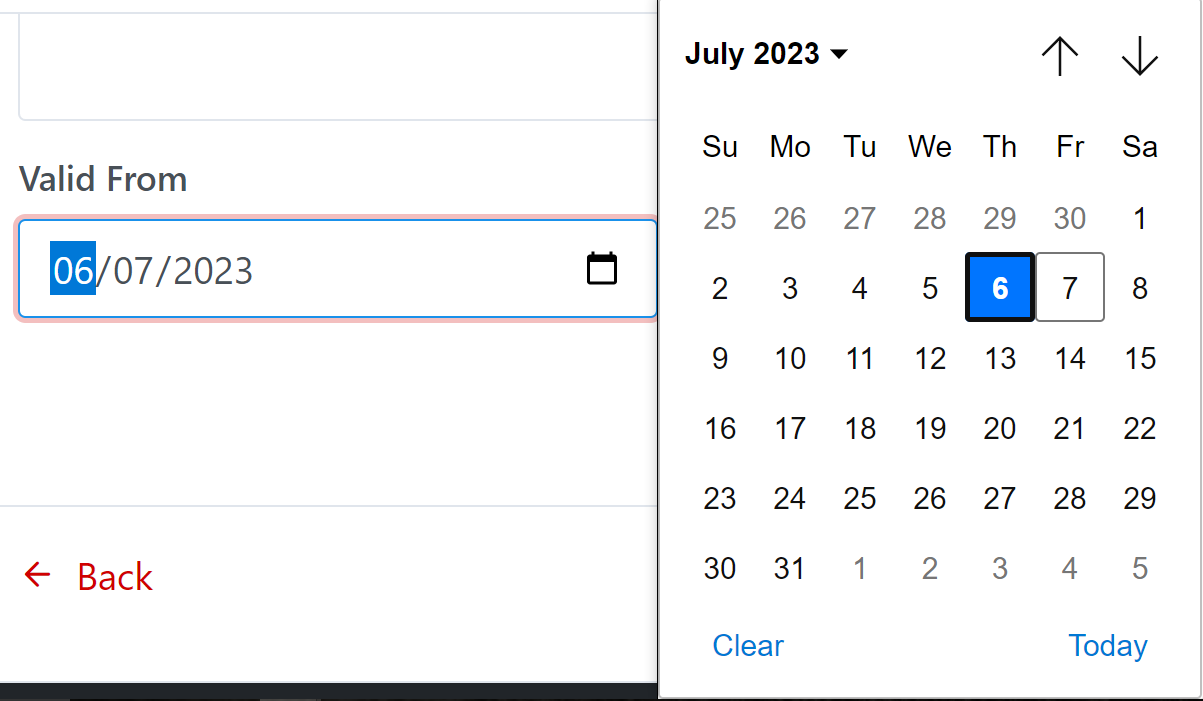
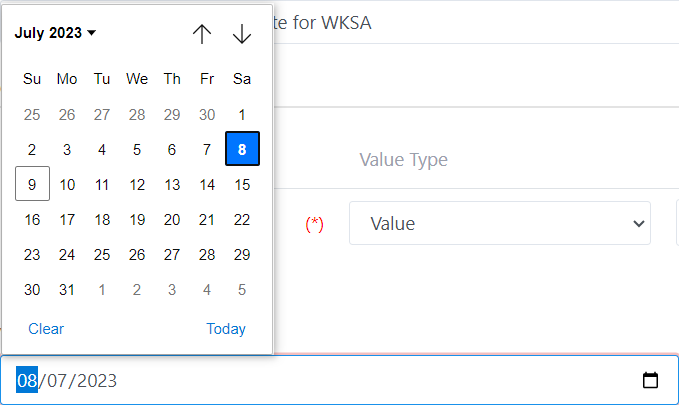
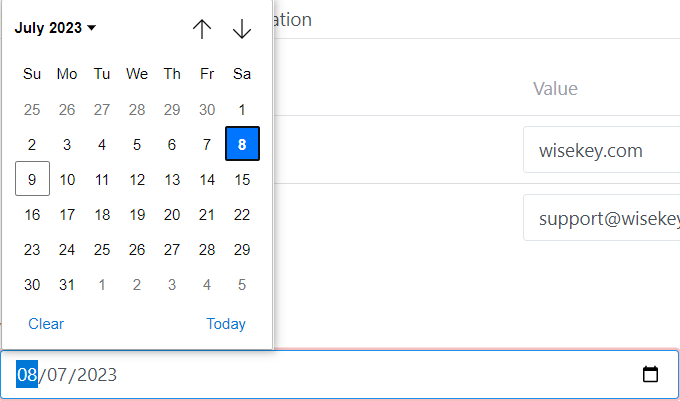
VALID FROM: The system allows user to set the date when certificate is
activated
·
Validity period (days): Set the
validity of certificate. You can set the xxx days or enable unlimited
expiration option depends on the settings of validity in selected certificate
template.
Illustrative example:
Select Tenant, Organization & Certificate Template
Select CSR to be uploaded
Or select Private key and CSR to be generated in the server
Tick the option Generate random passphrase to protect the PFX
file, then user email will be required to receive the passphrase.
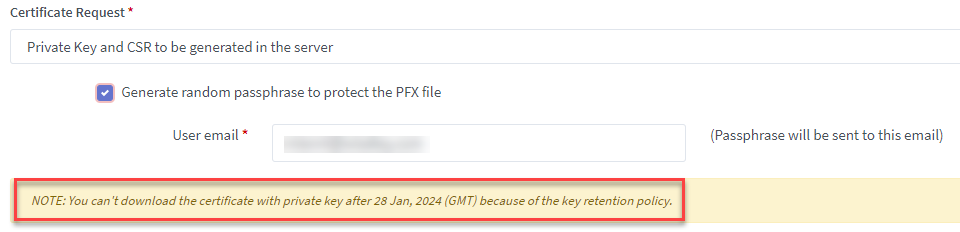
If it’s uncheck the option Generate
random passphrase to protect the PFX file, then user can set a password for
PFX, user email is optional, you can input your email to receive the passphrase
(for recovery purposes) if you want.

Allow user to put VALID FROM of certificate when making a
certificate request. That means certificate will be validated from the date is
set in “VALID FROM” field. By default the NOW date is
set, user can set to any date you want.
Step 4: Click on Save button to generate a new Certificate
Step 5: The New certificate will be listed in Certificate list page
with ACTIVE status

An email about certificate has been issued successfully will be
sent to user email that you entered in certificate request.
2.2.2
Certificate details page
You can open a certificate to view its details and to
download certificate
Note:
·
If the certificate was creating after CSR to be uploaded
certificate request is selected then you can download without private key
·
If Private key and CSR to be generated in the server is
selected then you can download with/without private key

2.2.3
Rekey Certificate
Pre-requisite: The original certificate is active
Step to rekey a certificate:
Step 1: Open a certificate to view detail and scroll down to the end to
find the Rekey button
Step 2: Click on Rekey button, a Re-key Certificate popup window is
displayed. You will be asked to upload new CSR file.

Step 3: Upload a CSR file and you can check/uncheck the option “Require
the original certificate will be revoked automatically after rekey”
Step 4: Click on Rekey button then a new certificate will be issued and
listed in the Certificate list page. If the option “Require the original
certificate will be revoked automatically after rekey” is checked then the
original certificate will be revoked.
2.2.4
Renew Certificate
Pre-requisite: The original certificate is active or expired
Step to renew a certificate:
Step 1: Open a certificate to view detail and scroll down to the end to
find the Renew button
Step 2: Click on Renew button. You will be asked to revoke the
current certificate after renewal or not.
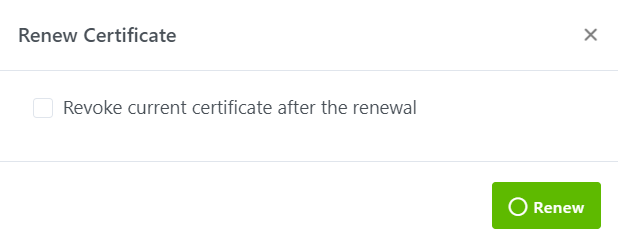
Step 3: You can check/uncheck the option “Revoke the current certificate
after renewal”
Step 4: Click on Renew button then a new certificate will be issued and
listed in the Certificate list page. If option Revoke the current certificate
after renewal is checked, then the original certificate will be revoked.
2.2.5
Revoking Certificates
Step to revoke a certificate:
Step 1: Open a certificate to view detail and scroll down to the end to
find the Revoke button
Step 2: Click on Revoke button, you will see popup window Revocation
information
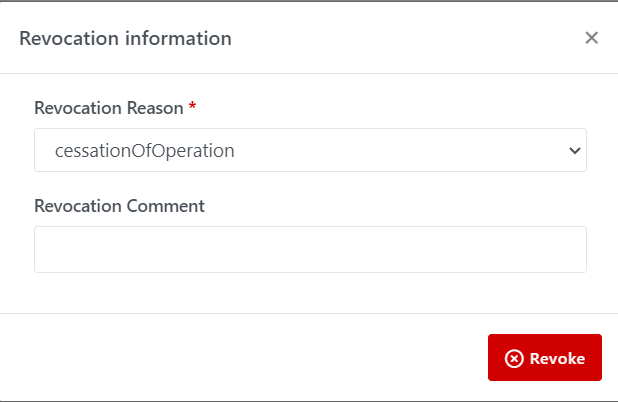
Step 3: Select any Revocation Reason and put, optionally, your Revocation
Comment. Then click on Revoke button to confirm

Step 4: Certificate is revoked successfully, and the status is shown as
Revoked.

2.3
Certification Authority (CA)
Management
Access rules:
·
Admin:
can CRUD CAs
·
Tenant
Admin: can CRUD CAs of that Tenant and can use all shared CAs of system.
·
Auditor:
can only view CAs
·
Other
roles: Cannot access CAs
2.3.1
Creating a new CA
Important Note:
The CMS connects to existing Certification Authorities using PrimeKey EJBCA.
The topics related to the configuration of EJBCA are out of the scope of this
manual. Please contact WISeKey if you need support to build your CA servers.
Here are steps required to create a CA
Step 1:
Open Certificate Management Service from HOME page or from top bar menu then open
Certification Authorities from
left menu: Configurations >
Certification Authorities. Click on the “New” button.
Step 2: Fill
the all required fields (*):
General information:
·
Name: Enter the CA name, it is a “free name”
·
Description: Optional
·
Accessibility: There are 3 options:
o
Global
Access: This option is to share this certificate template to all resources
in the INeS IoT system and only administrator can do this. It will be available
for using to request a certificate by any resource except auditor.
o
Tenant
Access: This option is to assign this certificate template to a certain
tenant. You must select the specific Tenant from the drop-down list when this
option is selected if you access as an administrator. If you access as a Tenant
admin, you only need to enable Tenant Access for yourself.
o
Organization
Access: This option is to assign this certificate template to a specific
organization of the certain tenant. You must select the specific Tenant and
organization of that tenant when this option is selected if you access as an
administrator. If you access as a Tenant admin, you only need to select the
Organization that you want to assign.
CA configuration: CA connection information such CA Name, Server
Name and CA service
·
CA Type*: This version, only support EJBCA and it is displayed by
default.
·
CA Name*: Name of CA in the CA
server
·
Server name*: Name of Server
·
Server Uri: It is an optional field but it becomes a mandatory field if users
want to valid the connection to the CA
Illustrative example:
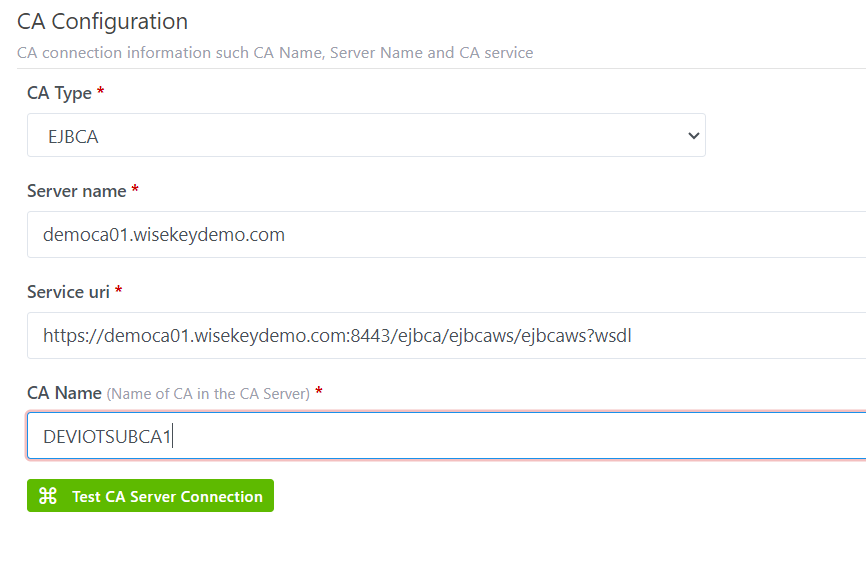
Step 3: Click
on SAVE to create CA. By default, a CA is set “Active” after being created.
Step 4: CA
is created successfully, and will be accessible from the CA list page
2.3.2
CA List page
All CAs will be listed on the List page.
The “Action” option allows to: Clone, Edit, Delete CAs on list page. The “View” icon opens the CA
Details page.

2.3.3
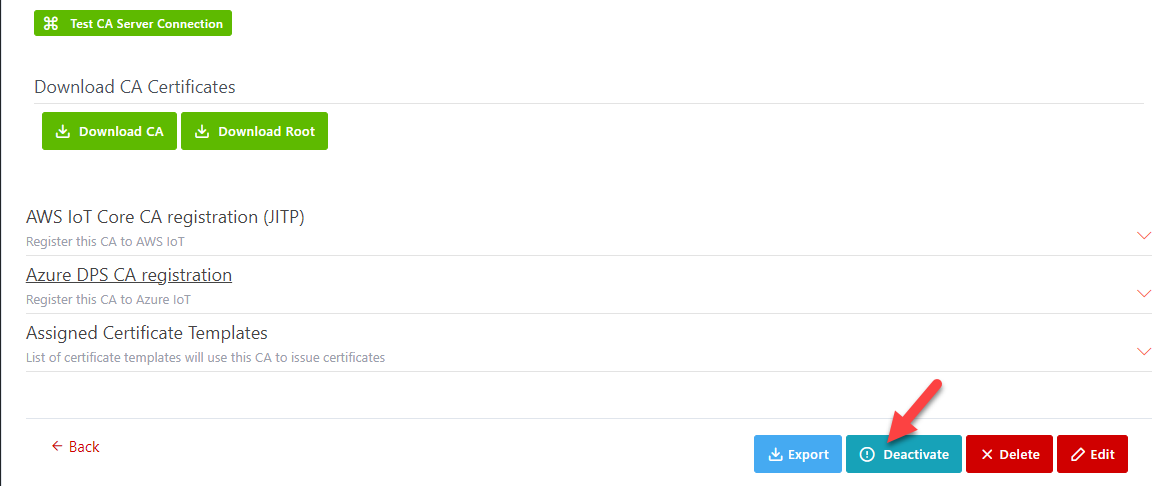
CA Details Page
From the “View” page, it’s possible to manage status, download CA
certificate, Test Connection and view all assigned Certificate Templates which
use this CA to issue certificates, among other operations.

Administrators can:
·
Clone an existing Certification Authorities.
·
Update/Delete an existing Certification Authorities
·
Activate/Deactivate a CA
·
Test Connection of a CA
·
Register the CA to AWS IoT
·
Register the CA to Azure IoT
·
Export CA
Note: Tenant admin can CRUD the CA belongs to that tenant only.
For shared CA, tenant admin can view only (test connection, download and export
CA)
2.3.3.1
Test Connection
Administrators can test connection of CA in: CA creation page,
view CA detail page, and update an existing CA page by clicking on Test Connection button at the end of
page

2.3.3.2
Activate/Deactivate a CA
Administrators can activate or deactivate an existing CA by
opening the details page of the CA, and then click on the Activate or Deactivate
buttons at the end of page.
2.3.4
Edit and
Delete an existing CA
Administrators can update an existing CA by clicking on Edit
button in Action list (CA list
page) or edit when view details a CA. All information of CA can be changed and
updated.
An existing CA can be deleted by administrator by clicking on Delete button in Action list (CA list
page) or delete when view detail a CA
IMPORTANT:
If a specific CA is being shared to all organizations
then when you stop sharing it by assigning it to an organization:
·
All certificate templates and device types belonging to other
tenants/organizations that are associated with it will be deactivated
·
All shared certificate templates and shared device types
associated with it will also stop sharing and belong to new
tenant/organization.
2.3.4.1
Register the CA to AWS IoT
Pre-requisites:
·
CA has been already created
·
Tested connection CA successfully
·
Certificate template already configured in EJBCA
Steps detail to register the CA to AWS IoT
Step 1:
Open an existing CA that you want to register to AWS IoT, for example: DEVIOTSUBCA1
Step 2: Find
AWS IoT CA Registration in CA detail
page and click on it to expand section then you will see Register button
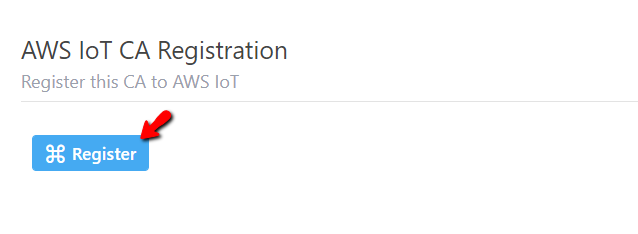
Step 3: Click
on Register button to open Register to AWS IoT page
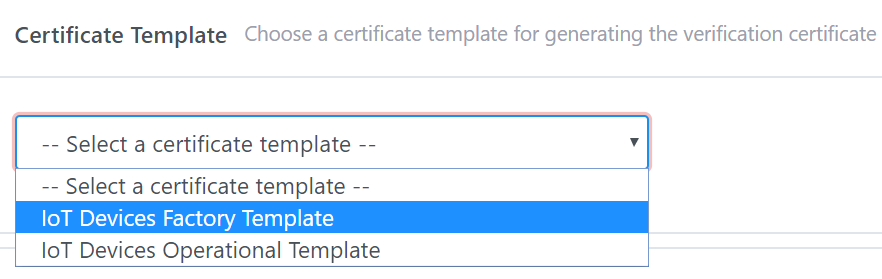
Step 4: Fill
AWS configuration and select the template certificate from list
·
AWS
configuration: include the Access Key ID
and Secret Access Key of your AWS
subscription account that authorize INeS to register the ICA to your AWS IoT
core.

·
Certificate
Template: Select one from list. This template will be used for generating
the verification certificate. Please note that only certificate templates that used
CA DEVIOTSUBCA1 as the issuing CAs
will be listed in the drop-down list. (see how to
create
Error! Reference source not found.)
·
Registration
Options: These are optional parameters that supported by AWS IoT core, user
can select among these options:

Step 5: Click
on Register button and wait for all
steps to be finished.
If
successfully, it will show:

If failed, an error message detail will be shown depending on
which step failed.
Step 6: Reopen the CA details
page, and then expand section AWS
IoT CA Registration to view the details, you will see the notification
message “This CA certificate already
registered to AWS IoT. Click on this button to re-register”.

2.3.4.2
Register CA to Azure IoT
Pre-requisites:
·
CA has been already created
·
Tested connection CA successfully
·
Certificate template is configured in EJBCA
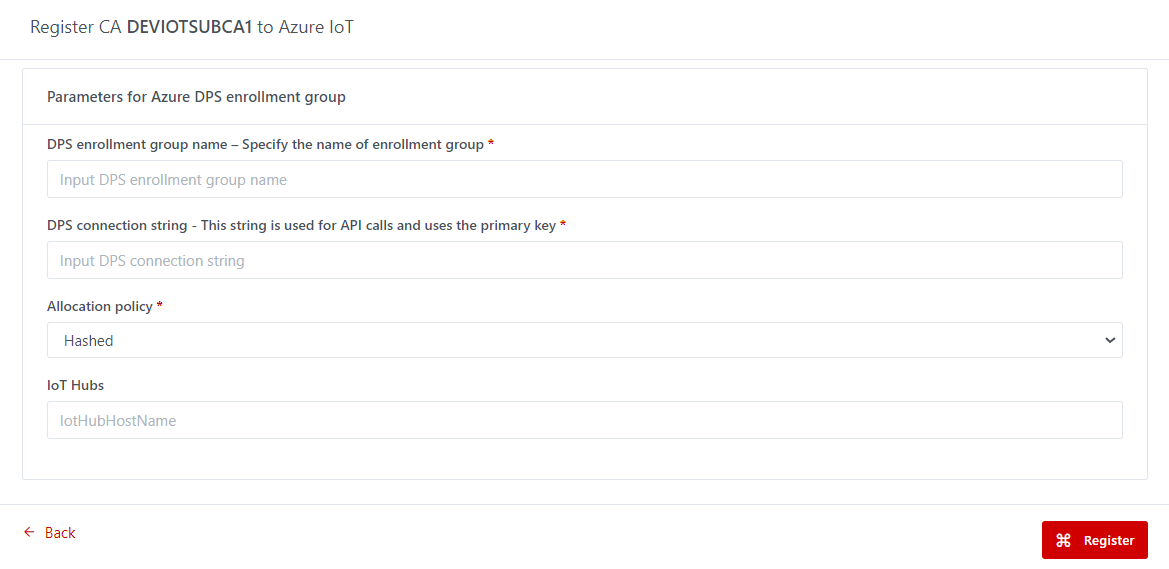
Steps detail to register the CA to Azure IoT
Step 1:
Open an existing CA that you want to register to Azure IoT, for example: DEVIOTSUBCA1
Step 2: Find
Azure DPS CA Registration in CA
detail page and click on it to expand section, then, you will see Register button

Step 3: Click
on Register button to open Register to Azure IoT page
Step 4: Fill
Azure configuration and click Register button to complete register CA.
2.4
Custom Extensions
Access
rules: only Admin can CRUD custom extensions. Other roles cannot access.
This
feature is to allow admin to define OID for SAN or Subject DN which can be used
when creating a certificate template
2.4.1
Create a custom extension
Steps to create a custom extension
Step 1:
Open Certificate Management Service from HOME page or from top bar menu then
open Certification Authorities
from left menu: Configurations >
Certification Authorities. Click on the “Add” button.
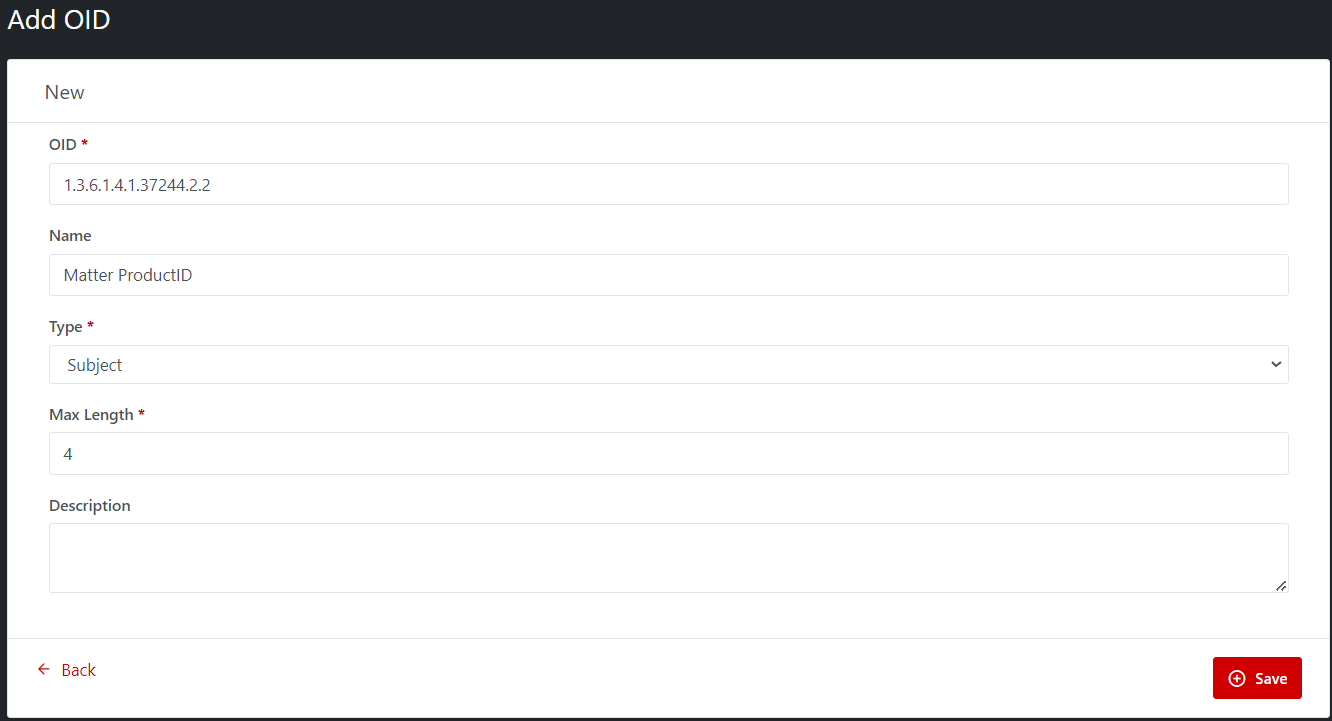
Step 2: Fill
the all required fields (*):
·
OID: Fill the OID value. An OID, or Object Identifier, can be applied
to each CPS (Certificate Practice statement). The OID is an identifier that is
tied to the CPS or, if multiple policies are defined, to each CA's certificate
policy. An object identifier is a string
of decimal numbers that uniquely identifies an object, for example:
1.3.6.1.4.1.37244.2.2. OID must be a string no longer
than 50 characters.
·
Name: Fill the Name of OID
·
Type: There are two types: Subject, and SAN. User can choose only one
option to specify this OID is Subject or SAN.
·
Max Length: Set the max length of this OID.
·
Description: This is optional field.
Illustrative screenshot:
Step
3: Click on SAVE button to complete. By default, an OID is set
“Active” after being created.
Step
4: Custom extension is created successfully, and will be accessible
from the Custom extension list page
2.4.2
Custom Extension List page
All
OIDs will be listed on the Custom extension list page.
The
“Action” option allows to: Clone, Edit custom extensions on list page. The
“View” icon opens the OID Details page.
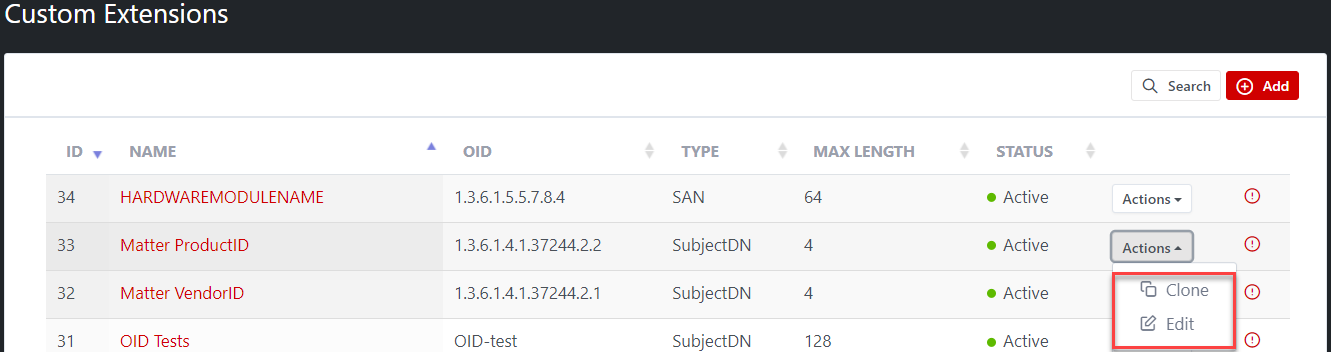
They
will be also listed in Subject field or SAN field (depends on the type of OID
which is selected during OID creation) when creating a certificate template.
2.4.3
Custom Extension Details page
From the “View” page, it’s possible to manage status, Delete,
Edit, among other operations.

Administrators can:
·
Clone an existing custom extension.
·
Update/Delete an existing custom extension
·
Activate/Deactivate a custom extension
2.4.4
Custom extension Edit page
Administrators can update an existing custom extension by clicking
on Edit button in Action list
(Custom Extension list page) or edit when viewing detail
a custom extension. All information of custom extension can be changed and
updated.
2.4.5
Delete a custom extension
An existing custom extension can be deleted by administrator by
clicking on Delete button when
viewing detail a CA
2.5
Batch Generation
This functionality is to generate a batch of certificates at a
time. INeS IoT CMS system supports 2 types of Batch Data Source:
·
Data, CSR and Private Key to be generated in server
·
Data and/or CSR from CSV file
Batch Generation is available for all roles: Admin, Tenant Admin,
Tenant Operator, Organization Operator, and Auditor/Tenant Auditor (view only)
2.5.1
Batch with Data, CSR and
Private Key to be generated in server
2.5.1.1
Create a Batch
Pre-requisite:
·
Organization exists
·
Certificate template is defined and available for the organization
Steps to create a Batch request with Data, CSR, and private key
are generated in Server
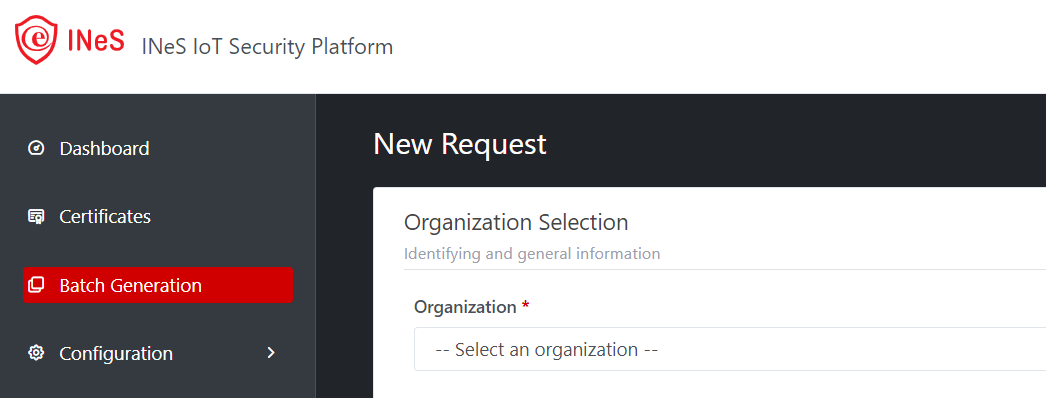
Step 1: Organization selection – It is a
required field
At this step: Admin role must select a certain tenant and an
organization of that tenant from the drop-down list
Illustrative screenshot:

Tenant Admin and Tenant Operation roles have to select the
organization from the drop-down list.
Illustrative screenshot:
Organization
operator role does not need to select the organization because the Batch
creation is for its organization.
Illustrative screenshot:
After select organization, click on NEXT button to continue…
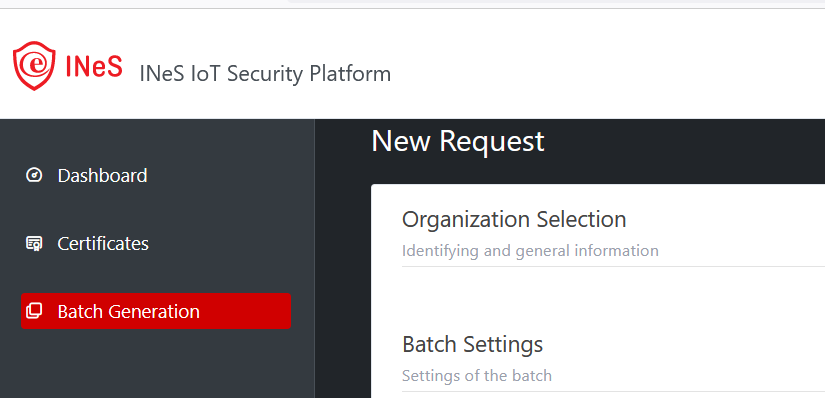
Step 2: Batch Settings
This step allows to select Batch Data Source and CSR Source
Select Batch Data Source as Data, CSR and Private Key to be
generated in server as below:
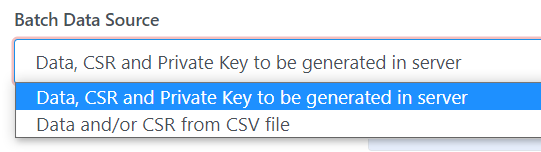
After selecting Batch Data Source with Data, CSR and Private Key
to be generated in server, the page is shown with settings for:
·
Passphrase for key protection*:
Enter the passphrase of certificate. The length of the passphrase must be
between 8 and 50 characters.
·
Number of Certificates*:
Enter the number of Certificate will be generated in a batch
Illustrative screenshot:

Click on Previous to make the changes in previous step or Click on
Next button to continue…
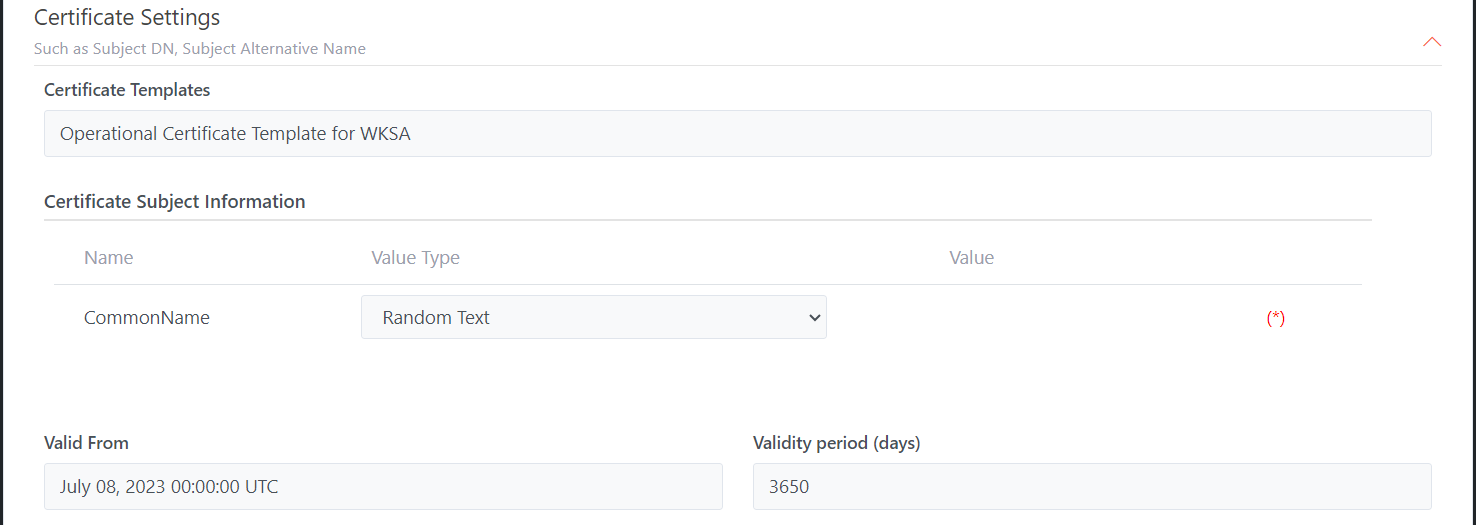
Step 3: Certificate Settings
All certificate templates of selected Organization will be
displayed in drop-down list, you can select one from the list.
Illustrative screenshot:
After selecting the Certificate Template, all Subject DN, Subject
Alternative Name, Valid From, and Validity period (days) of that selected
Certificate template will be displayed in detail as below:
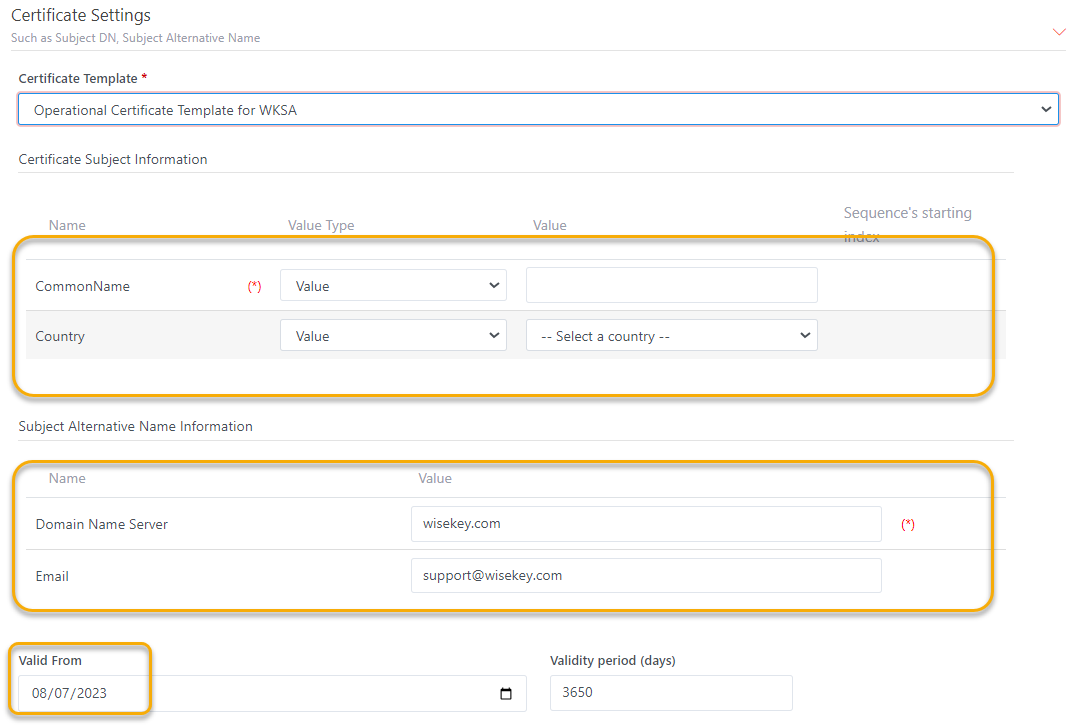
All required fields (*) of Certificate
Subject Information need to be set Value Type and corresponding Value.
Currently INeS IoT CMS system supports the following Value Type for all subject
DN:
·
Value: when Value type is set to Value, you must fill the fixed
value in Value textbox
·
Random Text: System automatically generate a random text
·
Random GUID: System automatically generate a random GUID
·
Prefix + Random Text: Set prefix value in Value Colum and It will
be in the front of Random Text
·
Prefix + Random GUID: Set prefix value in Value Colum and It will
be in the front of Random GUID
·
Random Text + Postfix: Set postfix value in Value Colum and It
will be behind Random Text
·
Random GUID + Postfix: Set postfix value in Value Colum and It
will be behind Random GUID
·
Prefix + Sequence: Set prefix value in Value Colum and Sequence's
starting index. The prefix value will be in front of Sequence
·
Sequence + Postfix: Set postfix value in Value Colum and
Sequence's starting index. The postfix value will be behind Sequence
Note: Country field only has Value Type = Value and user have to
select the Country. Optional field (for example Country) will not be shown in
Batch request detail page.
Illustrative screenshot:

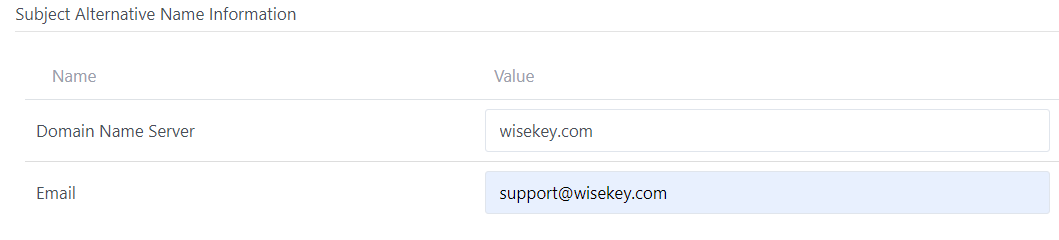
All required fields in Subject Alternative Name Information must
be filled with the value
Illustrative screenshot:
You can set “Valid From” as well as Validity period (days) for all
certificates will be generated in the Batch
Note: max Validity period is set by CA so if you input the
Validity period greater than the max Validity of CA, all certificates will have
the max Validity of CA.
After settings for Certificate, you can click on Previous to make
the changes in previous step or Click on Next button to continue…
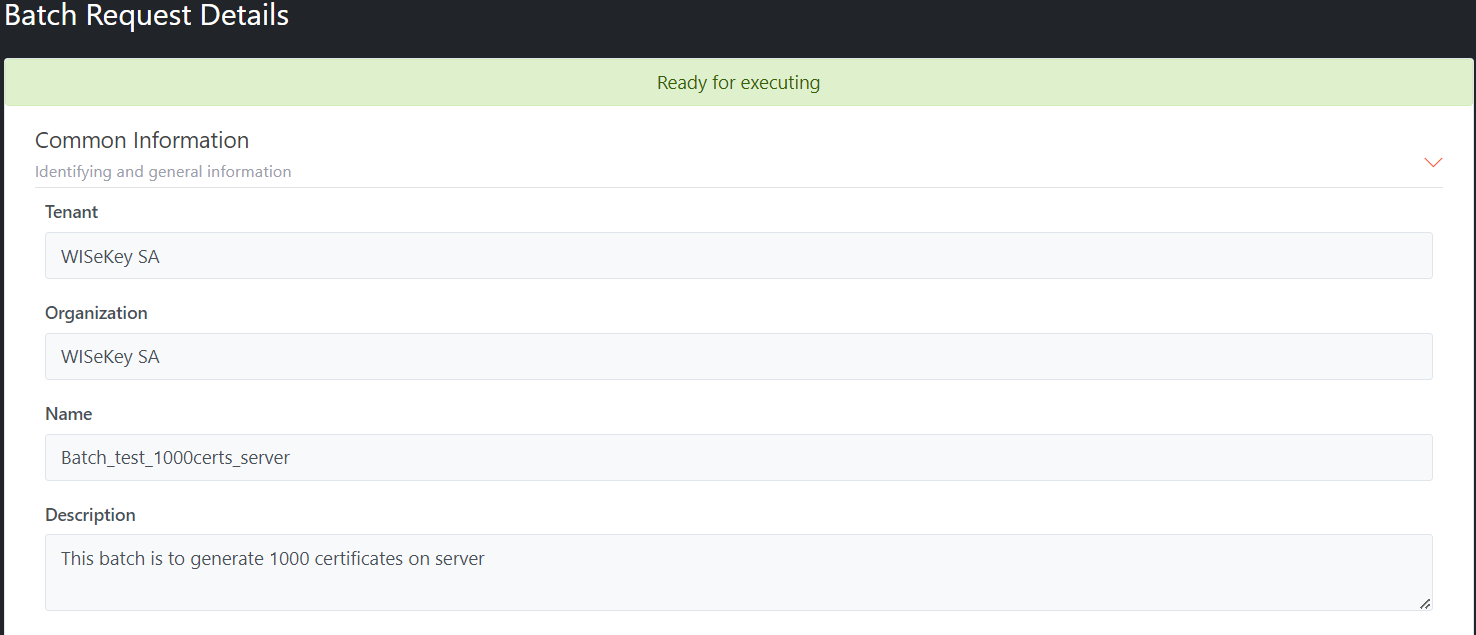
Step 4: Batch Information
This step is to set common information of the batch request
·
Name*: enter the Batch name
·
Description (optional)
·
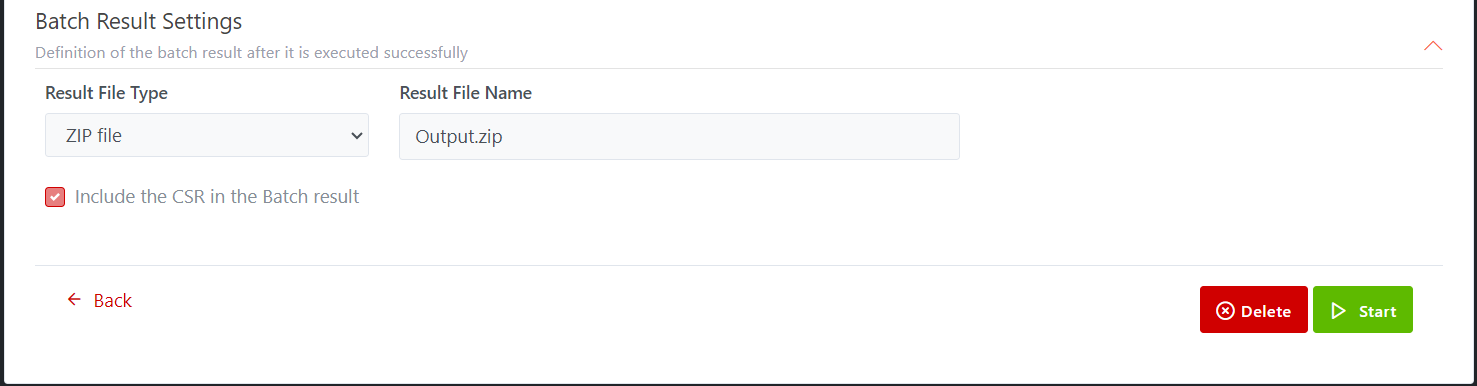
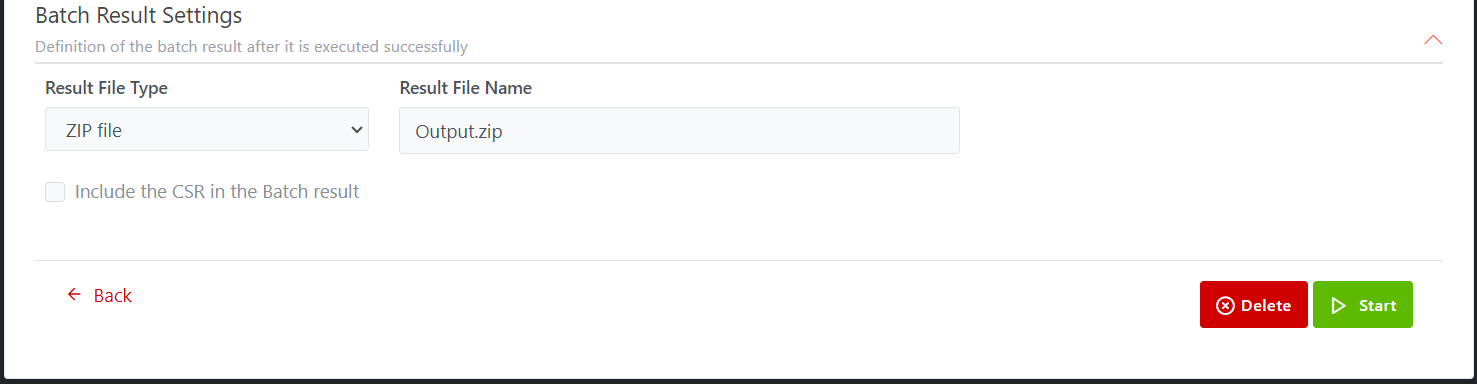
Result File Type: Zip file by default
Illustrative screenshot:

After
fill the Name for the Batch, you can click on Previous to make the changes in
previous step or Click on SAVE button to create the Batch
After
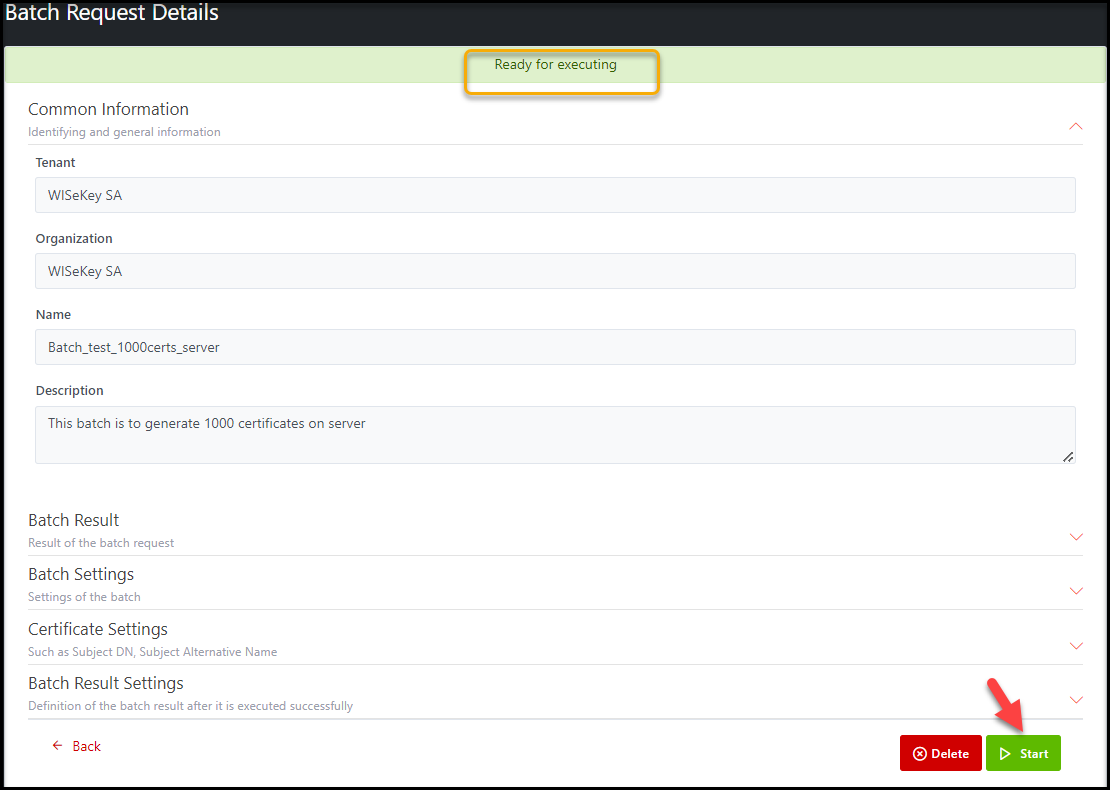
the Batch is created, the status of the Batch is Ready, and you can
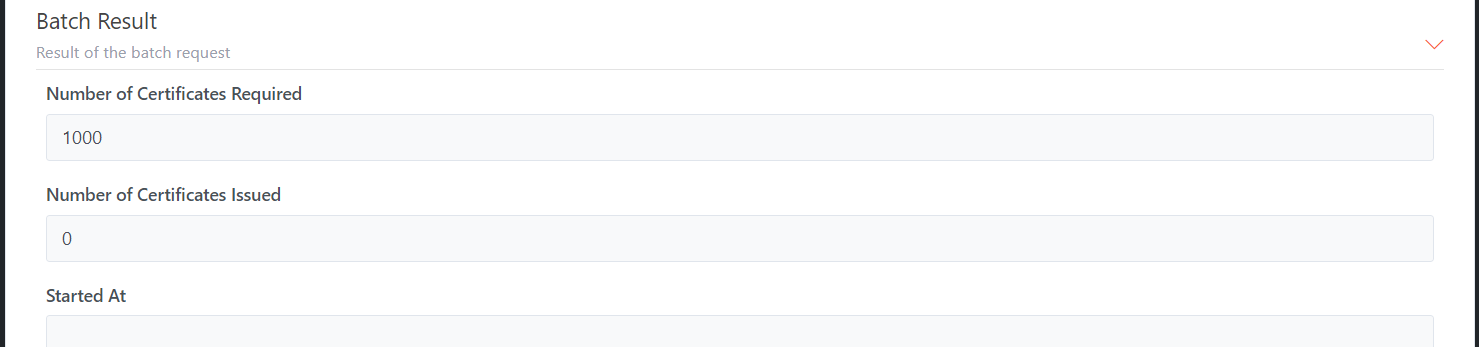
Start a Batch. All Batch details are displayed with Common Information of
Batch, Batch Settings, Certificate Settings, and Batch Results Settings so that
you can check carefully before starting the Batch
Illustrative
screenshot:
Common Information:
Batch Result
Batch Settings

Certificate Settings
Batch Result Settings
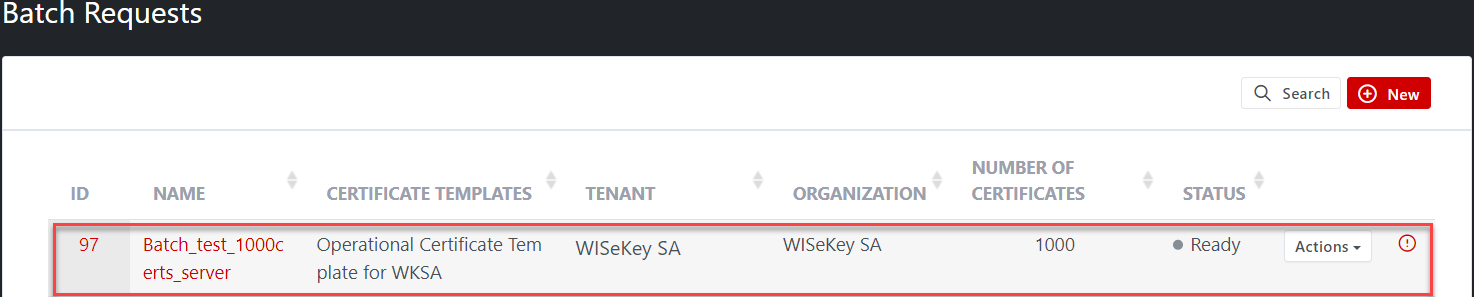
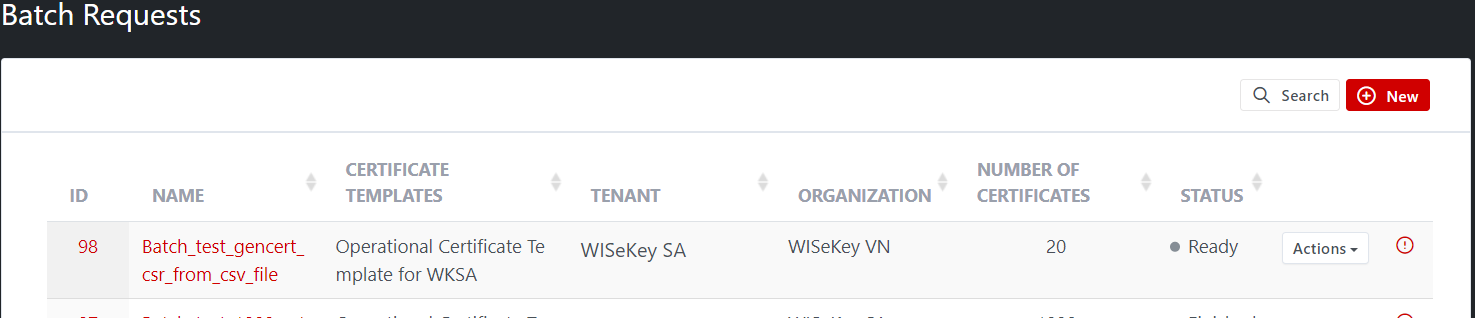
A new batch request is also listed on the Batch Requests list page
2.5.1.2
Delete a Batch
IMPORTANT: When Batch is in READY status, user can START or DELETE the
batch. Other Batch status like: Processing, Finished, Error…User can view batch
only.
Note: This version, IoT CMS system does not support Edit
functionality for Batch
2.5.1.3
Execute a Batch
Pre-requisite: Batch is created and is in READY status
Steps to run a Batch:
Step 1: Open the READY Batch from the Batch Requests list page
Step 2: On Batch Request Details page, find the Start button and click on
it
Illustrative screenshot:
After
clicking on Start button, Batch status is changed to Pending for
validating the request, then changing from Pending to Validating (Request
is being verified), if validating is successfully, the status is changed to Validated
(pending for executing the request), then request is executing, the status is
changed to Processing. When processing is completed successfully, the
status is updated to Finished, otherwise, the status is updated to Error.
Start a Batch successfully:
READY PENDING
VALIDATING
VALIDATED
PROCESSING
FINISHED
Start a Batch but not completed:
READY PENDING
VALIDATING
VALIDATED
PROCESSING
ERROR
Note: Should refresh page to update latest status of the Batch
Illustrative screenshot:

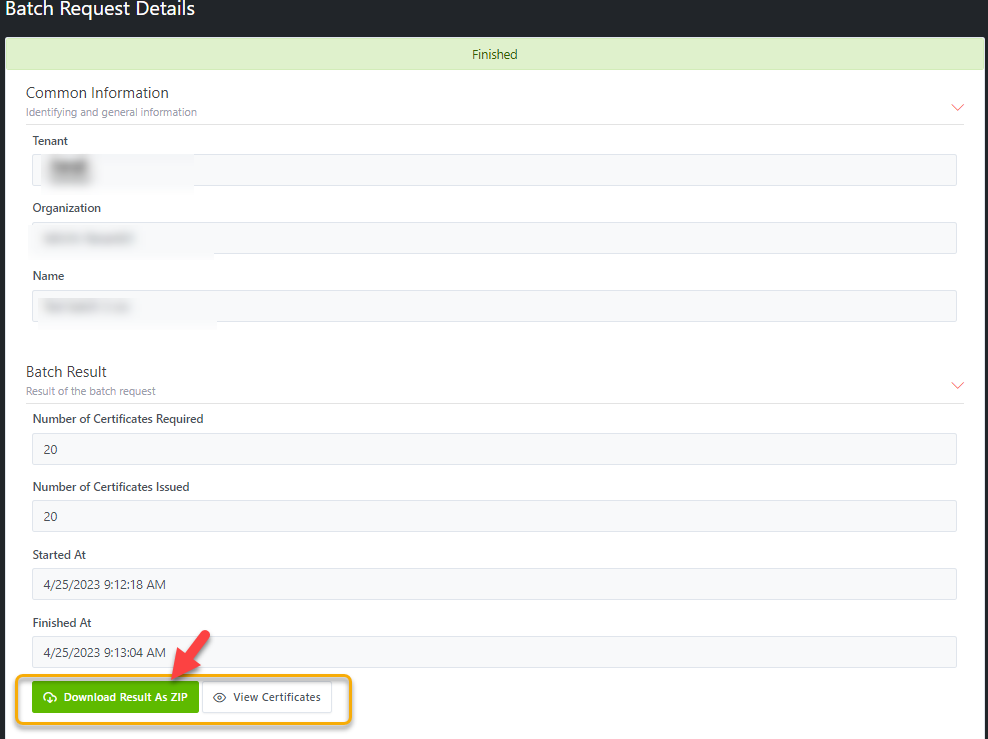
When the Batch processing is finished, then you can download the
results.
2.5.1.4
Download the Batch result
Prerequisite: The processing of a Batch has been finished.
If the Batch processing is completed successfully, its status will
turn to Finished. You can download the result as a Zip file and can view
all Certificates of the Batch


The
Zip file (Output.zip) will include Certificates and CSRs which are
generated in the Server
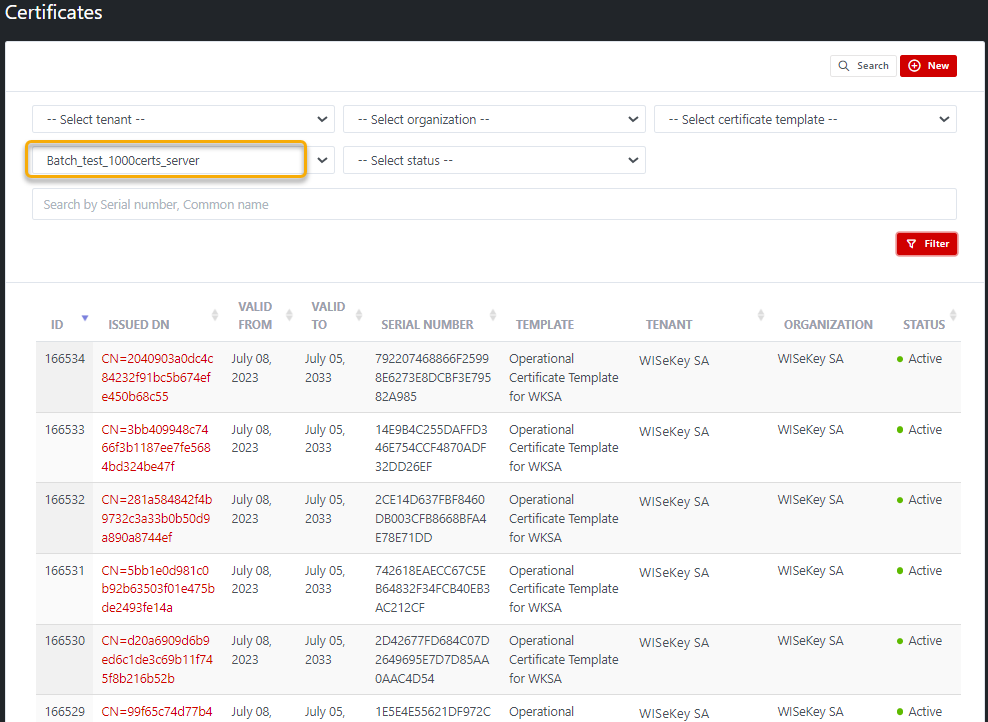
Click
on View Certificates, the Certificates page will show all certificates
of that batch (filter by Batch Generation and batch name)
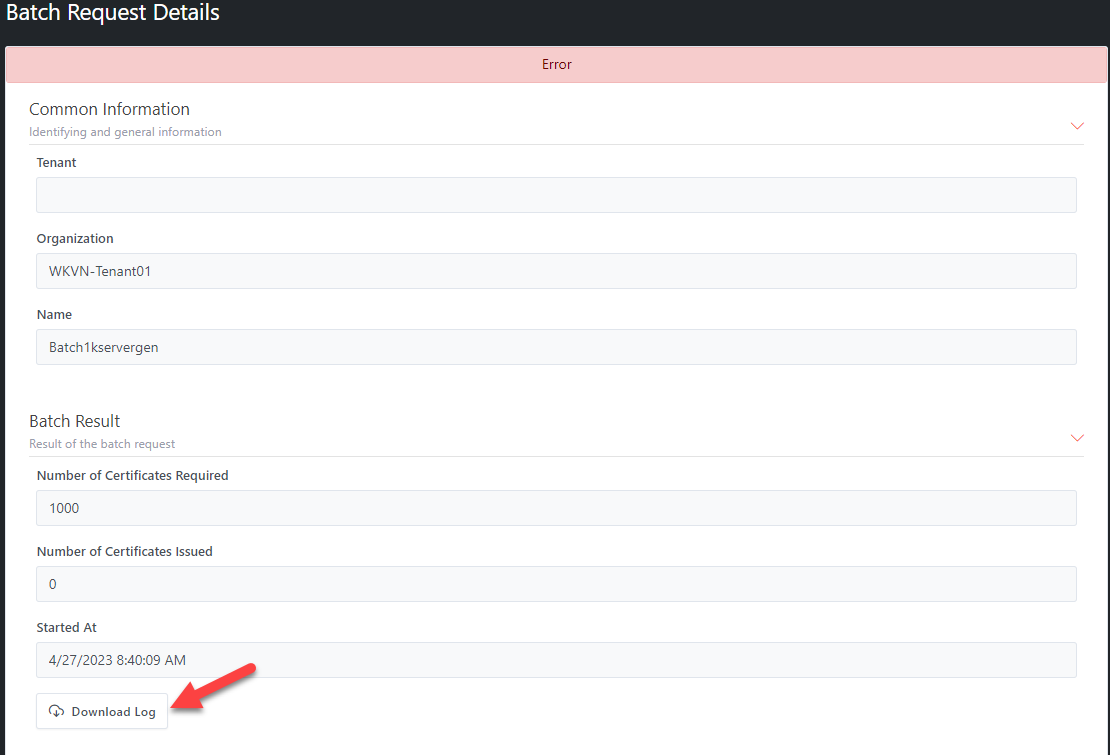
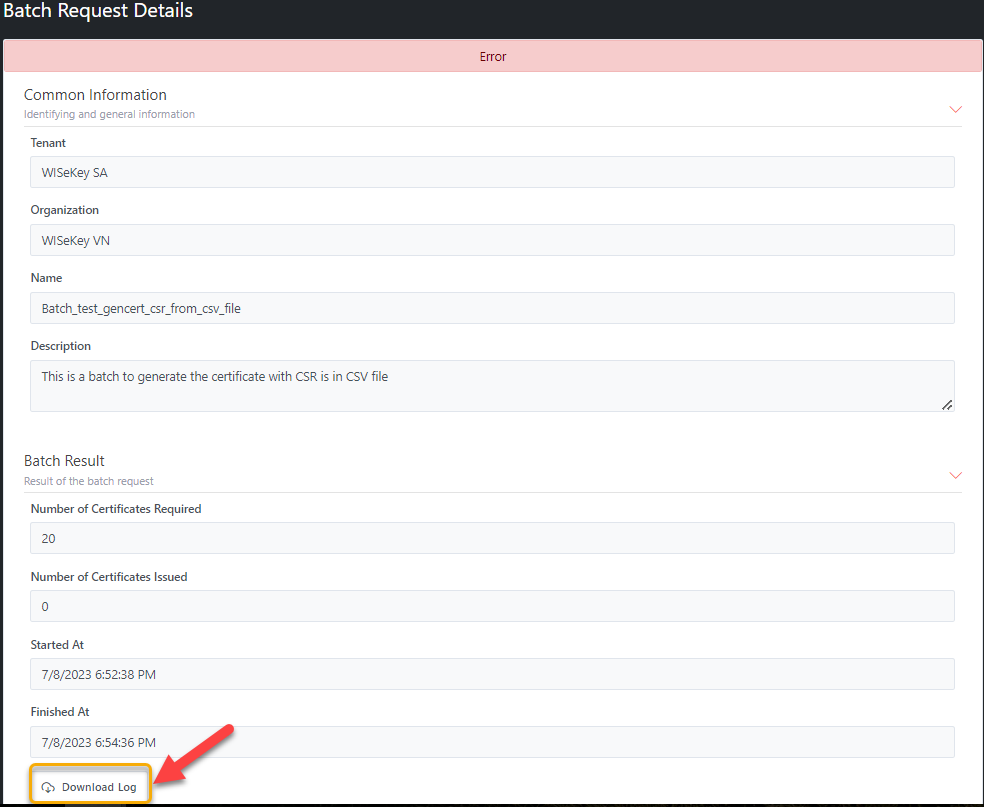
If the Batch processing is NOT COMPLETED, its status will turn to Error. You can download the log file by clicking
on Download Log button.

2.5.2
Batch with Data and/or CSR
from CSV file
2.5.2.1
Create a Batch
Pre-requisite:
·
Organization is existing
·
Certificate template is required
·
CSV file is required and satisfy the following rules:
o
The file must be in CSV format (as a delimited text file: Comma,
semicolon, tab) with column headers in the first row. Another format like xls,
xlsx… will be refused
o
The column name is matched with subject name (distinguish
lowercase and uppercase)
o
Required columns (Required subject): for example, Common Name,
Base64CSR must be in the CSV file.
o
Optional columns (Optional subject): for example, Country – It
is
not required. If
it is in the CSV file, then data of Country column will be used in the Batch to
generate certificate. Otherwise, Country will not be used.
o
The CSV file contains only columns whose headers match the
required and optional columns above. Any column with a different header is not
accepted.
o
It
is recommended that the size of CSV file should be under 15MB to execute a
batch effectively
Steps to create a Batch request with Data and/or CSR from CSV file
Step 1: Organization selection – It is a
required field
At this step: Admin role must select a certain tenant and an
organization of that tenant from the drop-down list
Illustrative screenshot:
Tenant
Admin and Tenant Operation roles have to select the organization from the
drop-down list.
Illustrative screenshot:
Organization
operator role does not need to select the organization because the Batch
creation is for its organization.
Illustrative screenshot:
After select organization, click on NEXT button to continue…
Step 2: Batch Settings
This step allows to select Batch Data Source and CSR Source
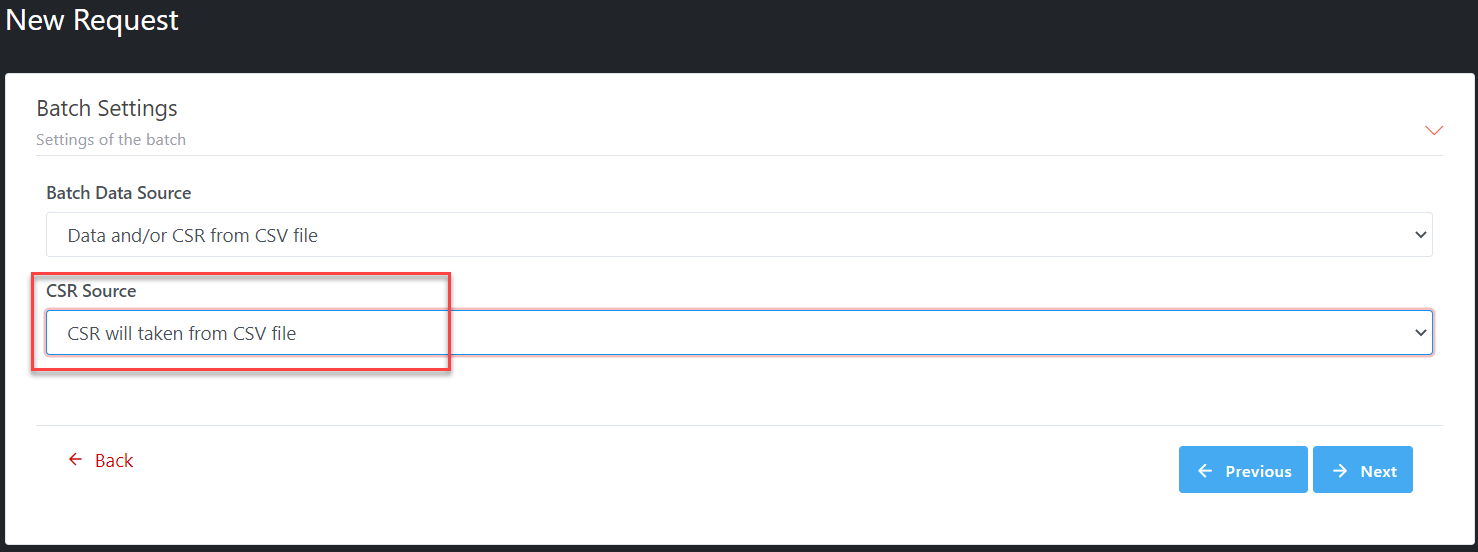
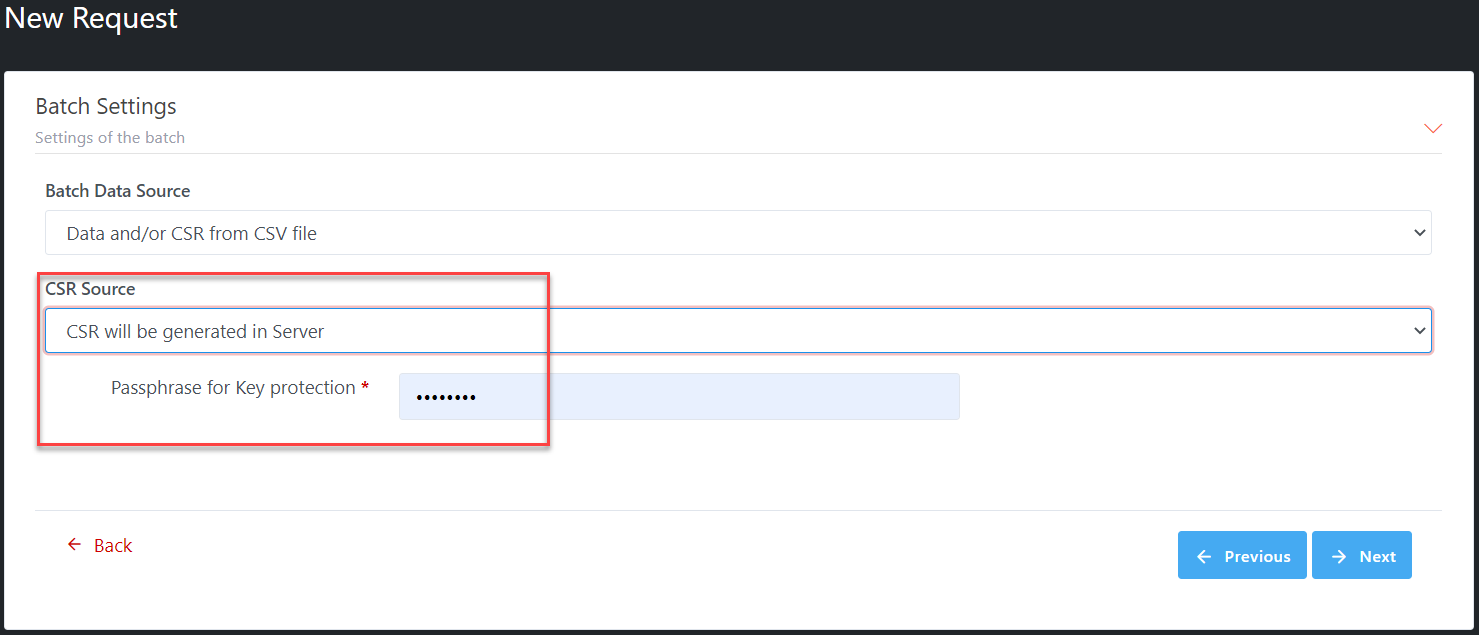
Select Batch Data Source as Data and/or CSR from CSV file
as below:

Then
select CSR Source, there are 2 options for CSR source after selecting Data
and/or CSR from CSV file for Batch Data Source:
·
CSR
will be taken from CSV file: If select this option, CSR is required in the CSV file with
column headers Base64CSR
·
CSR
will be generated in Server: if select this option, CSR is NOT required in CSV file. CSR will
be generated in Server; you must set Passphrase for key protection. All CSRs
will be included in Zip file results after batch is processed successfully.
Illustrative screenshot: option “CSR will be taken from CSV file”
is selected.
Illustrative screenshot: option “CSR will be generated in Server”
is selected.
Click on Previous to make the changes in previous step or Click on
Next button to continue…
Step 3: Certificate Settings
All certificate templates of selected Organization will be
displayed in the drop-down list, you can select one from the list.
Illustrative screenshot:
After
selecting the Certificate Template, all Subject DN, Subject Alternative Name,
Valid From, and Validity period (days) of that selected certificate template
will be displayed in detail as below:
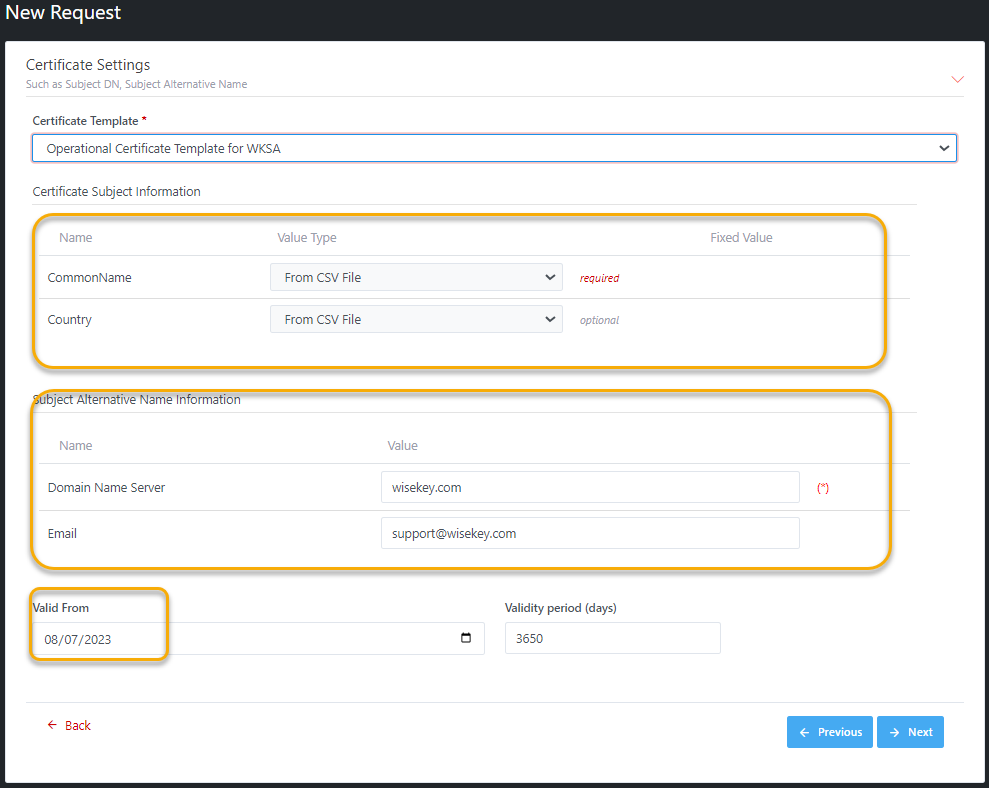
All
fields of Certificate Subject Information are mapped from CSV file, in
which the required fields must be in the CSV file. Optional field can be in or
not in the CSV file as it is not required.
Illustrative
screenshot: Common Name is required in the CSV file,
Country field is optional.
All required fields in Subject Alternative Name Information
must be filled with the value
Note: Optional field will not be shown in Batch request detail
page.
Illustrative screenshot:
You can set “Valid From” as well as Validity period (days) for all
certificates will be generated in the Batch
Note:
max Validity period is set by CA so if you input the Validity period greater
than the max Validity of CA, all certificates will have the max Validity of CA.
After settings for Certificate, you can click on Previous to make
the changes in previous step or Click on Next button to continue…
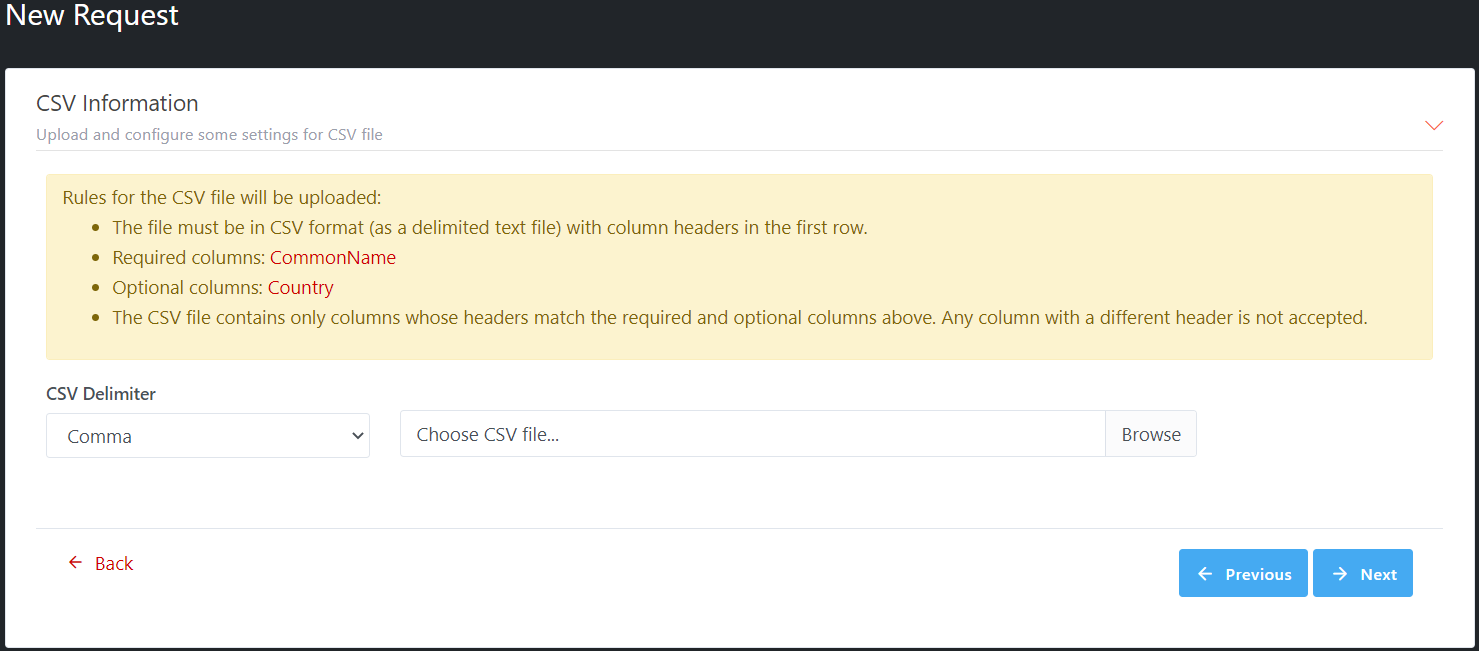
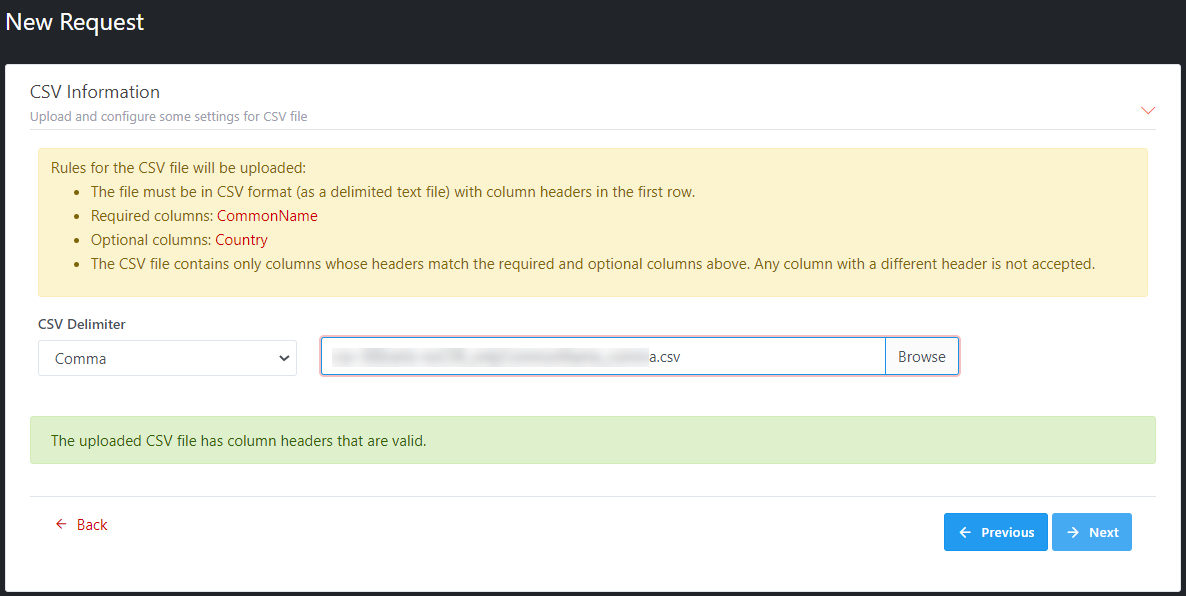
Step 4: CSV Information
This step is to upload and configure some settings for the CSV
file
If at step 2: option “CSR will be taken from CSV file” for
CSR Source, rules for the CSV file will be uploaded and will be shown as
follow:
·
The file must be in CSV format (as a delimited text file) with
column headers in the first row.
·
Required columns: Common Name, Base64CSR
·
Optional columns: Country
·
The CSV file contains only columns whose headers match the
required and optional columns above. Any column with a different header is not
accepted.
Illustrative screenshot:

If at step 2: option “CSR will be generated in Server” for
CSR Source, rules for the CSV file will be uploaded will be shown as follow:
·
The file must be in CSV format (as a delimited text file) with
column headers in the first row.
·
Required columns: Common Name
·
Optional columns: Country
·
The CSV file contains only columns whose headers match the
required and optional columns above. Any column with a different header is not
accepted.
Illustrative screenshot:
Upload
the CSV file and click Next to continue (you can click on Previous to make the
changes in previous steps).
NOTE:
Validating uploaded the CSV file is running in the background and if the CSV
file size is small, the result can be shown immediately in the CSV Information
screen. When a CSV file is VALID, the Next button is available to go to next
step
Illustrative screenshot: Valid CSV file
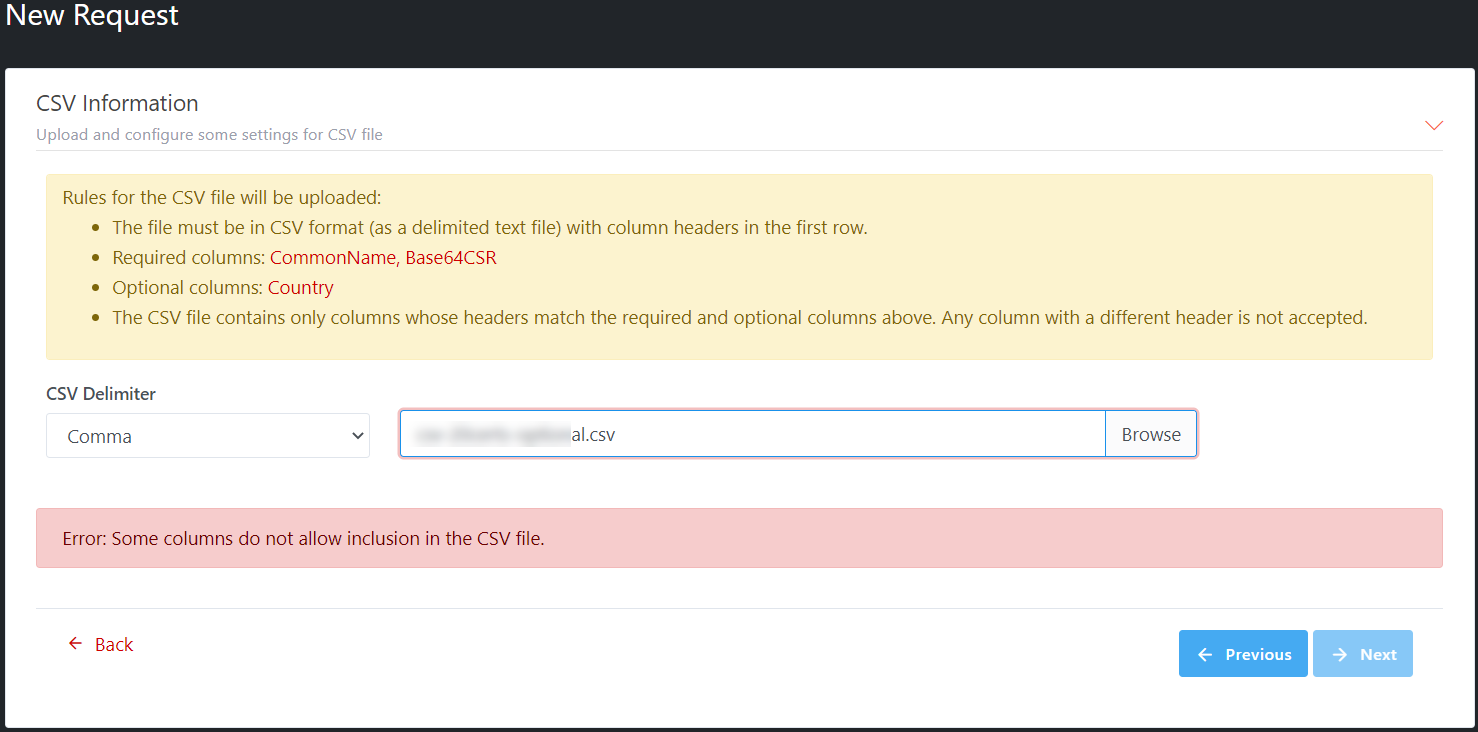
Illustrative
screenshot: Invalid CSV file, there are various warning messages depend on the
content in the CSV file. This is an example: there are some columns are not
allowed in the CSV file
Illustrative
screenshot: the CSR column is not allowed in the CSV file in case CSR will be
generated in Server

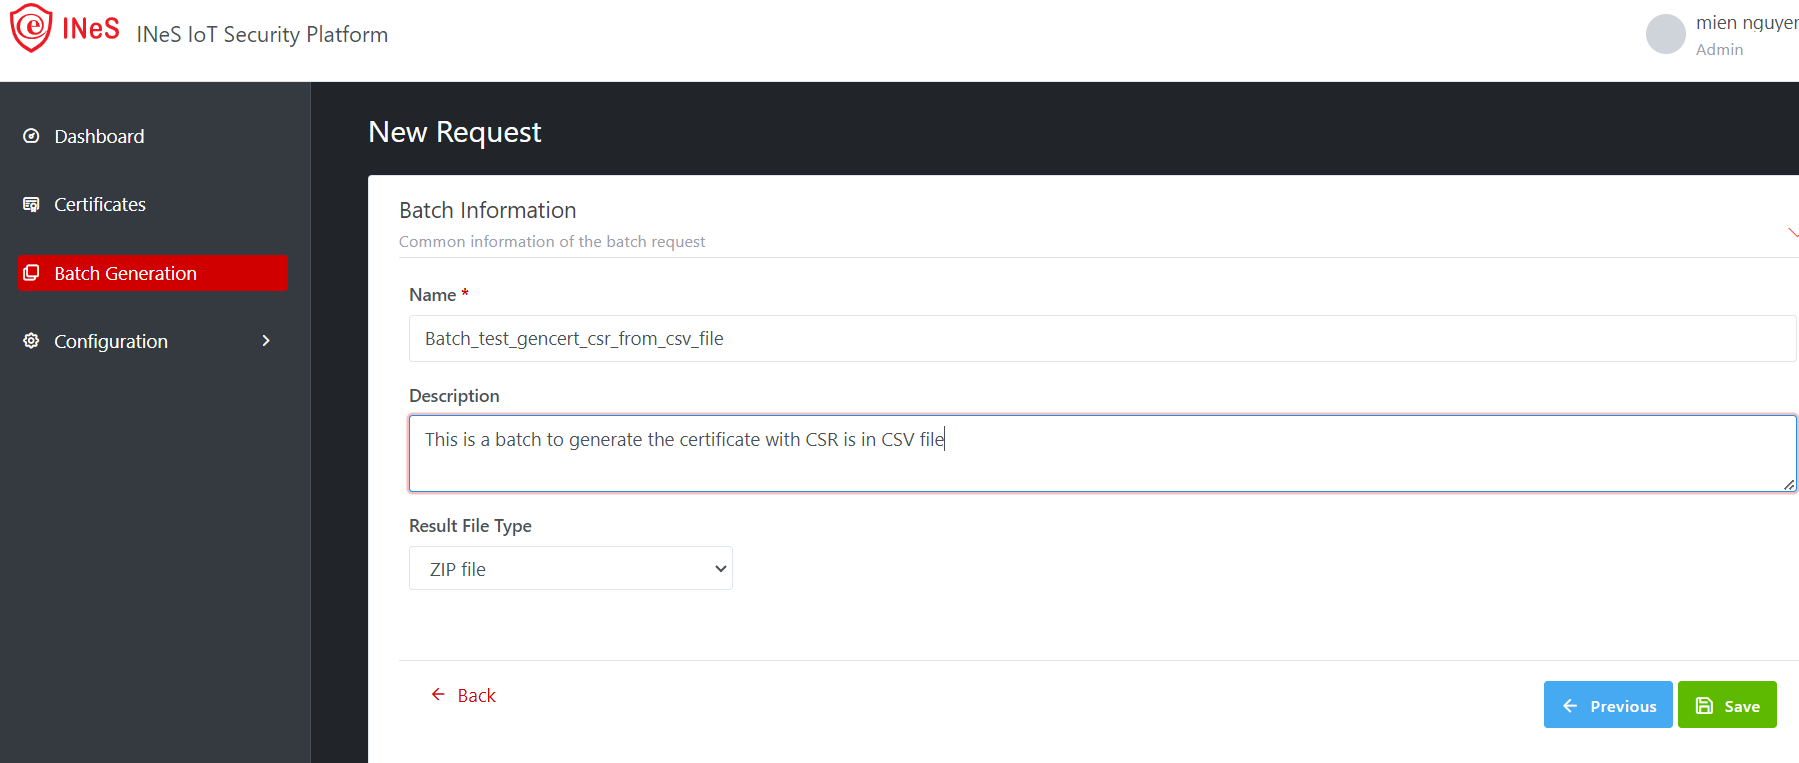
Step 5: Batch Information
This step is to set common information of the batch request
·
Name*: enter the Batch name
·
Description (optional)
·
Result File Type: Zip file by default
Illustrative screenshot:
After
fill the Name for the Batch, you can click on Previous to make the changes in
previous step or Click on SAVE button to create the Batch.
Batch
is created successfully with VALID CSV file only.
After
Batch is created, the status of Batch is Ready, and you can Start a
Batch. All Batch details are displayed with Common Information of Batch, Batch
Settings, Certificate Settings, and Batch Results Settings so that you can
check carefully before starting the Batch
Illustrative
screenshot:
Common Information:
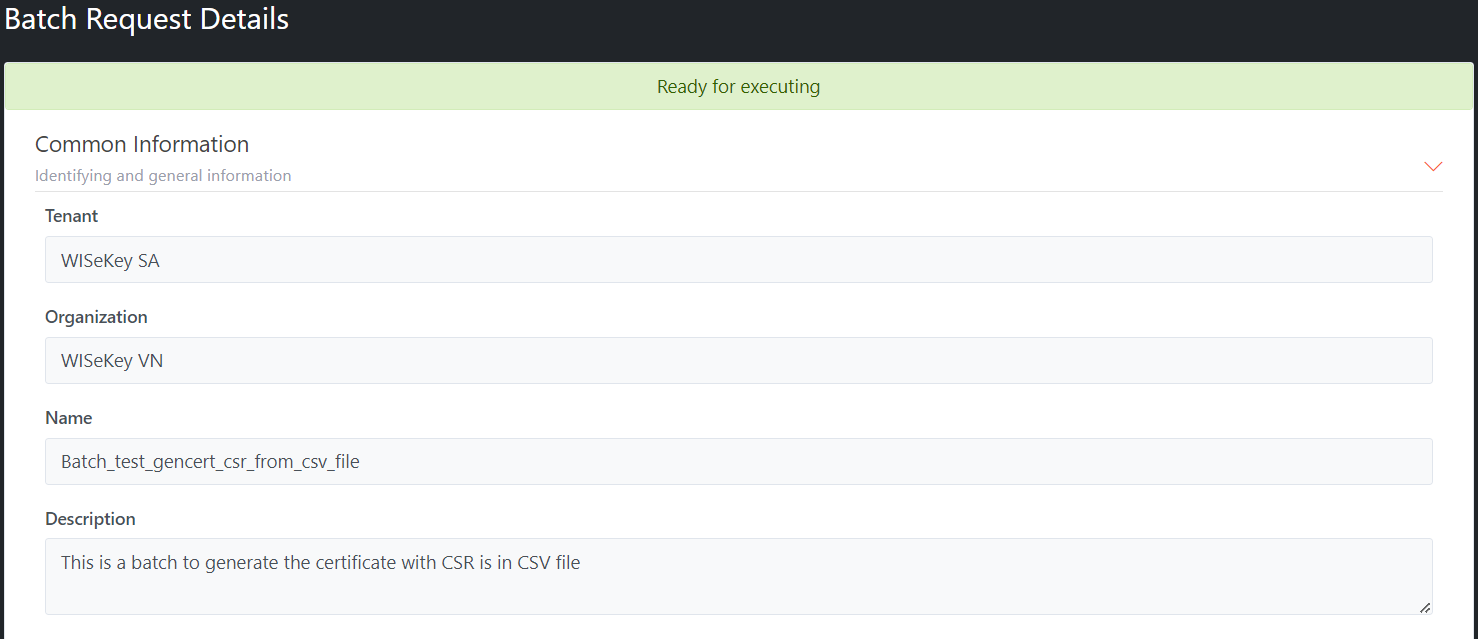
Batch Result
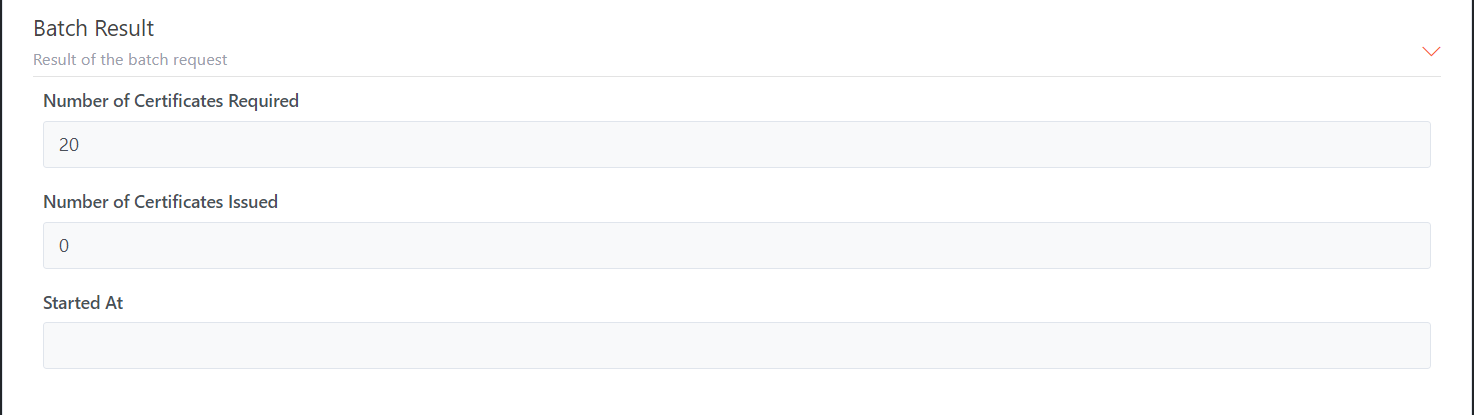
Batch Settings

Certificate Settings

Batch Result Settings
A new batch request is also listed on the Batch Requests list page
2.5.2.2
Delete a Batch
IMPORTANT:
When Batch is in READY status, user can START or DELETE the batch. Other Batch
status like Pending, Validating Processing, Finished, Error…User can view batch
only.
Note:
This version, we do not support Edit functionality for Batch
2.5.2.3
Execute a Batch
Pre-requisite: Batch is created and is in READY status
Steps to run a Batch:
Step 1: Open the READY Batch from the Batch Requests list page
Step 2: On Batch Request Details page, find the Start button and click on
it
Illustrative screenshot:

After
clicking on Start button, Batch status is changed to Pending for
validating the request, then changing from Pending to Validating (Request
is being verified), if validating is successfully, the status is changed to Validated
(pending for executing the request), then request is executing, the status is
changed to Processing. When processing is completed successfully, the
status is updated to Finished, otherwise, the status is updated to Error.
Start a Batch successfully:
READY PENDING
VALIDATING
VALIDATED
PROCESSING
FINISHED
Start a Batch but not completed:
READY PENDING
VALIDATING
VALIDATED
PROCESSING
ERROR
Note: Should refresh page to see the latest status of the Batch
Illustrative screenshot:
2.5.2.4
Download the Batch result
Prerequisite: The processing of a Batch has been finished.
If
the Batch processing is completed successfully, its status is Finished.
You can download the result as a Zip file and can view Certificates of the
Batch

The Zip file (Output.zip) will include all Certificates
only if CSR is included in the CSV file.
The Zip file (Output.zip) will include all Certificates and CSRs
if the CSR is generated in Server
Click on View Certificates, the Certificates page will show
all certificates of that batch (filter by Batch Generation and batch name)

If the Batch processing is NOT COMPLETED, its status will turn to Error. You can download the log file by clicking
on Download Log button.

2.6
EST Server
This
functionality is to create an EST Server for CMS. EST is a standard protocol to
obtain and manage certificates, and widely supported by the IoT industry.
The
EST Server functionality available in the CMS Module is intended to be used by
applications (i.e. factory applications or gateways)
that need to obtain certificates to be embedded later in IoT Devices.
INeS
also provides a separate EST functionality integrated in the DPS Module, which
is intended to be used by the IoT devices, which will authenticate themselves
with a “Factory Certificate” (or a unique password) to obtain a corresponding “Operational
Certificate”.
Therefore, a possible use case for EST in INeS could be:
·
EST in CMS is used by a provisioning application to obtain
“Factory Certificates” and embed those in the IoT Devices
·
EST in DPS is used by the IoT Device, to obtain an “Operational
Certificate”
There are two authentication methods to connect EST Sever:
·
Enable HTTP Basic Authentication: The client uses the API
credential for authentication to request new operational certificates or
re-enroll (renew) certificates. The API credential can be a pair of App ID and
App Key working as the user name and password.
·
Enable TLS Client Authentication: The client uses the TLS Client
Certificate for authentication to request new operational certificates or
re-enroll (renew) certificates.
The EST Server for CMS can only be configured by Admin and Tenant
Admin roles. Auditor can view only.
2.6.1
Create
an EST Server
Pre-requisite:
·
Only Admin and Tenant Admin role can create EST Server.
·
Tenant/Organization exists
·
Certificate template is defined and available for the organization
Steps to create an EST Server:
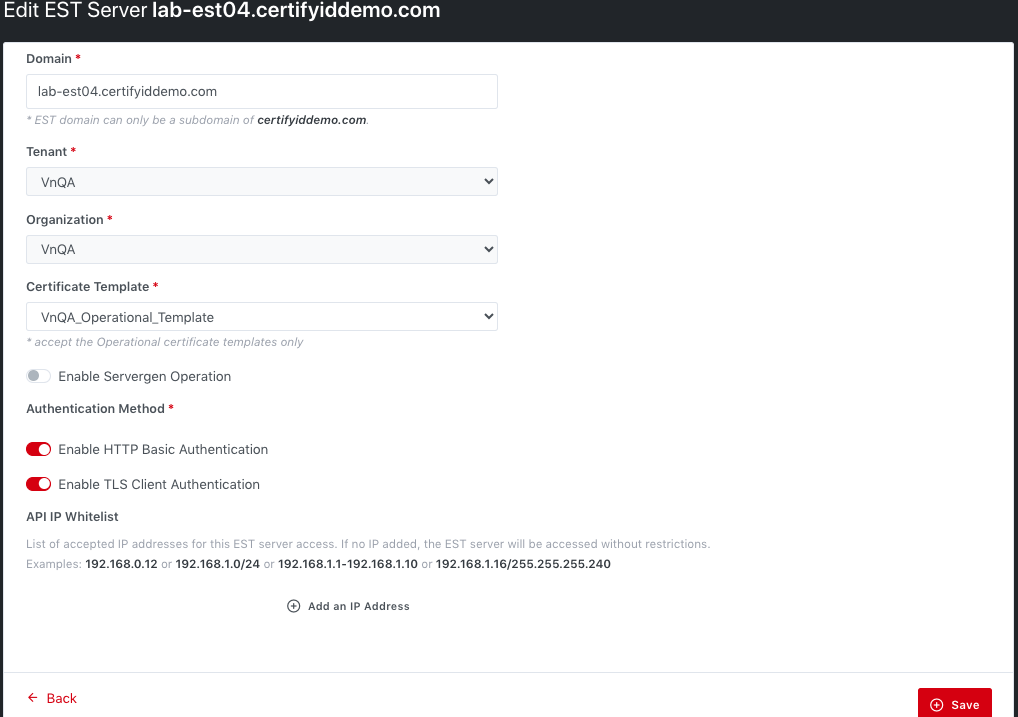
Step 1: Navigate
to Configuration > EST Server on left-menu to view the EST Server list:

Step 2: Click
on “New” button, and fill the all required
fields, marked with the “*” sign:
·
Domain – It is a required field
Admin
role must fill an EST domain name. EST domain
can only be a subdomain of certifyiddev.com (on INeS IoT Dev); can be
a subdomain of certifyiddemo.com (on INeS IoT Demo); can be a
subdomain of certifyid.com (on PRODUCTION environment)
You can enter a domain name without port (lab-est054.certifyiddemo.com) or with port (lab-est03.certifyiddemo.com:443).
Illustrative screenshot:

·
Tenant selection and Organization selection
– It is a required field
o
Admin role must select a certain tenant and an organization of
that tenant from the drop-down list
Illustrative screenshot:

o
Tenant Admin role has to select the organization from the
drop-down list.
Illustrative screenshot:

·
Certificate Templates selection – It is a
required field
All
certificate templates of selected Organization will be displayed in drop-down list;
you can select one from the list.
Illustrative screenshot:

·
Enable Servergen Operation: It allows the
key to be generated by server
o
By default it is ON (enable) mode.
o
You can select OFF (disable) mode.
·
Authentication Method option – It is a
required field
At least one
authentication method must be enabled, you can select both methods:
o
Enable
HTTP Basic Authentication
o
Enable
TLS Clients Authentication
Illustrative screenshot:

·
API
IP Whitelist - It is an optional field
List
of accepted IP addresses for this EST server access.
If no IP added. This EST server will be accessed without
restrictions.
Illustrative screenshot:

Step 3: Click on SAVE button to create the EST Server.
After
EST Server is created, the status of EST Server is Active. All EST Server details are displayed.
Illustrative screenshot:

A new EST Server is also listed on the EST
Server list page
·
The same EST Server can be used for all organizations in that
Tenant. It cannot be used for other Tenant.
·
Each Certificate template in INeS IOT system only works for either
RSA or ECC key type. Therefore, each EST Server associated with only one
Certificate template will issue certificate using either RSA or ECC key type.
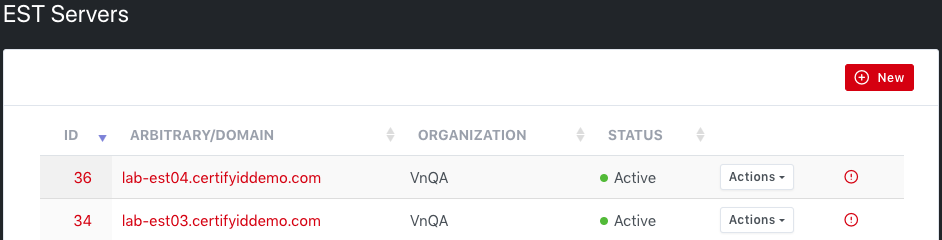
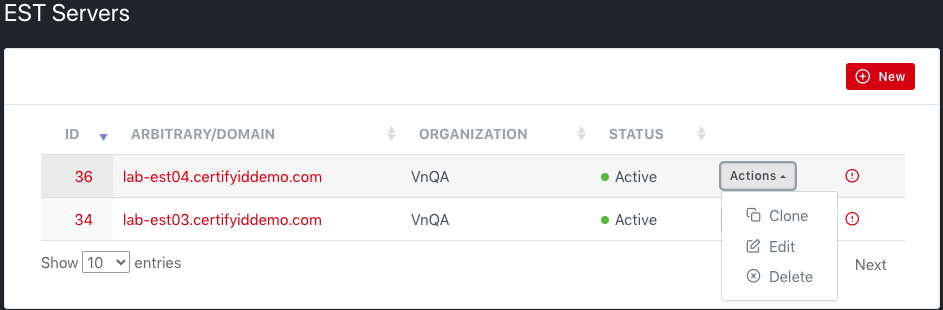
2.6.2
The EST
Server list
All available EST Servers appear in this list.
The “Actions” button allows Clone/ Edit the EST Server.
Admin and Tenant Admin can:
·
“Clone” an existing EST Server: will clone all information of
selected EST Server to new one, user have to rename the EST Server before
saving if the EST server is created for another Tenant.
·
“Edit” an existing EST Server.
·
“Delete” an EST Server.
The “View” icon opens the EST Server Details page.
2.6.3
The EST
Server Detail page and
Download Authentication
files
Open
the EST Server detail page by clicking on View button or EST Server name on the
list page.
EST
Server detail page shows all EST Server information. It’s possible to
deactivate, re-activate, delete, and edit, using the related buttons available
in this page.
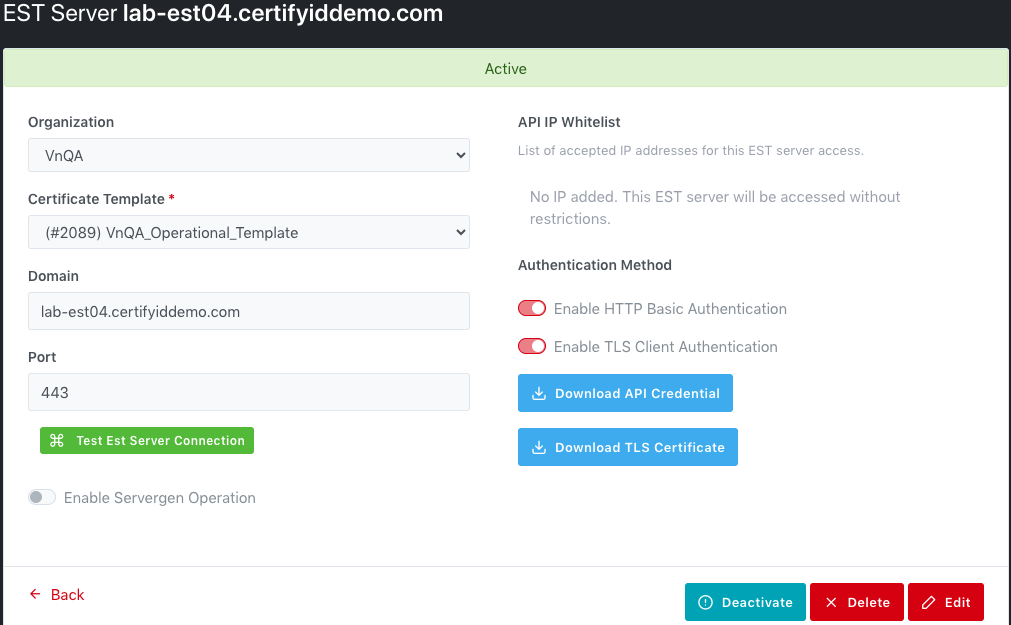
The
information of the Port is displayed
and Test EST Server Connection button
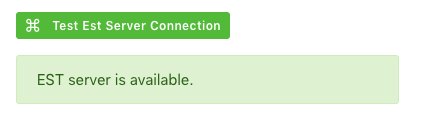
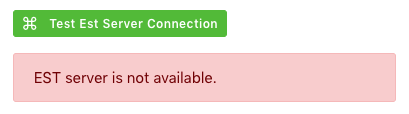
is available for test connection to EST Sever to know it is available or not.
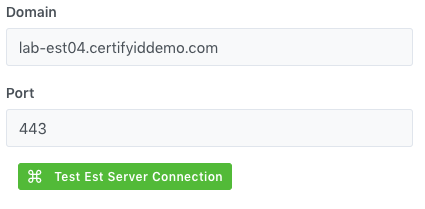
Click
on the Test EST Server Connection button
to check the status of the EST Server Connection.
·
Est
Server is available.
·
EST server is not available.
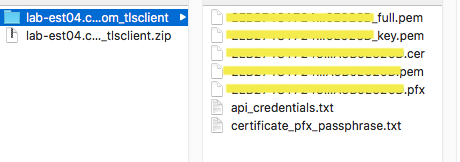
You can download the Authentication file.

·
If the Enable HTTP Basic Authentication is enabled then you can
Download API Credential file. It will include app_id and app_key.
·
If the Enable TLS Client Authentication is enabled then you can Generate Certificate and it is downloaded automatically to your machine in Zip
file. The Zip file will include Certificates, api_credentials (app_id and app_key) and
certificate_pfx_passphrase. Please note: The private key is not stored.
Ensure you keep it safely after download. If you lose it, you have to generate
new TLS certificate.
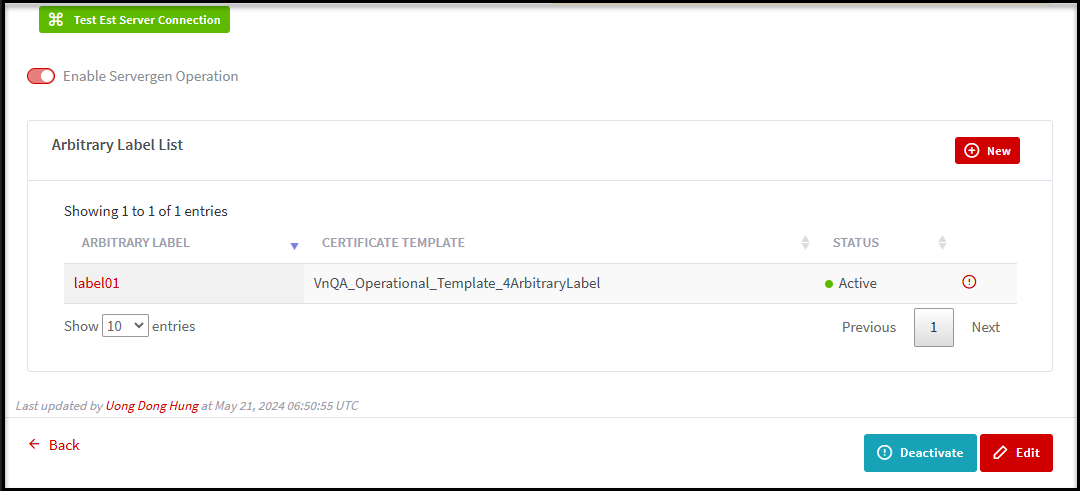
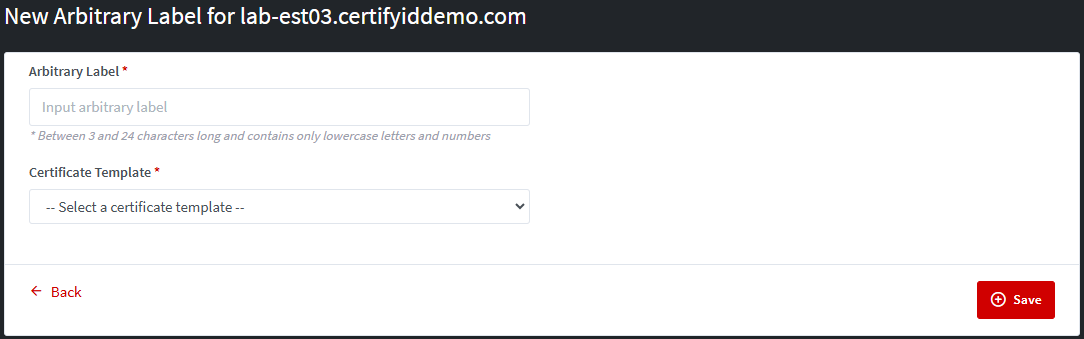
You can add one or more Arbitrary Label for domain in a particular EST Server. Each Arbitrary Label List is associated with a certificate template that assigned to organization/tenant.
How to add an Arbitrary Label List:
Step 1: View detail a particular EST Server then scroll down to the end to find the Arbitrary Label List section. Click on New button.
Step 2: Fill the required fields: required
fields, marked with the “*” sign:
·
Arbitrary Label: Between 3 and 24 characters long and contains only lowercase letters and numbers. It does not allow the spaces.
·
Certificate Template: Select one certificate template that is available in the list.
2.6.4
The EST
Server Edit page
Allows to edit all available fields EXCEPT Tenant and
Organization:
2.6.5
The EST
Server Delete page
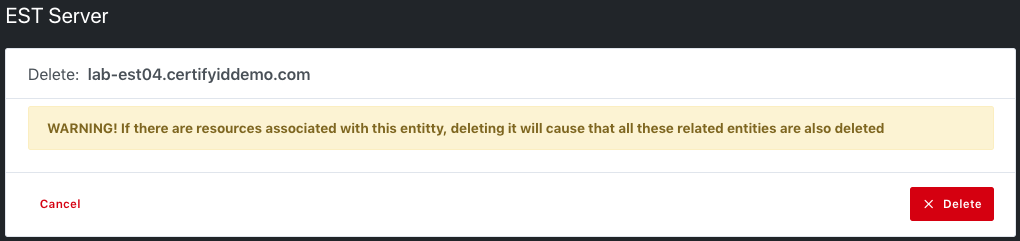
Please note that Deletion operations can’t be reversed. A
confirmation page will be shown.